


Update 41: The Old Peace

UPDATE 41: THE OLD PEACE
Face the Past. Shape the Future
We could not be more elated for you to experience all that The Old Peace has to offer! This final update of 2025 sets the stage for our next major chapter with a heart-rending revisit to the past.
Return to the battlefields of old and relive your experiences on Tau with our latest cinematic Quest: The Old Peace. Albrecht Entrati’s trail leads beyond the Origin System. Only by delving into the past can the path ahead be made clear — but buried secrets can be deadly.
Completing the Quest will grant you access to the Dark Refractory – a new Navigation access point to new gamemodes: The Perita Rebellion and Descendia. You can also save the Quest for later if you want to jump right into these game modes with a new experimental feature called Mission Preview!
Relive repressed memories of the calamitous battles on Tau as the Operator in The Perita Rebellion or descend the Infernums of Roathe’s mind, wracked with memories of a violent past in Descendia.
Roathe, along with the rest of The Devil’s Triad Protoframes Marie Leroux and Lyon Allard, reside in La Cathédrale. A location somewhere in time accessible from a new portal in the Sanctum Anatomica (Deimos). They can all be talked to and romanced (if your heart desires) in the KIM system. Their Gemini Skins and Emotes are also available in the Market!
Bring the essence of the ultimate Tenno power to the battlefield! Focus has received a massive expansion in this update with the introduction of Tauron Strikes – a mighty power harnessed through the Focus Schools. Unlock Strikes by acquiring Tektolyst Artifacts, weapons summoned by the Operator and wielded by your Warframe to devastate the battlefield.
Operators and Drifters have received a significant remaster! Every feature has had an overhaul to elevate your unique look and bring a more realistic feel to these characters. On login, you will meet your remastered Operator and Drifter with the team’s best efforts to adapt their premaster looks, which you can customize further if desired.
There’s even more to explore in this update! Meet our 63rd Warframe Uriel, the Heretic of Xata. Shoot and slash with the Vinquibus, a new Bayonet weapon type that is both a Primary and Melee. Expand your Arsenal further with two Orokin-era Grineer weapons and 9 new Arcanes. Shock and awe with Gyre Prime Access. Earn Honoria, profile titles to wear proudly and howl at Lua with the Voruna Medeina Collection.
And so much more including Operation: Blood of Perita which commences December 16th! We will have a dedicated Operation post once it's live explaining how you can participate. Prepare by completing The Old Peace Quest, which is the prerequisite to be able to trade Operation currency for rewards at Roathe.
Thank you for an incredible year of Warframe! We hope you love The Old Peace as much as the DE team had making it.
Spoiler Courtesy
While everyone will find the truth eventually, we ask that our best Tauron Academy students help preserve the mystery for fellow Tenno as they enjoy the update at their own pace. Please read our Spoiler Courtesy PSA to learn more about how you can post with best spoiler-free practices!
Update 41 is a Mainline Update!
Meaning that everything the team has been working on since the launch of Update 40: The Vallis Undermind is in this update (with the obvious exception of content that is not ready to be released). It is very likely, as it is with all Mainline updates, that things slip through the cracks so we will be watching for bug reports and feedback in the dedicated The Old Peace subforums to address in follow-up Hotfixes.
If any of the terms above are new to you, visit The Warframe Lexicon for Updates to learn more about Warframe’s development cycle.
PC Download Sizes:
- DirectX 11: ~5.30 GB
-
DirectX 12: ~6.04 GB
TABLE OF CONTENTS
We highly encourage you to read the entirety of The Old Peace patch notes to learn the nitty gritty that’s been wrapped into this update! But if you are looking for something in specific, simply search the following keywords to jump to its dedicated section in the spoilers below:
- New Cinematic Quest: The Old Peace
-
Dark Refractory
- Mission Preview Feature
- New Resources
-
La Cathėdrale & The Devil’s Triad
- Marie Leroux
- Lyon Allard
- Roathe
- New Gamemode: Descendia
- New Gamemode: The Perita Rebellion
-
Focus School Expansion
- Tauron Strikes
- New Focus School Nodes
- Tektolyst Artifact Upgrades
- Operator & Drifter Remaster
- Kinemantik Messaging System Expansion: The Devil’s Triad
- Honoria
- New Warframe: Uriel
-
New Weapons
- New Weapon Type: Bayonet (Vinquibus)
-
New Orokin-Era Grineer Weapons
- Galariak Prime
- Sagek Prime
- New Arcanes
- Gyre Prime Access
- Market Additions
-
The Old Peace Uriel Bundle
- The Old Peace Gemini Bundle
- War Stories Bundle
- Voruna Medeina Collection
- Tau Dax Armaments Skin Bundle
- Crown of Splendor Salon Pack
- The Devil’s Triad Community Bundle
- Prime Vanguard Display
- General Market Additions
- Prime Vanguard Varzia Offerings (Begins December 18)
- Additions
- Changes
- Performance & Optimizations
- Fixes
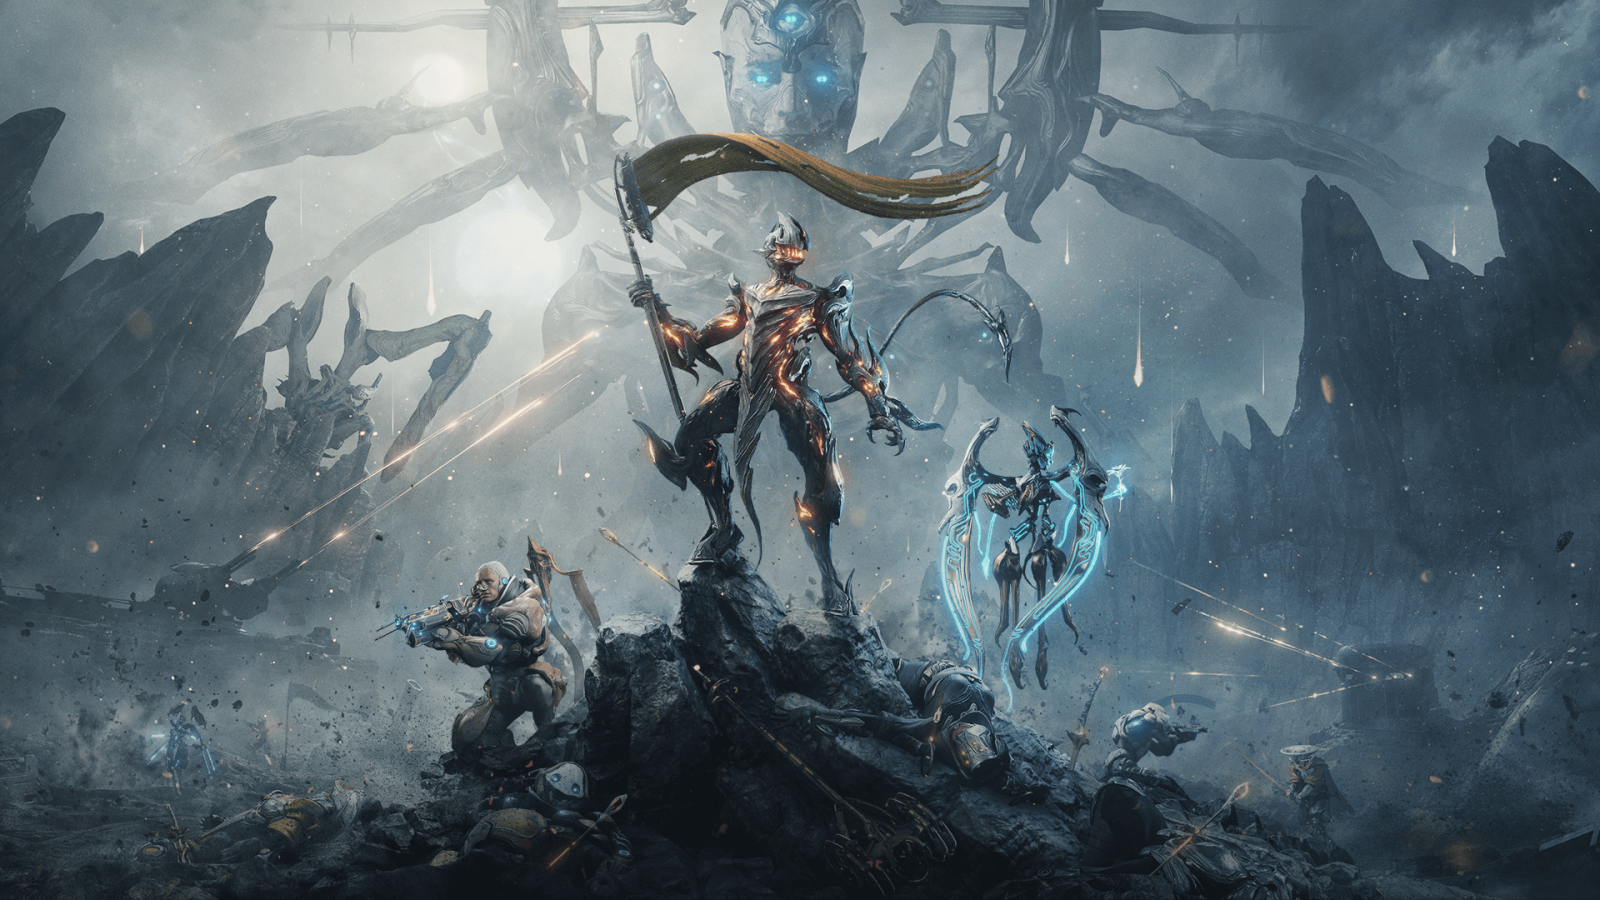
Image Description: Uriel stands in proud defiance waving a yellow flag while flanked by Valdur to his left and the Sentient Adis to his right as the carnage of the war on Tau’s moon ensues. Hauntingly towering over the battlefield in the distance is the Hunhullus, a colossal Sentient weapon.
NEW CINEMATIC QUEST: THE OLD PEACE
Using Albrecht's Dark Refractory, delve deep into memories thought lost to time, memories of Tau and the fragile peace brokered between Orokin and Sentient. What happened in the past to make such bitter enemies in the present? With the help of your friend, Adis Truth-bloom, only the Tenno can uncover the real story of Tau.
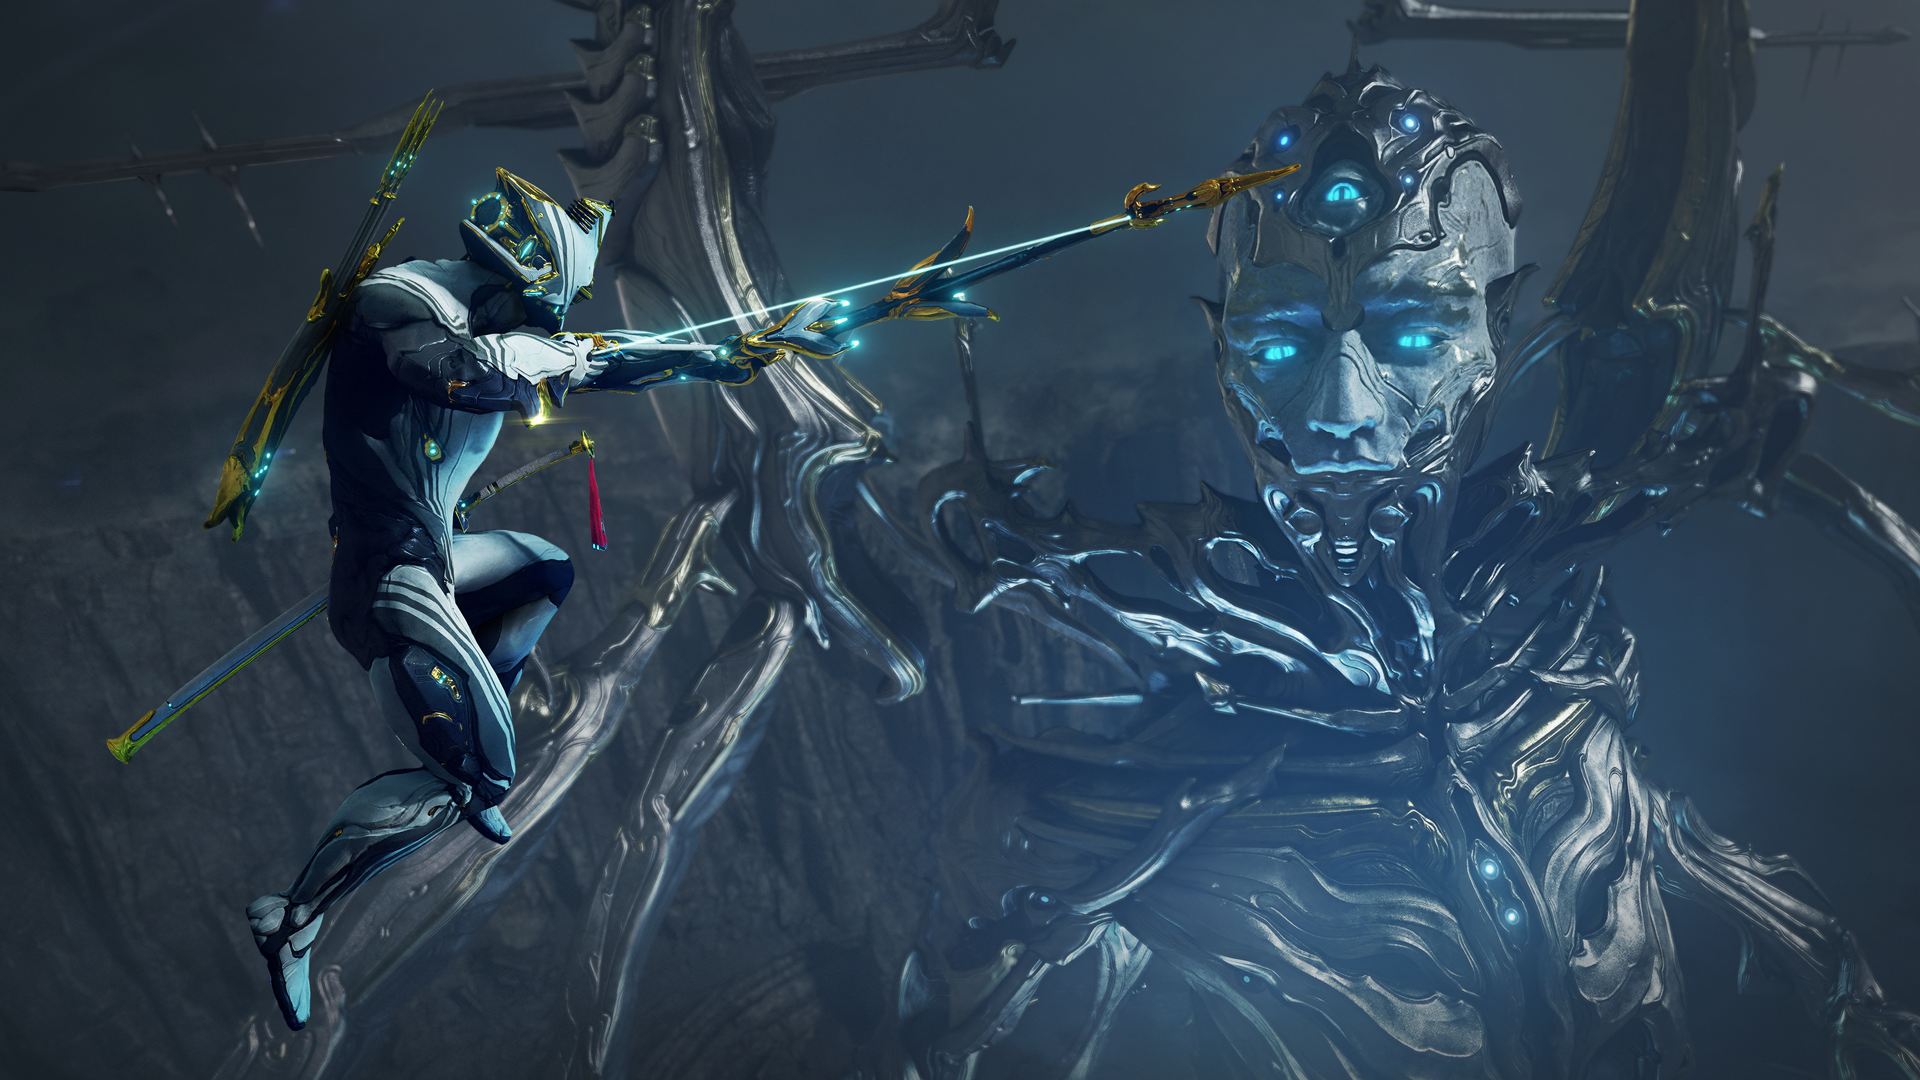
Image Description: Excalibur Prime is poised in midair to fire an arrow from his bow at the face of the colossal Sentient weapon, the Hunhullus.
During The Old Peace Quest, you’ll relive the war-torn memories of the Operator and Excalibur Prime. The latter’s usage is solely tied to the Quest and does not carry over to your Arsenal if you do not own him. It's important we continue to honor our Founders in this memory with the Prime that breathed life into Warframe. We hope you enjoy this experience!
At certain key pivotal moments, you will come upon Somatic Bearers in the form of a spectral Excalibur Prime kneeling. This is a place to escape the horrors of war and remember that you are not alone in this fight. Tenno who have played the Quest before you may leave behind a memory here for you to call upon for aid and you too can do the same for those who come after.
The Tau levels in the quest feature new volumetric wind, an experimental system that delivers more realistic wind interactions. In the quest, this allows certain abilities and weapons to blow particles and cloth around. We will be slowly rolling this system out in the game in the future.
Prerequisite
Complete all main quests up to and including The Lotus Eaters Quest.
Visit our Quest Guide to help you along your journey to unlocking The Lotus Eaters Quest.
Quest Duration
The quest can take roughly an hour and 15 minutes to complete.
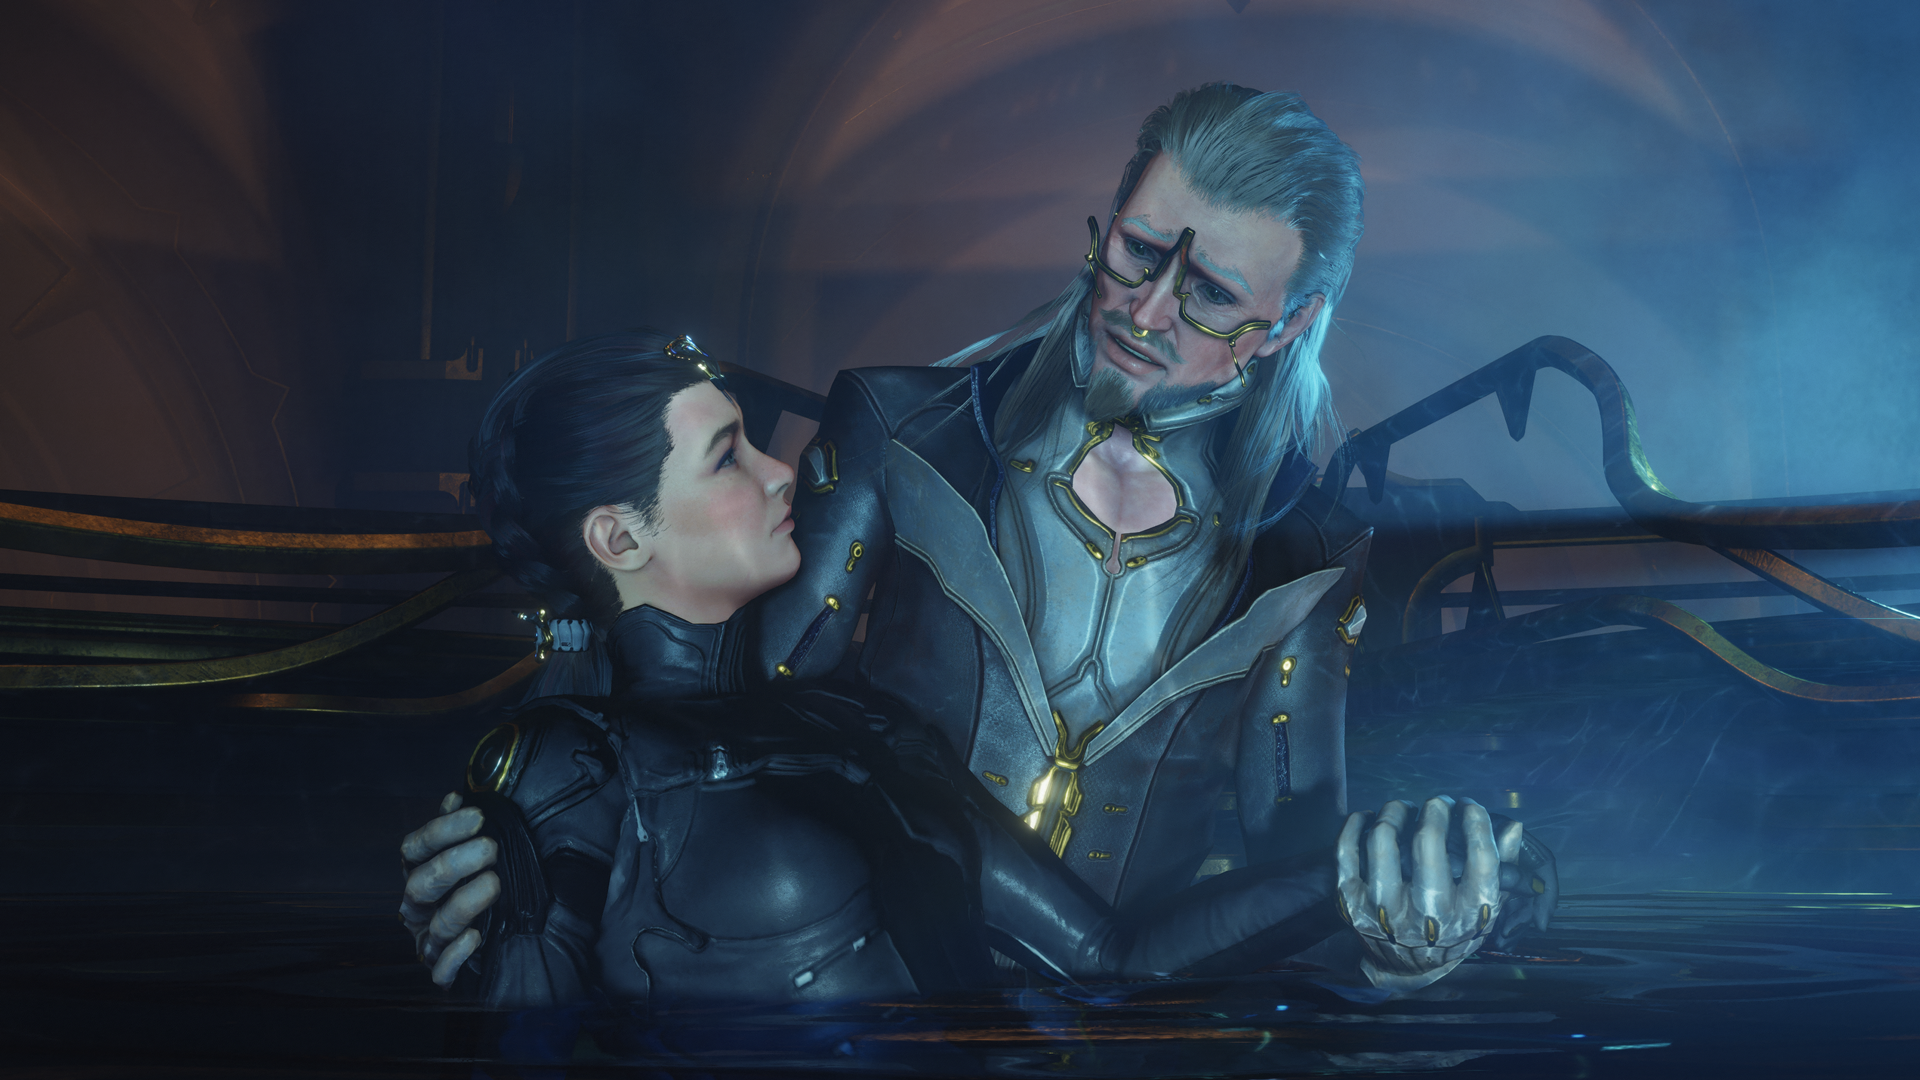
Image Description: Loid helps to support the Operator who is floating in a pool of water within the Dark Refractory. His face is full of concern as he looks down at the Operator.
Prepare Before Beginning!
We highly recommend you complete the following check list before beginning the quest:
-
Customize your Operator appearance
- We highly recommend you customize your newly remastered Operator to your liking before beginning the Quest for all of your cinematic screenshot moments! Learn more in the dedicated “Operator & Drifter Remaster” section.
-
Activate your favorite Focus School
- There are moments in the Quest that utilize your current active Focus School. So be sure to have your preferred School of choice active prior to starting.
- Prepare and customize your Loadout (Warframe, weapons, etc.)
Quest Rewards
Completing the Quest will reward you with the following (relevant dedicated sections are in the patch notes with more information):
-
Inbox Message Rewards:
- New Warframe Uriel’s Blueprint
-
Operator Atmosphere cosmetic
- Worn by Operators to ensure ventilation in the hostile atmosphere of Tau. While the name states “Operator”, it can also be equipped on your Drifter!
-
New Resources:
- 75x Lyroic Bridge
- 75x Ren Hypercore
- 75x Ascaris Prime
-
Access to the following:
- The Dark Refractory and new gamemodes: Descendia and The Perita Rebellion
- La Cathédrale and The Devil’s Triad in the Sanctum Anatomica
- The Devil’s Triad KIM Expansion
- A new skin available for purchase in the [spoiler] customization menu in your Personal Quarters. Those who know, know!
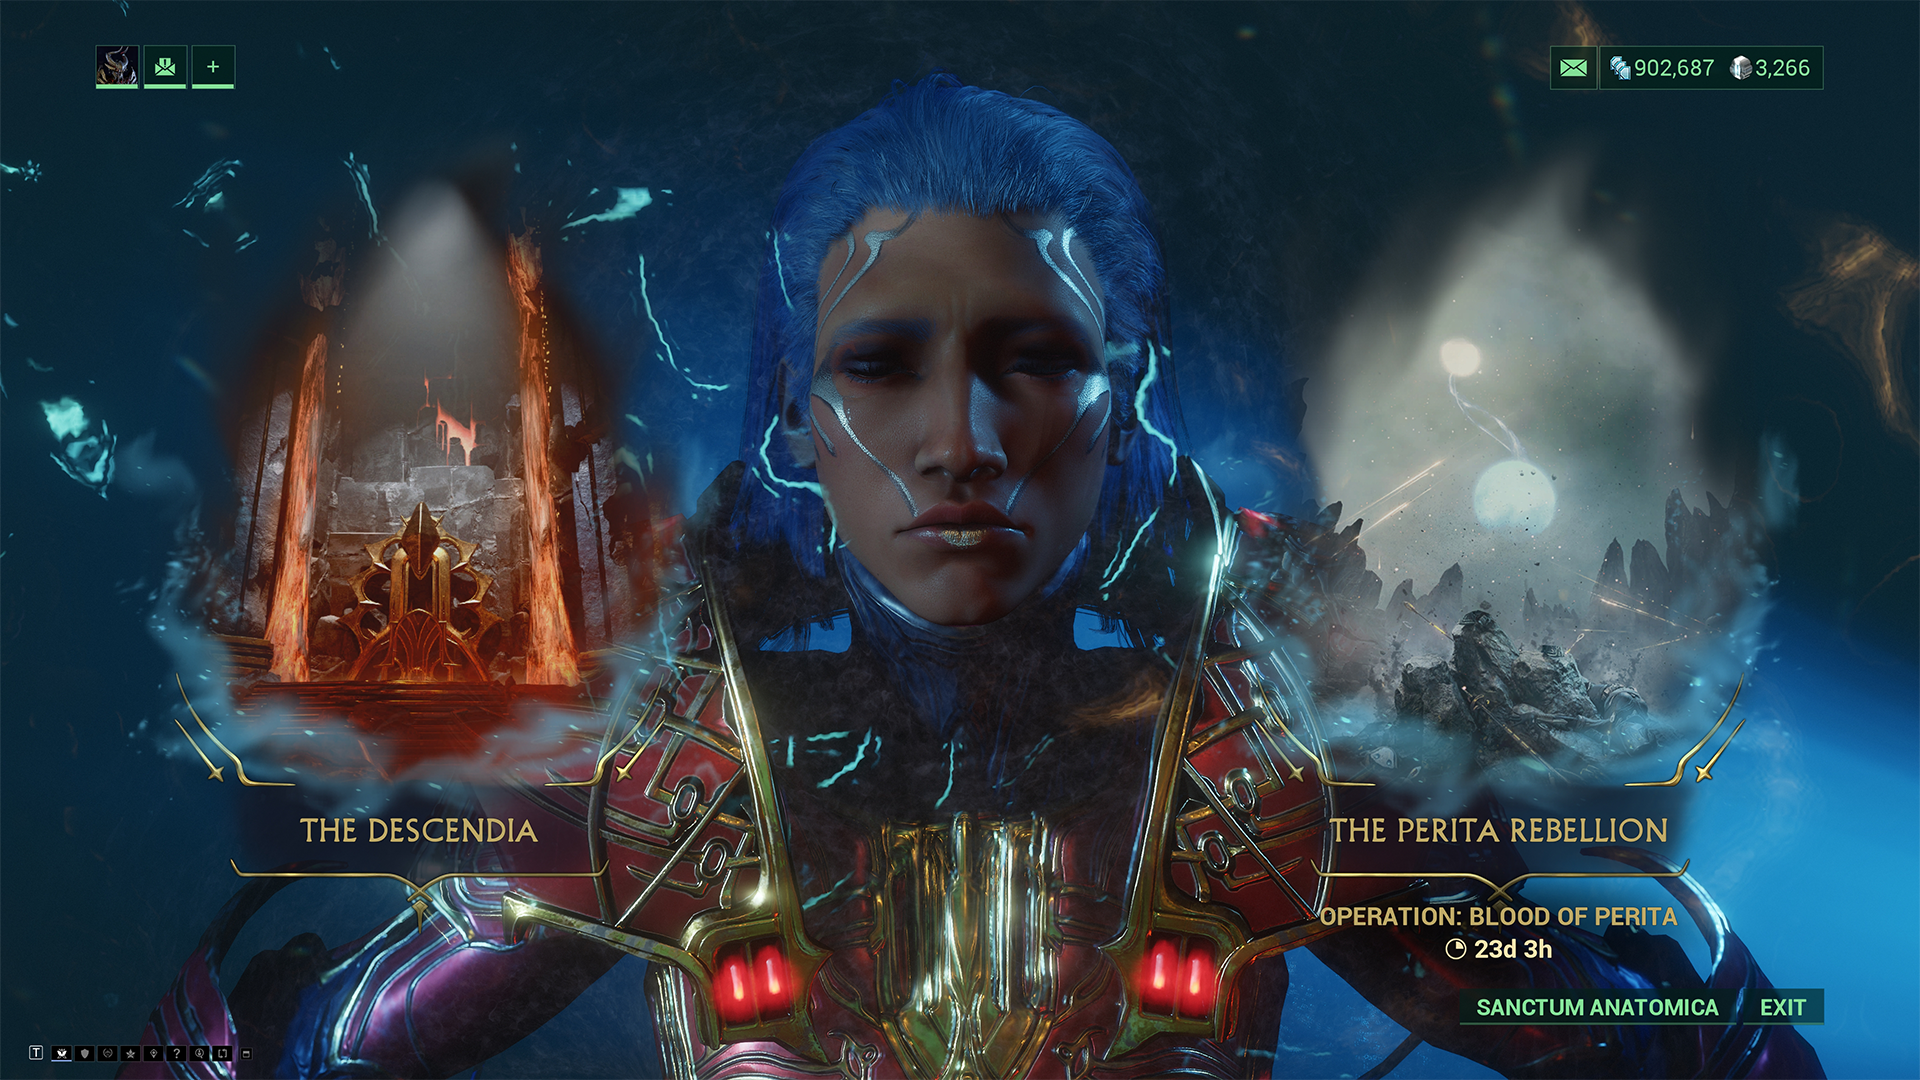
Image Description: Screenshot of the Dark Refractory’s UI where an Operator lies face up in a pool of water. Two options are available, The Descendia on the left and The Perita Rebellion on the right.
DISCLAIMER: This screenshot was taken on the Dev build and is not reflective of the current live events – Operation: Blood of Perita begins December 16th.
DARK REFRACTORY
Slip deep into memories of another time and place in the Dark Refractory… Descend into the Infernums of Roathe’s mind as the Drifter in Descendia and the memories of war-torn Tau as the Operator in The Perita Rebellion.
Upon completing The Old Peace Quest or using the Mission Preview Feature, the Dark Refractory will appear as an additional option at Navigation. This is where you access the two new gamemodes, Descendia and The Perita Rebellion.
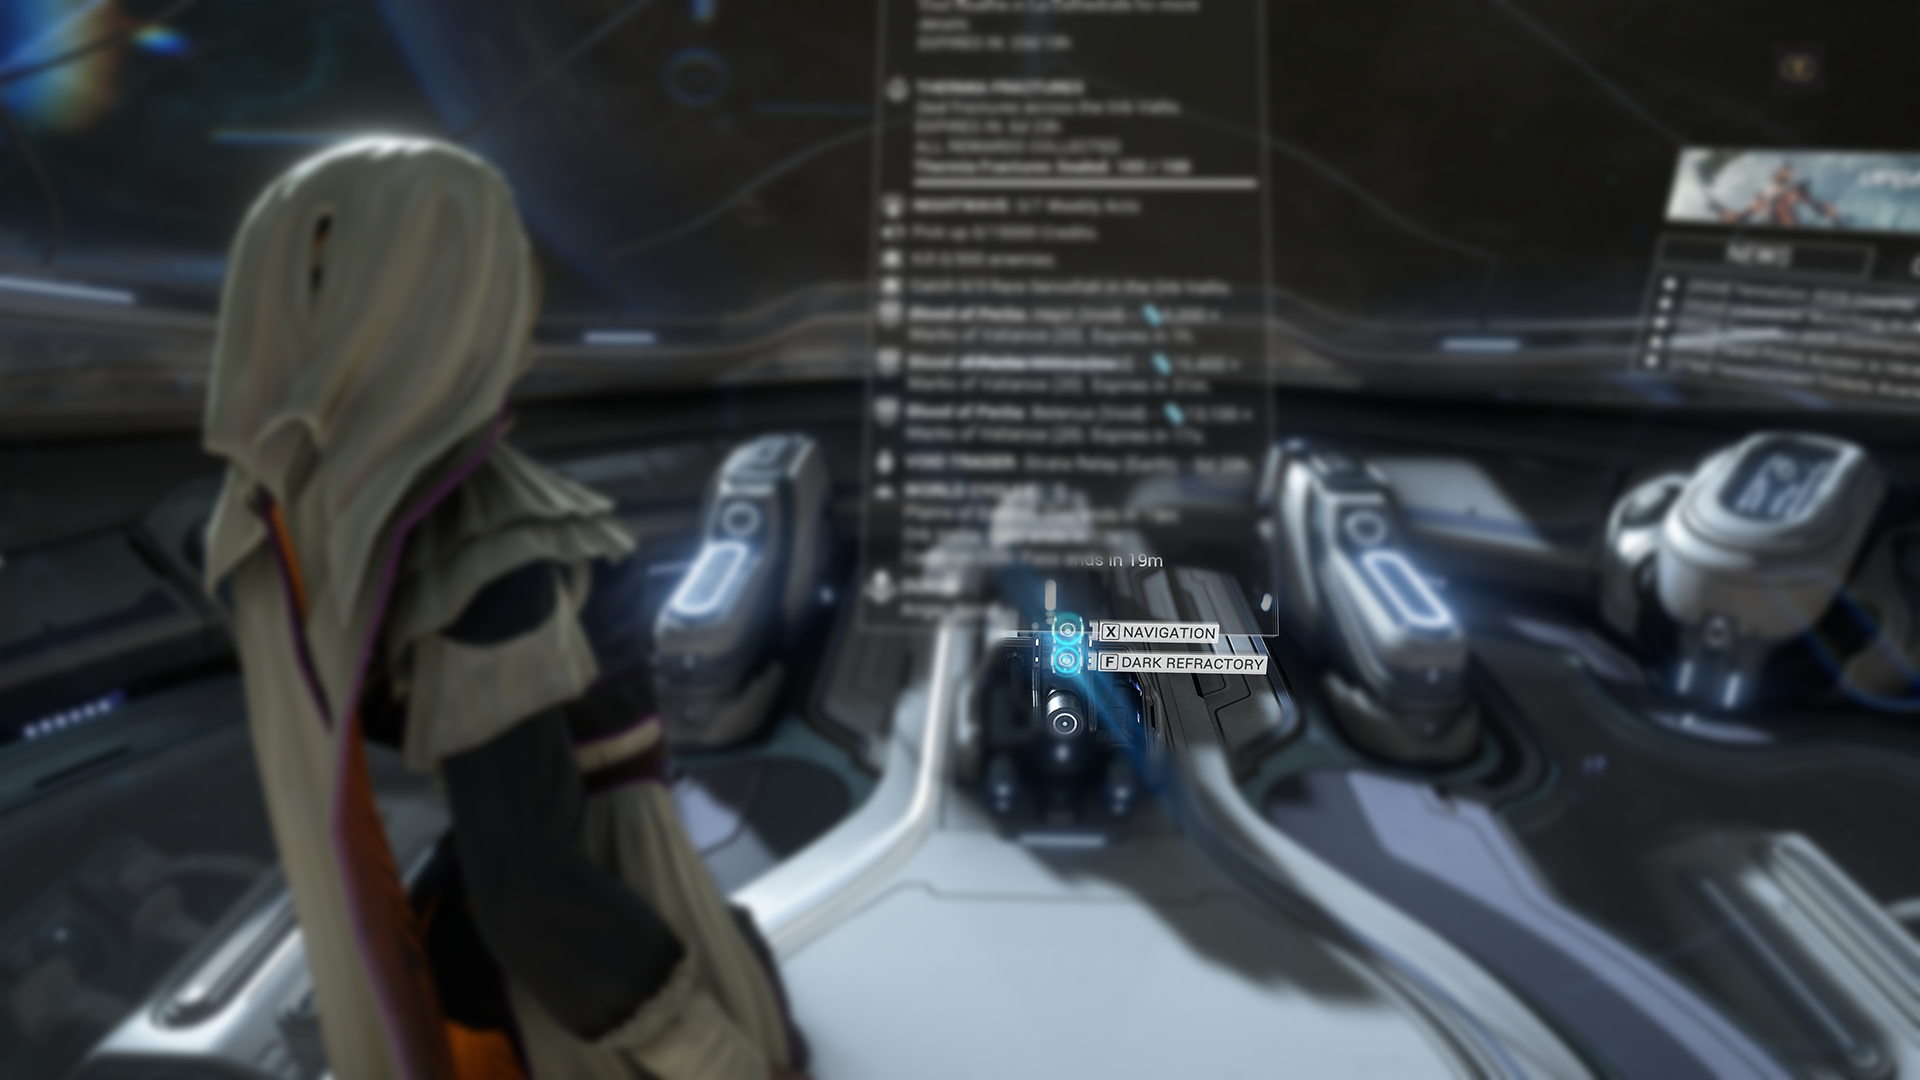
Image Description: Screenshot of the Dark Refractory option appearing under the Navigation option in the Orbiter. Marie (Wisp’s Protoframe) is to the left of the screenshot looking at the options.
Note: Players will not currently receive Steel Path trophies for their completion of Steel Path missions in The Dark Refractory. We aim to release these in early 2026 — thank you for your understanding and patience, Tenno!
Learn more about each gamemode in their dedicated sections below.
Mission Preview Feature
We’re introducing a new feature with The Old Peace: the ability to preview new gameplay content immediately, regardless of Quest completion status. This preview mechanic is designed to let newer players join their friends in-mission and allow returning players to try out the latest content even if they haven’t finished all of their Quests.
This option will not skip Quests — think of it as getting a taste of The Old Peace gamemodes, where you can play with friends right away, but you’ll still need to play the main story to make use of your rewards!
To keep this balanced around that intention, it has a few caveats:
- Players must have completed The Teacher quest before they can use Mission Preview.
- Mission Preview players cannot publicly matchmake into Dark Refractory missions if they are below Mastery Rank 10.
- Mission Preview players do not have access to The Devil’s Triad vendors, new Protoframe KIM chats, or any other Quest-locked content outside of the two new gamemodes (with the exception of Focus School access in The Perita Rebellion, as a preventative measure for potential issues that could arrive from Mission Preview players not having Operators).
This is an experimental feature, borne from the reality that, after 13 years, letting new and returning players jump into shiny new content is important for our longevity. Rest assured, we’ll be keeping a close eye on its implementation should any additional changes be needed.
WARNING: By previewing missions you may encounter story spoilers, and face extremely difficult gameplay intended for experienced players with fully modded, max rank weapons and Warframes.
How to Access: The Mission Preview button is located in the Update Highlights screen, which will pop up on login. It is also accessible from the Pause Menu.
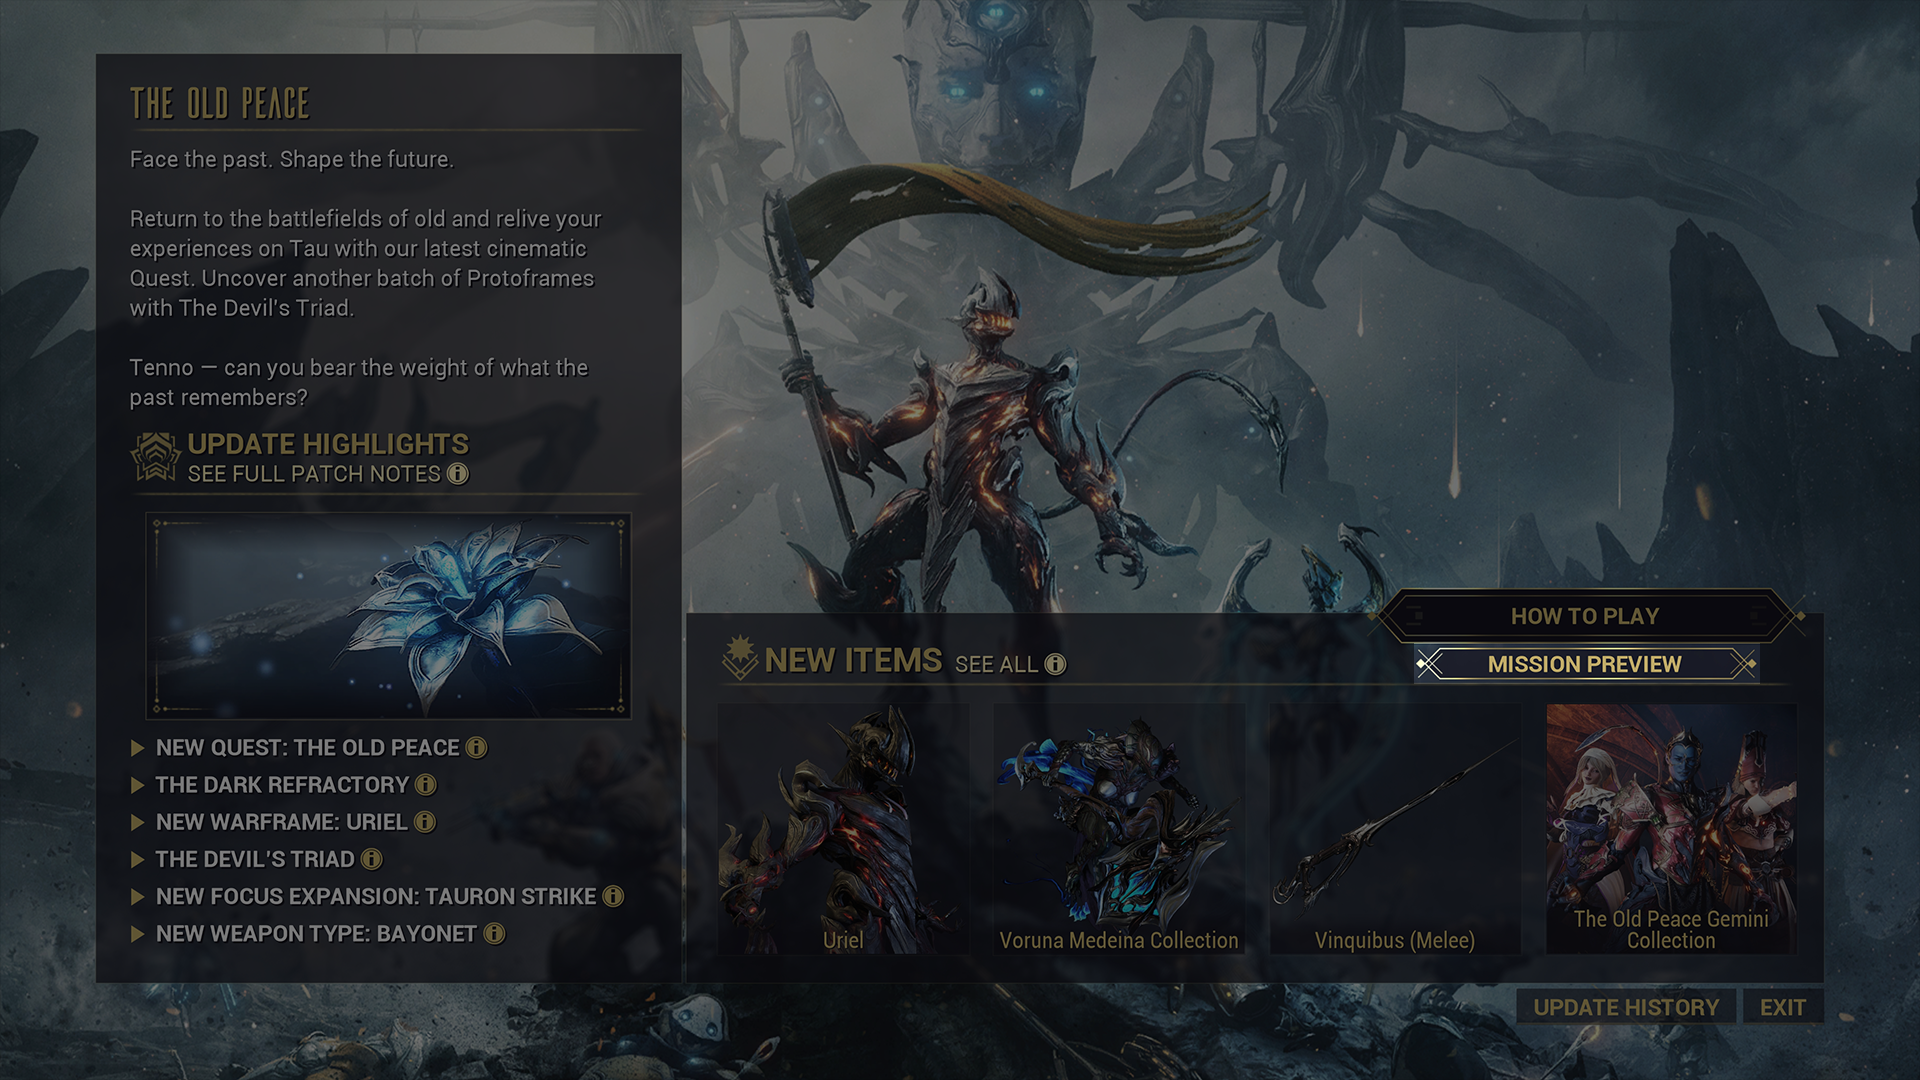
Image Description: Screenshot of the Updates Highlights screen, where details of the update are listed but the focus is on the “Mission Preview” button which is to the right of the screen underneath the “How to Play” button.
New Resources
Whether you are stepping into your memories of Tau or delving through Roathe’s Infernums, new resources await you in The Dark Refractory.
Descendia Resources
The following are Infernum rewards which can also be acquired from containers in Descendia.

Ignia — The passionate heat of flames fuels the path to redemption.
- Currency to purchase a Descendia Arcane Collection from Roathe’s Surplus (learn more in “La Cathėdrale & The Devil’s Triad” section).

Maphica — A core of rage, jealously guarded in a burnished shell.
- Currency to purchase wares from Roathe’s Surplus store (learn more in “La Cathėdrale & The Devil’s Triad” section).
The Perita Rebellion Resources
Unless otherwise specified, the resources in The Perita Rebellion drop from enemies, crates, and from completing Encounters. Learn more about this new gamemode in its dedicated section.

Agnovidisc — A mark of identification carried by soldiers during The Old War so that their names might be remembered if they never returned home.
- A crafting component for new content introduced in The Old Peace.
- Currency to purchase Tektolyst Artifact Mods and Arcanes, as well as other resources from Marie’s store (learn more in “La Cathėdrale & The Devil’s Triad” section).

Laudavi — Awarded to soldiers during the The Old War for distinction in battle.
- A crafting component for new content introduced in The Old Peace.
- Currency to purchase Tektolyst Artifact Mods and Arcanes, as well as other resources from Marie’s store (learn more in “La Cathėdrale & The Devil’s Triad” section).

Servoris — Medals awarded to Orokin soldiers during The Old War for acts of distinguished service.
- A crafting component for new content introduced in The Old Peace.
- Currency to purchase Tektolyst Artifact Mods and Arcanes, as well as other resources from Marie’s store (learn more in “La Cathėdrale & The Devil’s Triad” section).
The following three resources (Lyroic Bridge, Ren Hypercore and Ascaris Prime) are all used for the same purposes:
- Currency to purchase Tektolyst Artifact weapons from Marie (learn more in the “Focus School Expansion” section).
- Upgrade the new Tauron Focus Nodes (learn more in the “Focus School Expansion” section).
In addition to their individual methods of acquisition via The Perita Rebellion, 75 of each are also rewarded from completing The Old Peace Quest. The Tektolyst Artifact Acquisition Pack (one-time purchase) is also available for purchase in the Market and contains 150 of each – which is the exact amount of resources required to acquire one Tektolyst Artifact weapon from Marie.

Lyroic Bridge — A delicate paraneural interface allowing a duly evolved Sentient pilot to command the colossal Hunhullus as if it were a second skin.
- Earned from Recall: Hunhullus missions in The Perita Rebellion.

Ren Hypercore — The evolved core of a Dactolyst, bearing its true self-given name and identity. When deprived of Tau pollen, the core becomes susceptible to forcible reprogramming.
- Earned from Recall: Dactolyst missions in The Perita Rebellion.

Ascaris Prime — Technology developed by Executor Ballas to allow remote piloting of a hijacked Warframe for short periods, forcing them to act against even their deepest instincts.
-
Earned from Recall: Vanguard missions in The Perita Rebellion.
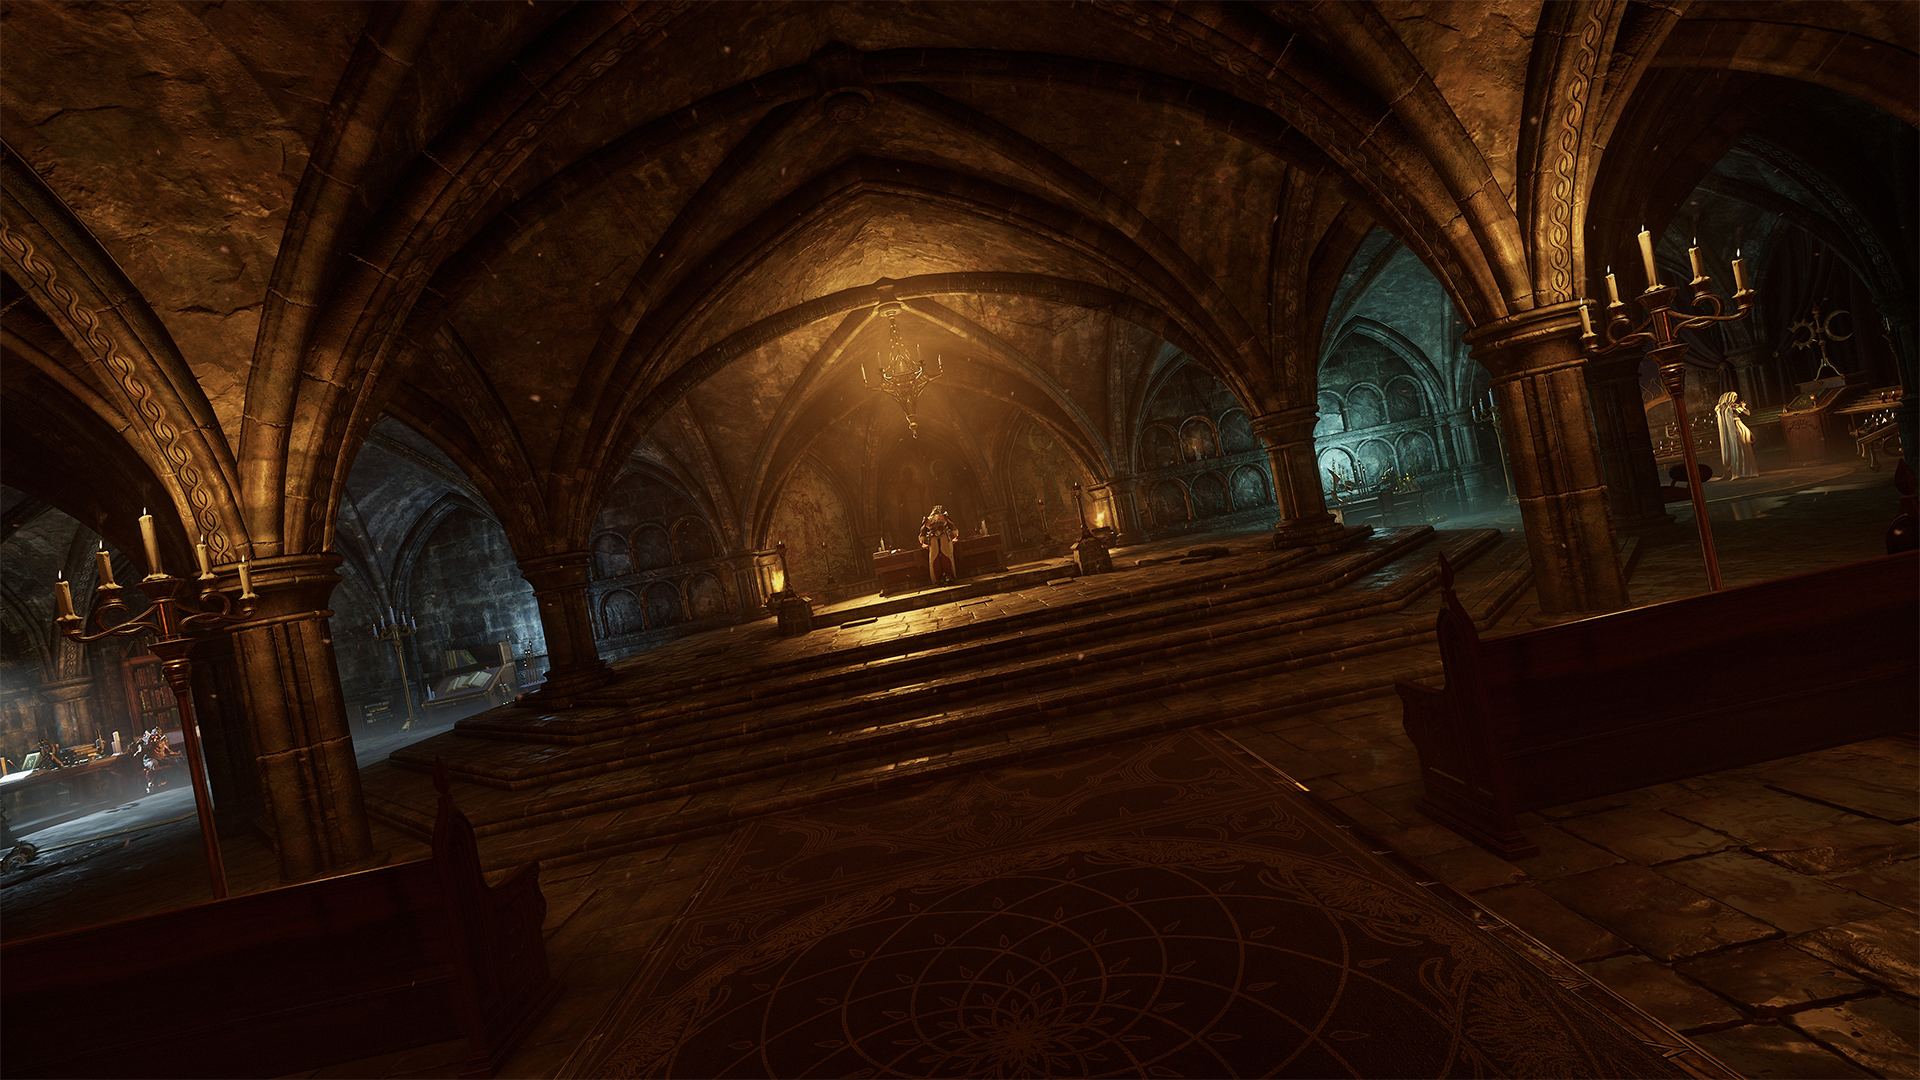
Image Description: Screenshot of the inside La Cathėdrale, with its many pillars and archways. Lyon (Harrow’s Protoframe) is at the center raised platform, Marie (Wisp’s Protoframe) is to the far right praying, and Roathe (Uriel’s Protoframe) is sitting to the far right.
LA CATHÉDRALE & THE DEVIL’S TRIAD
Completing The Old Peace Quest will unlock a new area in the Sanctum Anatomica - La Cathédrale! You can enter via portal that has appeared in the Sanctum Anatomica – on the other side resides The Devil’s Triad. In order to enter, you must have the Drifter selected.
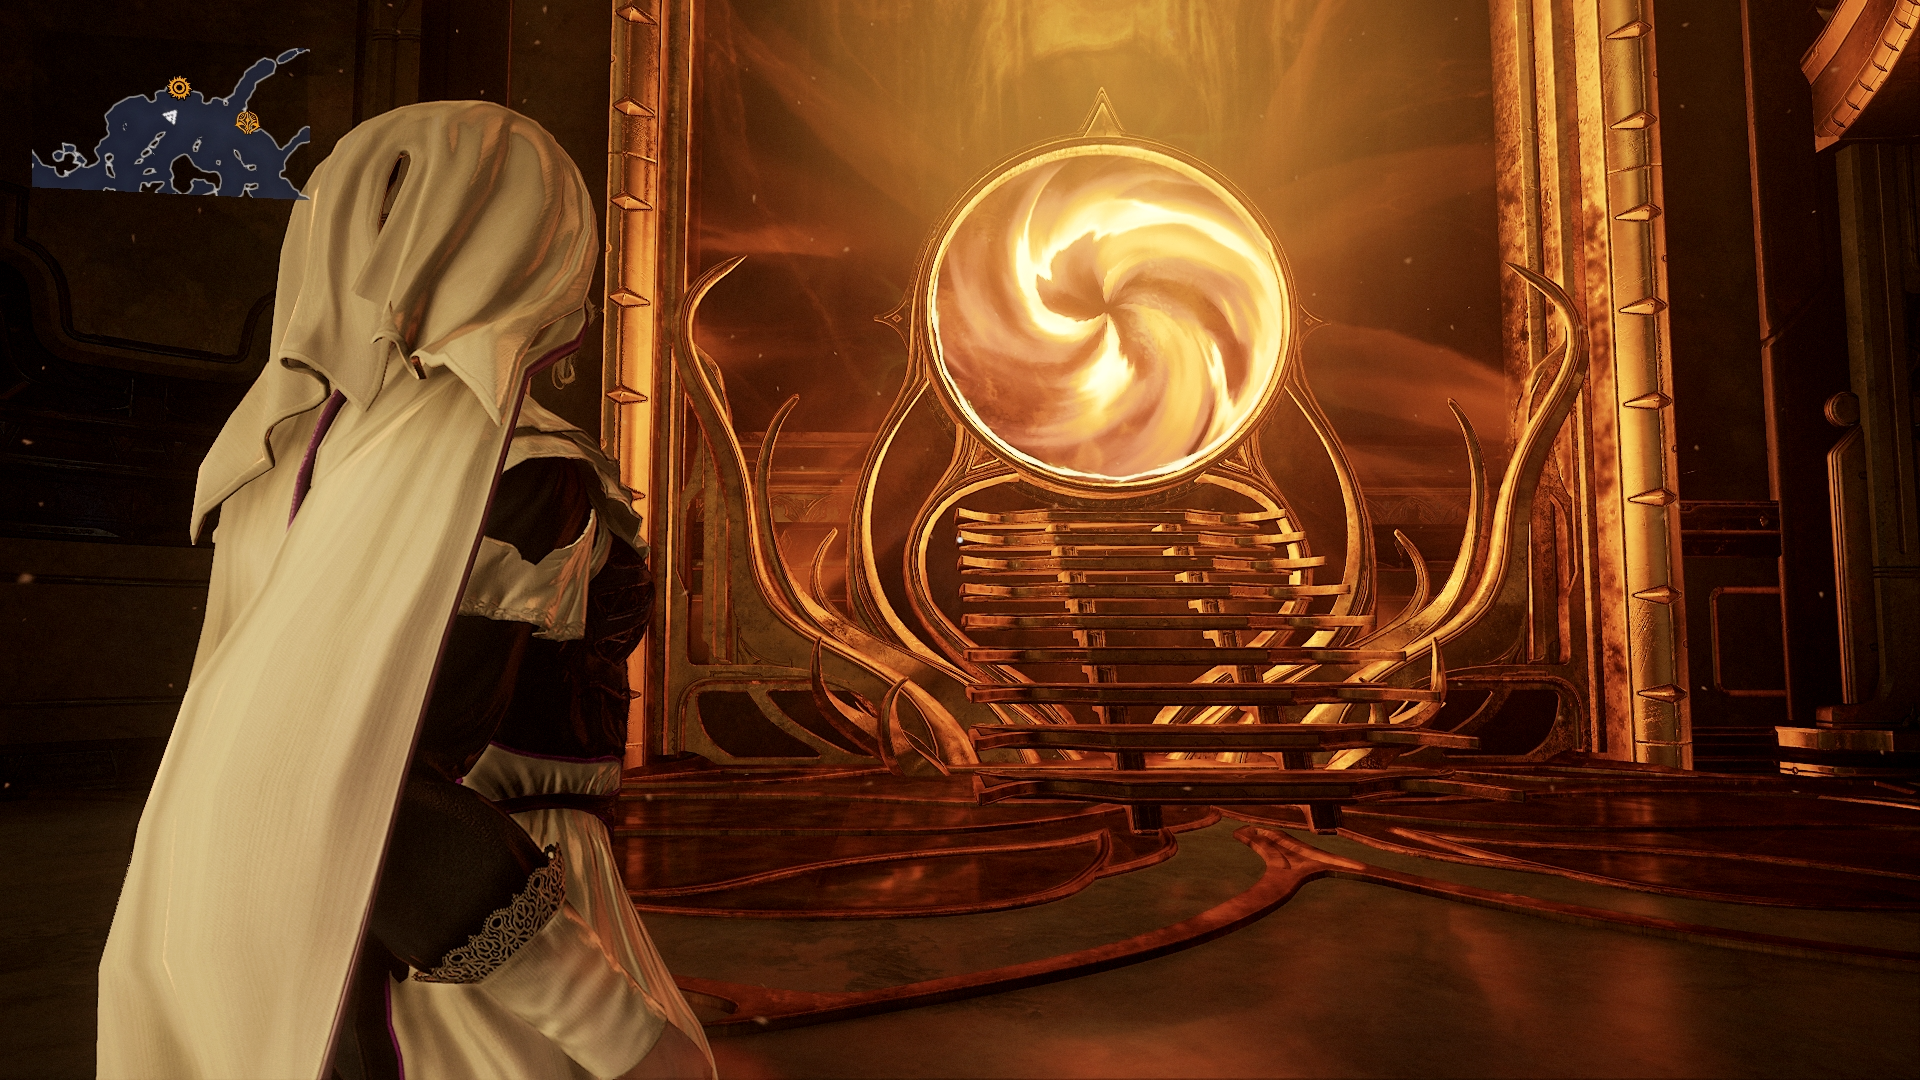
Image Description: Marie Leroux stares at a portal in the Sanctum Anatomica that leads to La Cathédrale. Golden and orange energy swirl within the portal almost reminiscent of a mini sun.
You can also fast travel to this new area from the pause menu and quick access wheel while in the Sanctum Anatomica.
Here you will meet and interact with The Devil’s Triad, who offer much in the way of goods and services.
You can also speak to these new Protoframes via the KIM system to learn more about them – learn more in the dedicated “Kinemantik Messaging System Expansion” section. Their Gemini Skins can also be purchased in the Market! Learn more in the “Market Additions” section.
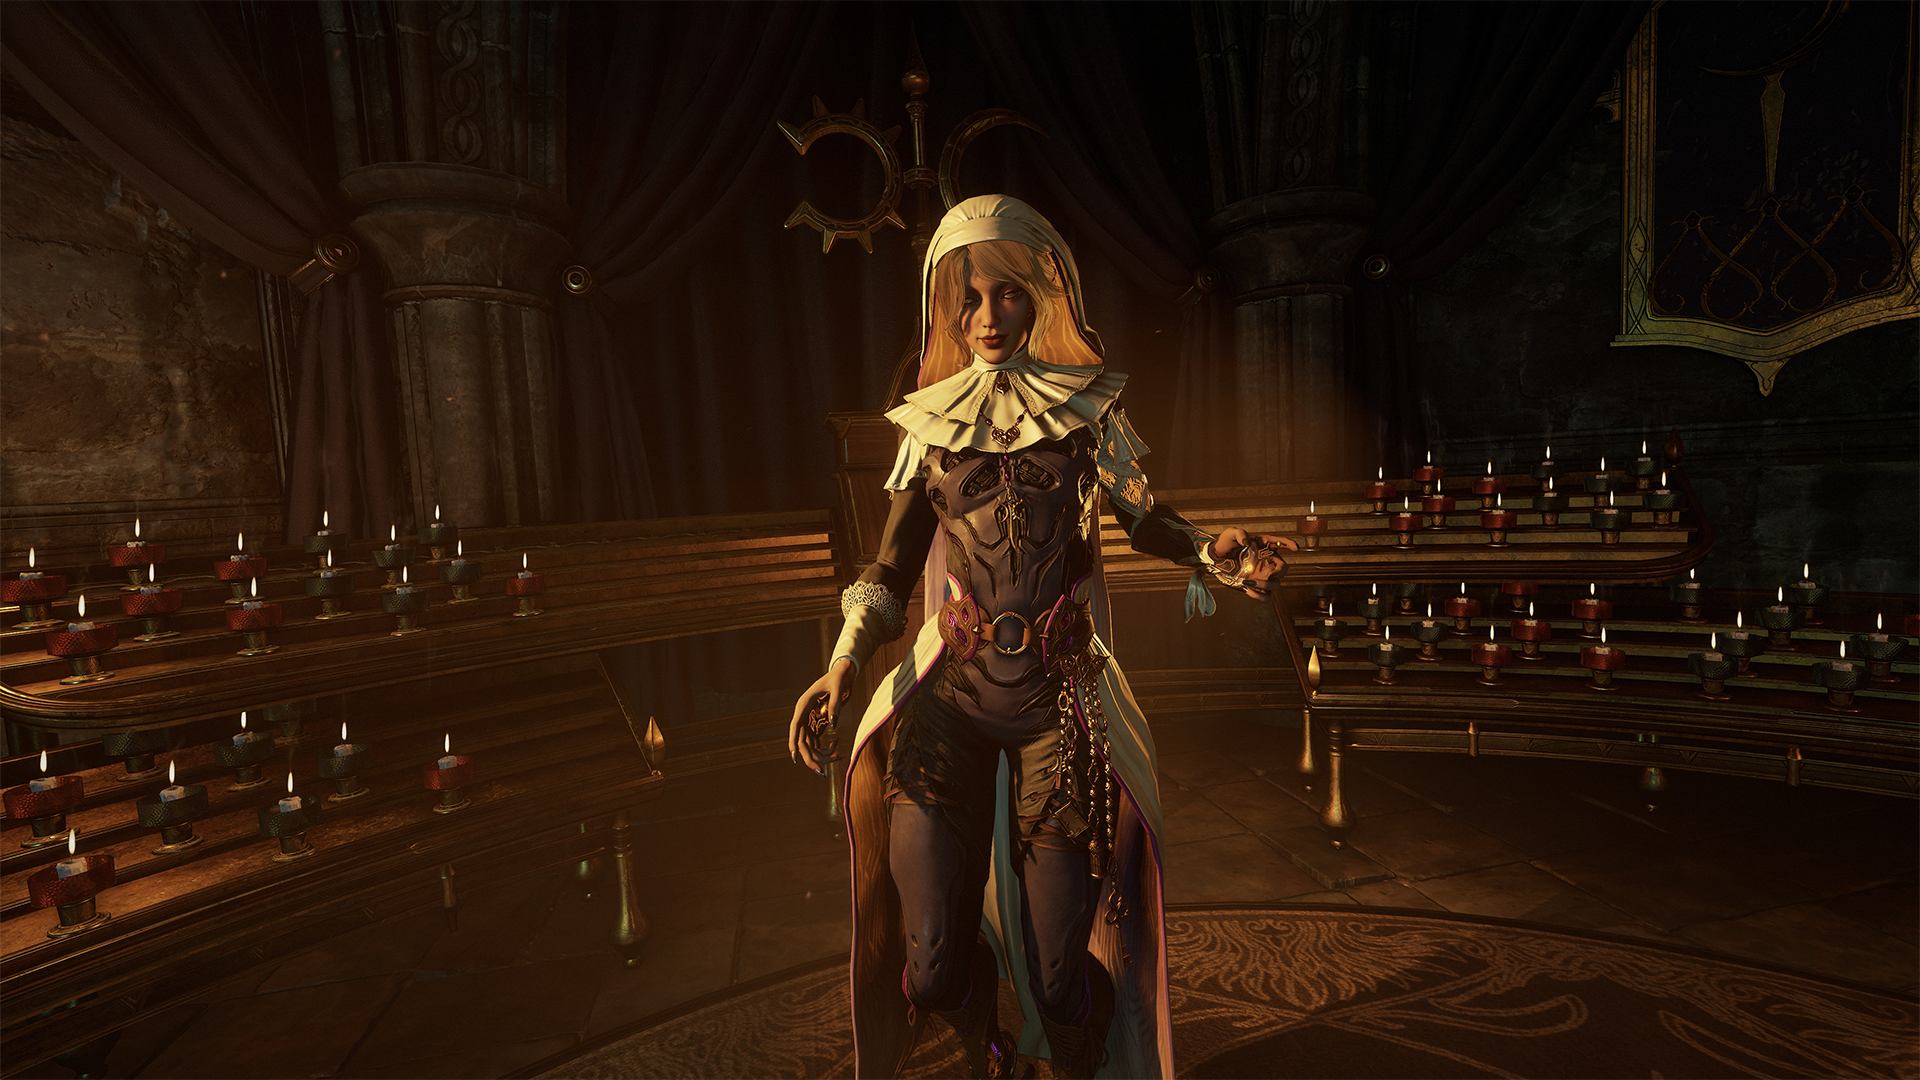
Image Description: Marie Leroux waits with a soft ethereal glow in La Cathédrale. On either side of her are several lit candles.
Marie Leroux
A nun determined to serve Sol by proving that even the most unrepentant devil can be redeemed. Wisp’s Protoframe!
Marie is your access point to retrieving Tektolyst Artifacts, Focus School weapons with immense power that are key to unlocking Tauron Strikes and new Focus School upgrades. Get all the details from the dedicated “Focus School Expansion” section.
She also has a rotating store (resets daily at 00:00 UTC) where you can trade resources earned from The Perita Rebellion for the following:
-
Tektolyst upgrades (Mods and Arcanes)
- Learn more in the dedicated “Focus School Expansion” section
- New resources from Descendia and The Perita Rebellion (1 per customer per day)
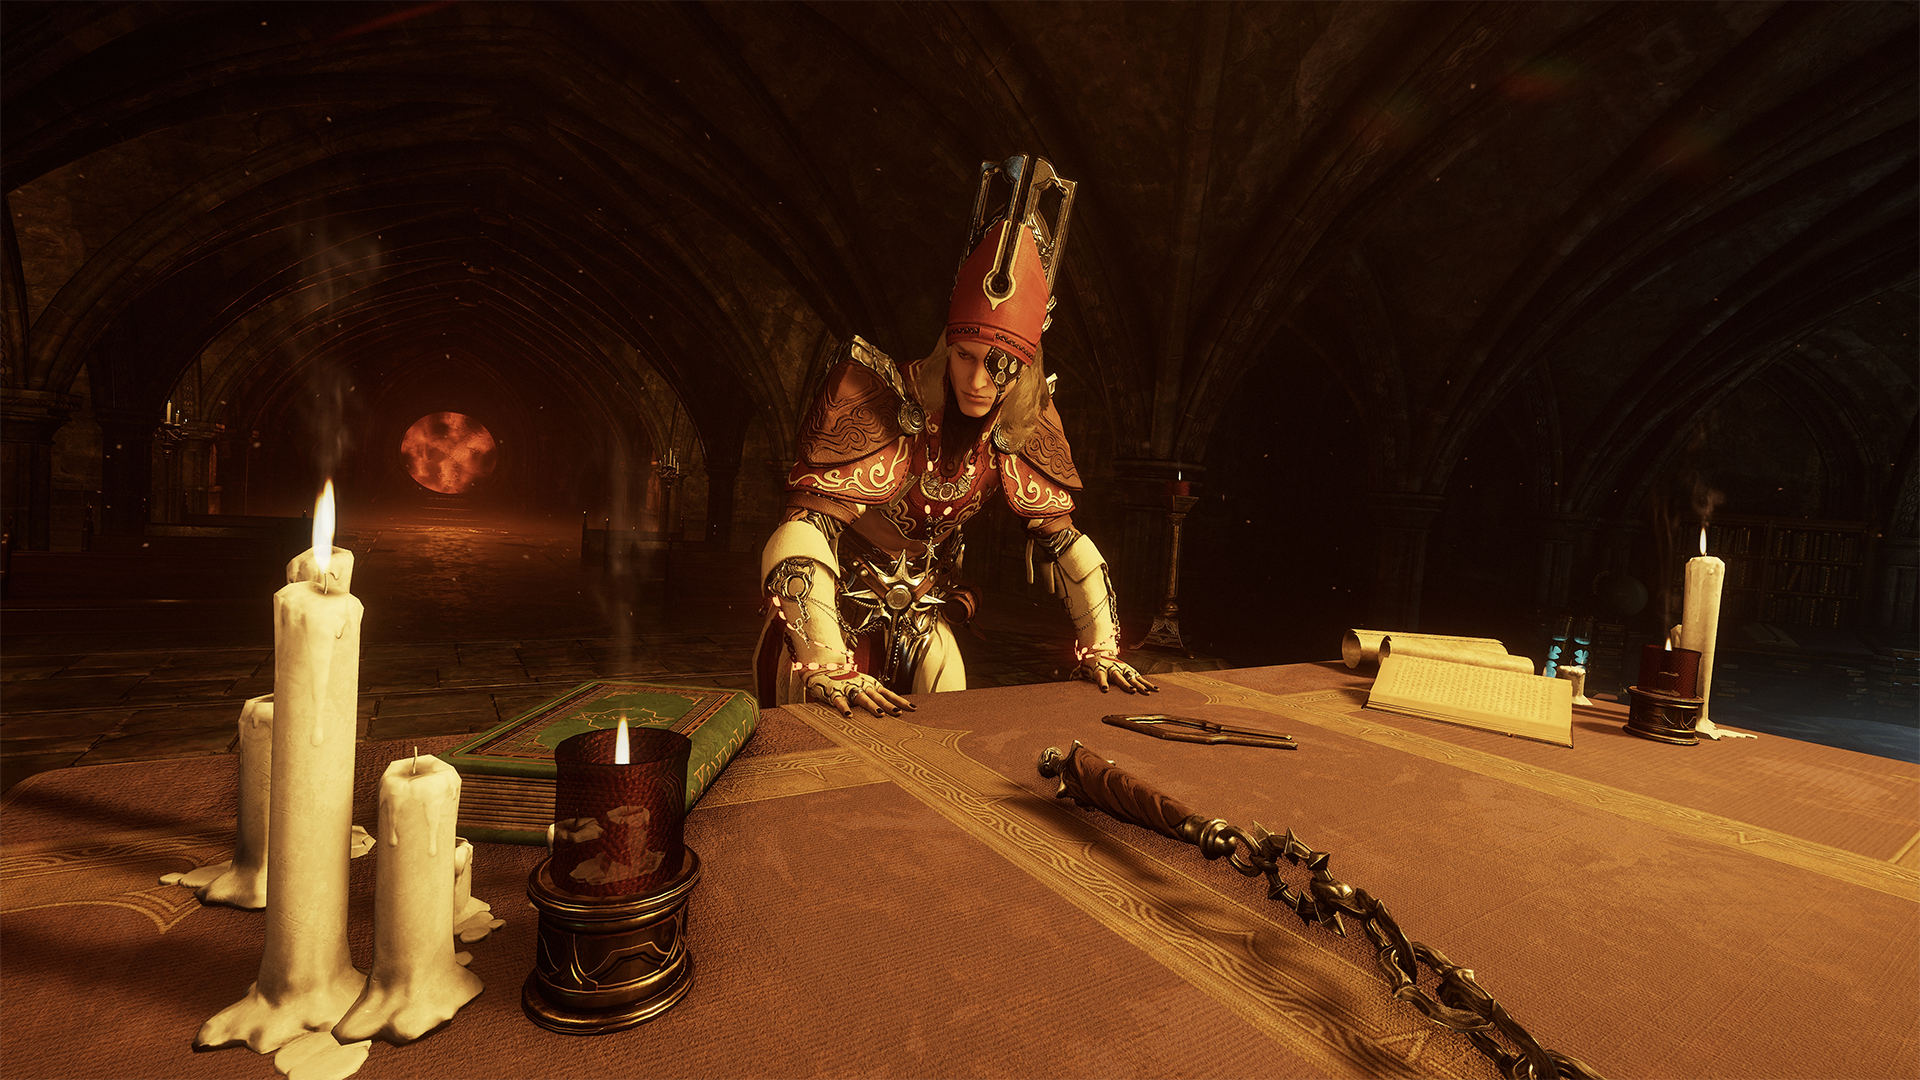
Image Description: Lyon Allard appears deep in thought with his hands pressed firmly against his table in La Cathédrale. Littered around the table are candles, tomes, and the chain of his thurible can be seen in the center.
Lyon Allard
A priest of Lua tormented by nightmarish visions. Harrow’s Protoframe!
Lyon is reserved upon first meeting, a man of few words indeed. You’ll have to earn his trust through Marie in the KIM system before he opens up and grants you access to his Decorations Shop. Learn more in the dedicated “Kinemantik Messaging System Expansion: The Devil’s Triad” section.
Once you meet the requirements to unlock his Decorations Shop, Orokin and Tauron-themed Decorations will be available to acquire with resources acquired from The Perita Rebellion (resets daily at 00:00 UTC). La Cathédrale Captura Scene can also be acquired here.
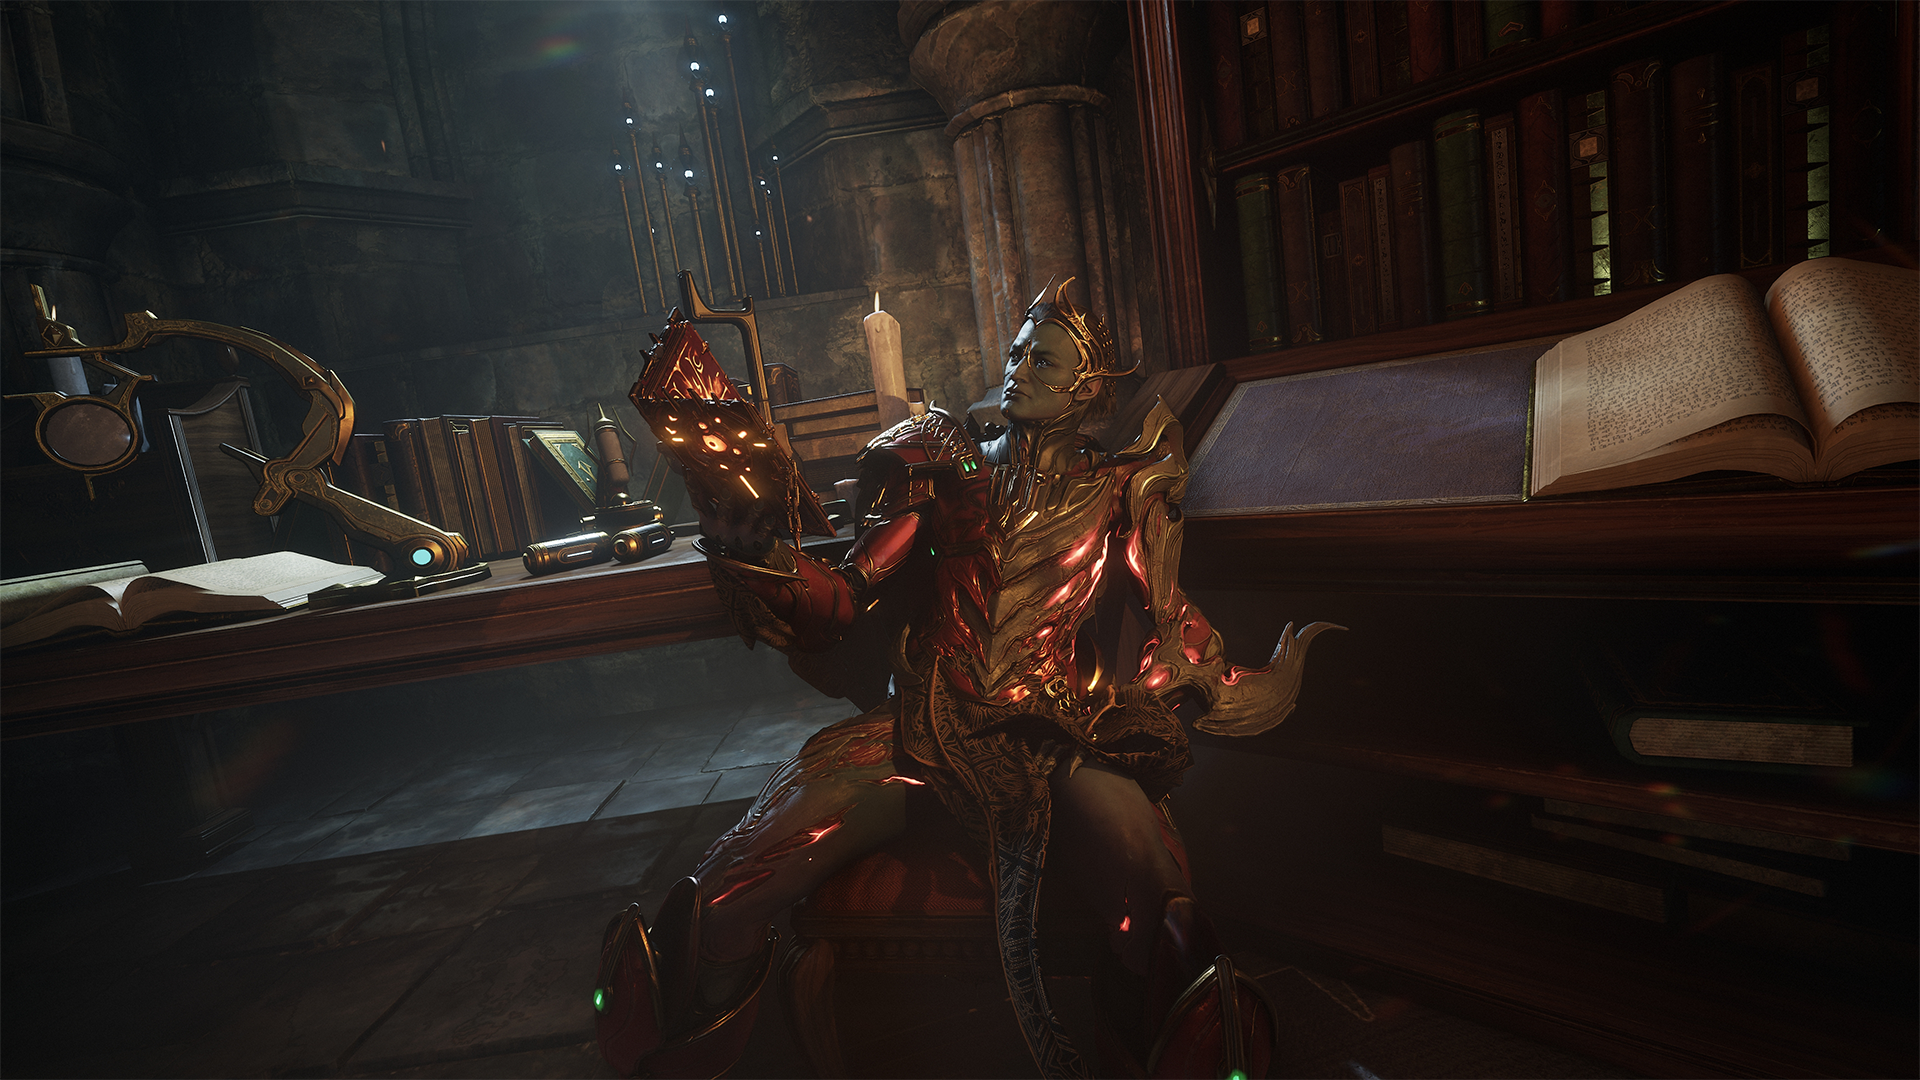
Image Description: Roathe sits in his corner of La Cathédrale engrossed by a book with a soft orange glow. Behind him are numerous books, candles, and instruments.
Roathe
Grand Carnus Roathe, the Heretic of Xata. Uriel’s Protoframe!
Browse his Surplus to trade Maphica (unless specified otherwise) for the following items:
- Uriel’s main and component blueprints (learn more in the “New Warframe: Uriel” section)
-
New weapons’ main and component blueprints (learn more in the dedicated “New Weapons” section):
- Vinquibus
- Galariak Prime
- Sagek Prime
-
New Arcanes (details in “New Arcanes” section):
- Primary Bulwark
- Primary Debilitate
- Primary Overcharge
- Arcane Concentration
- Arcane Expertise
- Arcane Persistence
- Arcane Circumvent
- Secondary Irradiate
- Melee Careen
-
Descendia Arcane Collection
- Trade Ignia to receive three random Arcanes from the list above.
-
New Captura Scenes:
- Makvos Cannon Scene
- Boro Overlook Scene
- World-Seeder Scene
- Fort Tennadis Scene
- Trauma Manifestation Arena
- Lyon’s Room Scene
- Marie’s Room Scene
- New Simulacrum Room: Roathe’s Oblivion Arena
Roathe also offers various Honoria (profile titles), which can be purchased using various resources. Learn more about Honoria in the dedicated section.

Image Description: Roathe, the devil-themed Warframe, stands armed with the Vinquibus Bayonet weapon back facing the camera in a gold clad tower, looking at glass pillars encasing Orokin statues that are engulfed in flames.
NEW GAMEMODE: DESCENDIA
Step into Roathe’s waking nightmare as the Drifter. Dive into Descendia and discover what fresh horrors await you with each new Infernum. Each week offers new rewards and challenges as you journey into Roathe’s mind.
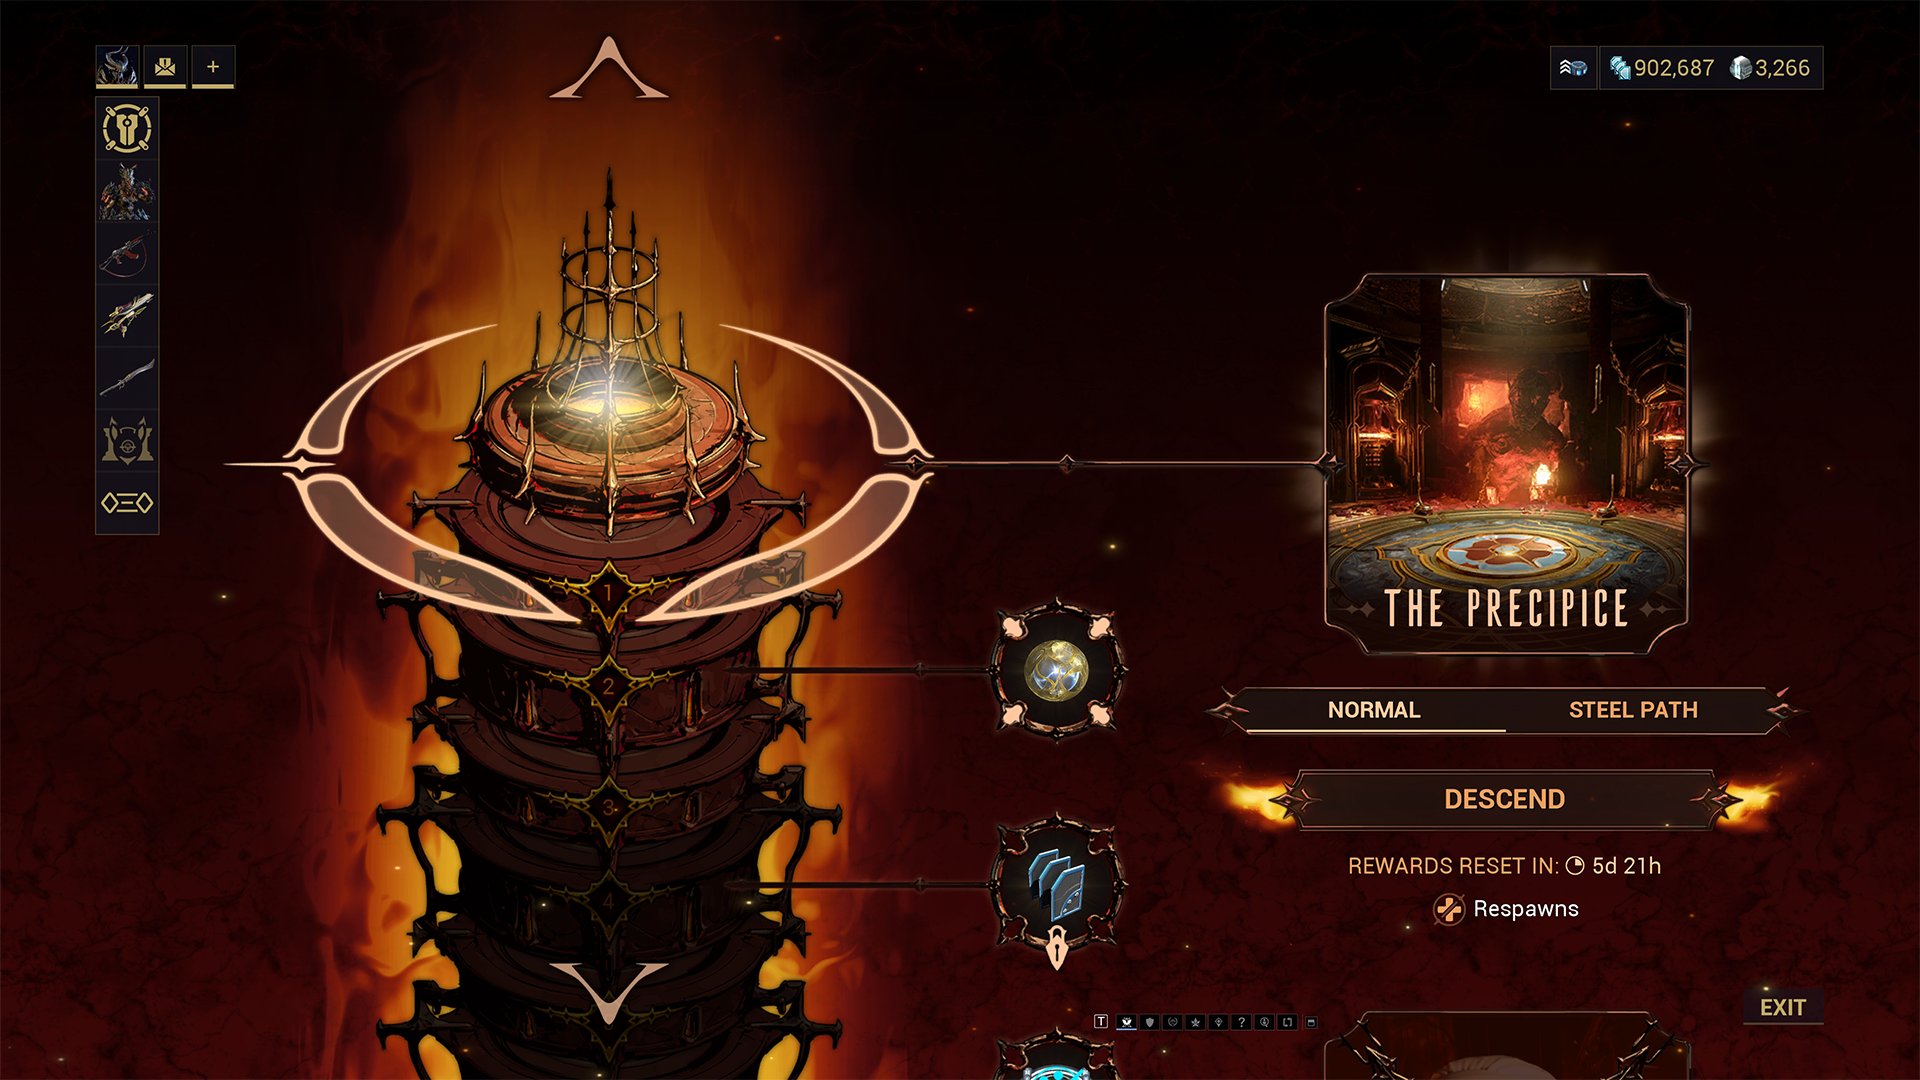
Image Description: Screenshot of The Descendia UI, highlighted is The Precipice - the first floor. Various rewards are shown at the different floors, the options for either Normal or Steel Path, and a fiery button to “Descend”.
Descend through The Precipice, with its 21 Infernums (floors) and encounter challenges ranging from single-wave Defense targets, to time trials, Gruzzling hunts, Kullervo confrontations, and more. Each Infernum is burdened by a Penance — a modifier that shapes how you must master the floor’s objective.
The further you progress, the more rewards you will earn, with each Infernum Reward being awarded once per week. It’s time to head into hell and see if you regret your deal with a devil, Tenno.
Descendia is a weekly game mode which resets each Monday at 0:00 UTC. Infernum objectives, Penances, Blessings, and Rewards will all reset at this time.
How to Access
After completing The Old Peace or opting in to Mission Preview via the Update Highlights screen, Descendia is accessible via the Dark Refractory. Select “Descendia” and choose your difficulty (normal or Steel Path*) to begin your descent into The Precipice.
*Steel Path in Descendia is accessible when/if you have unlocked Steel Path on the Star Chart.
The first descent of each week always starts at the top of The Precipice, but for those who reach Infernum 7 or 14, you may start from there at any point during the week. It’s like a hellevator to your latest checkpoint. Your progress on the Normal Path and The Steel Path are tracked separately, so you can only access these checkpoints on the paths you earned progress on.
Gameplay
Infernums
Descendia consists of 21 Infernums, floors within the Precipice. Each Infernum has its own mission objective, as well as a Penance (challenge modifiers).
Unlock rewards every 2 Infernums completed after a checkpoint, with a bonus reward after Infernum 21 — meaning players can expect 10 Infernum rewards for a full descent!
Infernums 7 and 14 act as checkpoints, where you will run into Marie (7) and Lyon (14), both of whom will give you a Blessing to help as you descend further into the horrors.
Penance
Each Infernum may be impacted by a Penance, of which there are many held within this torturous tower. Penances change with each Infernum — so prepare by bringing your best gear to take on the varying challenges during your descent.
Penances for all Infernums change weekly to challenge your might, whether that’s meteors falling from the sky, Liminus leeching off your every move, or enemies lighting you on fire with interconnected chains from hell. Roathe’s mind knows no bounds when it comes to making The Precipice a fresh hell.
You may be afflicted by any of the following Penances:
- Arbitration Drones - Enemy spawns are protected by Arbitration Drones.
- Sneaky Retreats - Upon reaching half health, enemies become invulnerable for a short duration and teleport away.
- Bomb Defusal - Players glow with heat, exploding after 15 seconds for massive damage. Delay the explosion by killing enemies.
- Bubble Blasters - Enemy projectiles are replaced with large, slow moving spheres.
- Chains of Fire - Chains of fire connect enemies. Chains burn players who come into contact with them.
- Chemical Warfare - Poison gas is dispersed around the arena, dealing Toxin damage to Tenno and their allies. Enemies drop safety zones which can be used to avoid damage.
-
Eximus Cabal - Increased chance of enemies spawning as an Eximus unit. There are 9 different Eximus Cabal, each with the ability to spawn 3 Eximus types:
- Leech Blitz - All Eximus units are Blitz, Guardian, or Leech Eximus.
- Fire & Ice - All Eximus units are Arctic, Arson, or Blitz Eximus.
- Frozen Light - All Eximus units are Arctic, Energy Leech, or Jade Light Eximus.
- Frozen Guardians - All Eximus units are Arctic, Energy Leech, or Guardian Eximus.
- Jade Guardian - All Eximus units are Guardian, Jade Light, or Shock Eximus.
- Power Hungry - All Eximus units are Arson, Blitz, or Jade Light Eximus.
- Shocking Leech - All Eximus units are Leech, Shock, or Venomous Eximus.
- Toxic Flames - All Eximus units are Arson, Shock, or Venomous Eximus.
- Toxic Leech - All Eximus units are Energy Leech, Leech, or Venomous Eximus.
- Falling Debris - Debris is constantly falling from the ceiling, dealing damage to any caught underneath it.
- Fire Trails - Enemies leave behind a trail of fire which burns Tenno and their allies.
- Fireball Rollers - All enemies are Rollers that leave behind a trail of fire and burn players who cross it.
-
Foes Vulnerable to Archguns - Players are armed with just an Archgun until the Infernum is complete.
- This will use the Archgun with Gravimag you have equipped. Don’t forget to upgrade your Archgun!
- Foes Vulnerable to Amphors - Enemies are heavily resistant to all damage not dealt by Amphors. Amphors will regularly spawn in the arena.
- Foes Vulnerable to Rockets - Enemies are heavily resistant to all damage not dealt by Rockets. Thermian RPGs will regularly spawn in the arena.
- Frictionless - Friction is greatly reduced for Tenno.
- Gigantism - Enemies are larger and slower than normal.
- Glassmaker Cephalites - Void tears turn enemies to glass, rendering them immortal until glass shards on their body are destroyed.
- Head Stompers - Enemies are smaller than normal and take massively increased damage from being jumped on.
- Hidden Threats - Enemies are invisible until they first attack.
- Laser Limbo - A laser security grid periodically spawns, rotating around its base. Players caught by the lasers take damage.
- Manic Mania - All enemies will be Manics.
- Narmer Deacons - Narmer Deacons are present to slow down players who cross their gaze.
- Only Weak Points Are Vulnerable - Enemies are heavily resistant to damage applied outside of weak spots.
- Sol Banished - The lights have been turned off in this Infernum, causing darkness.
- Sol’s Fury - Enemies emit a damaging light aura, which damages Tenno and allies who enter it.
- Tau's Revenge - All enemies will be Sentients.
- Weakpoint Horde - Enemies are heavily resistant to damage applied outside of weak spots, and will be more likely to swarm around you with melee attacks.
Blessings
On Infernums 7 and 14, you will encounter Marie (7) and Lyon (14)! A brief reprieve from the constant nightmare of Roathe’s memories, they will provide you with a choice of two Blessings, you must choose one before continuing your descent into chaos.
The Blessings you choose from Marie and Lyon will persist for that difficulty throughout the week, and reset on Monday at 0:00 UTC with the rest of Descendia. If you choose to replay Descendia you will receive Marie’s Blessing once you pass through Floor 7 and Lyon’s Blessing at Floor 14. Normal Path and Steel Path Blessings are independent of each other, allowing selection of different Blessings when reaching Marie and Lyon across difficulties. You will only receive the Blessings of the difficulty you are descending.
You may receive the following blessings:
Marie:
- Vol Sacré: Aim Glides last longer and have reduced gravity.
- Angelic Balm: Regenerate 10 Energy and 50 Health per second.
- Shroud of Invisibility: While airborne, become invisible.
- Renewed Faith: Upon death, restore Health to full with 5 seconds of invulnerability. Can be used once per floor.
- Sol's Shield: While Shields are active, gain Armor that stacks over time. Upon taking health damage, lose 25% of the accumulated Armor.
- Surging Vulnerability: Hitting Weak Points causes enemies to release Surge Sparks.
- Motes of Prayer: Gain a permanent set of Motes from Wisp's Reservoirs ability.
- Holy Roller: Rolling restores 200 Shields.
- Avian Grace: Gain +3 jumps. While airborne, incoming damage is reduced by 50%.
- Righteous Celerity: Gain +50% Parkour Velocity and Ability Casting Speed.
- Congregation's Protection: Enough kills and assists by Companions and Summons grant 5 seconds of invulnerability. Gain an additional 2 seconds per additional kill while active.
- Triumphant Bounty: Killed Eximus units grant your companions their aura for 30 seconds.
- Fervent Gunner: Gain +25% damage for a weapon upon picking up its ammo type; can stack up to 10 times.
- Hidden Benevolence: Upon entering a new Infernum, gain +1000 Overguard and invisibility that lasts until you attack or are damaged..
Lyon:
- Ascendant Penance: Abilities cost no Energy but consume 200% of their Energy cost in Health.
- Restrained Fury: Sacrifice 100% Movement Speed while firing to double your Fire Rate and Magazine Capacity.
- Faithful's Wager: Melee Damage is reduced to x0.5 but you gain 25% chance to strike 4 times.
- Mutual Suffering: Apply Cold Status to nearby enemies. Standing still has a 10% chance of giving yourself Cold Status.
- Leaded Discipline: Increase Magazine Capacity by 400% but reduce damage by 90%. The last bullet in the chamber deals +100% damage multiplied by magazine capacity.
- Sacred Annihilation: Ranged hits have a 5% chance to instantly kill the target, expending all remaining ammo in the magazine.
- Measured Force: Deal 3x more damage for 5seconds after a reload, but reloading now takes twice as long.
- Ferocious Condemnation: Heavy Attacks trigger Harrow's Condemn ability, but consume 50 Shields for each enemy hit.
- Lua's Blessing: Deal +200% damage as the Drifter and gain 50% Damage Resistance. Warframes take +100% damage.
- Nullified Nullifiers: Gain usage of Abilities within Nullifier bubbles, but receive Heat Status within their range.
- Ascetic Munitions: Archguns gain unlimited ammo, but drain Energy instead of ammo upon reloading.
- Sharpshooter's Benediction: Sacrifice 50% damage to gain +25% damage for every consecutive hit to an enemy Weak Point with a ranged weapon. Damage bonus resets upon missing a Weak Point.
- Hollow Decimation: Eximus units no longer drop orbs, but take +100% damage.
- Sinner's Tithe: Deal -50% less damage to Overguard, but steal enemy Overguard upon damaging them.
- Flowing Slayer: Gain +90% Ammo Efficiency while Sliding or Crouching, but receive -30% Ammo Efficiency otherwise.
- Agony's Enlightenment: Gain +75% Heat Damage resistance, but all damage taken has a 10% chance of inflicting Heat Status.
- Rejuvenating Temperance: Gain +200% Energy Orb Effectiveness, but orb pickups now have a 10 second cooldown.
- Haunted Strength: Increase Status Damage over time by 200%, but gain 50% Status Vulnerability.
- Steadfast Adherence: Gain 99% Damage Reduction while Wall Latching, but lose 2% of your Health per second.
Rewards
Descendia is full of new rewards to make your torturous delve into Roathe’s mind worthwhile. There are 10 rewards per difficulty to be gained each week, which reset weekly on Mondays at 0:00 UTC.
Collect Ignia and Maphica found throughout the Infernums to trade with The Devil’s Triad, search for the coveted Bayonet stance hidden in containers, collect Uriel and Vinquibus Blueprints from the bottommost Infernum, and be rewarded for sifting through memories to help Roathe remember his past!
The further you descend, the more twisted nightmares you overcome, the better your rewards will be. Normal and Steel Path Difficulties have separate reward tables, and both can be completed once per week.
IMPORTANT NOTE: Unfortunately, there is an issue where Rewards for completing Infernums, and blueprints obtained by Infernum 21 (for Uriel or Vinquibus) won’t appear in the end of mission screen (after defeating Infernum 21). Since this is a code fix, we won’t be able to resolve this in a hotfix, but rest assured that the items are being properly rewarded despite the visual bug with mission results.
Normal Path Rewards
Common Rewards
Found on Infernums 2, 4, 9, 11, 16, and 18, each Infernum will randomly choose a reward each week from the following options:
- 3x 10,000 Credits Cache
- 2,500 Endo
- 50 Vosfor
- 25 Ignia
- 5 Maphica
Arcane Rewards
Rewarded after completing Infernums 6, 13, and a triple drop on Infernum 20!* These Arcanes are all but the rarest Arcanes available from Eidolons, available here to bolster your supply and help you finish off Rank 5!
*This will be 3x your drop, not 3 separate Arcane drops.
Rare Rewards
Rewarded only on Infernum 21, after clearing the entirety of hell. If you manage to beat Roathe’s challenge, you’ll receive one of:
- Forma Blueprint
- Primary Arcane Adapter
- Secondary Arcane Adapter
- Melee Arcane Adapter
- Amp Arcane Adapter
Steel Path Rewards
Common Rewards
Found on Infernums 2, 9, and 16, these common rewards will have you stockpiling resources to trade with Roathe in no time at all:
- 75 Ignia
- 15 Maphica
Uncommon Rewards
Earned on Infernums 4, and 11, to provide a boost to your power.
- Forma Blueprint
- Melee Riven Mod
- Pistol Riven Mod
- Rifle Riven Mod
- Shotgun Riven Mod
- Zaw Riven Mod
- Kitgun Riven Mod
- Primary Arcane Adapter
- Secondary Arcane Adapter
- Melee Arcane Adapter
- Amp Arcane Adapter
- 3 Day Affinity Booster
- 3 Day Resource Booster
- 3 Day Mod Drop Chance Booster
Descendia Exclusive Arcane Rewards
Rewarded for completing Infernums 6, 13, and a triple drop on Infernum 20!* These Arcanes are all new to the Descendia Game Mode! For more details on these Arcanes, check out the “New Arcanes” section of the Patch Notes.
*This will be 3x your drop, not 3 separate Arcane drops.
- Arcane Concentration
- Arcane Circumvent
- Arcane Expertise
- Arcane Persistence
- Primary Bulwark
- Primary Debilitate
- Primary Overcharge
- Secondary Irradiate
- Melee Careen
Steel Essence Rewards
It wouldn’t be Steel Path without a bit of Steel Essence - 25 Steel Essence is rewarded for clearing Infernum 18!
Rare Rewards
If you’ve managed to rip and tear through the entirety of hell, descended to the bottom and braved the most hellish of challenges, you’ll be rewarded with one of the following:
- Orokin Catalyst Blueprint
- Orokin Reactor Blueprint
- Omni Forma Blueprint
- Eidolon Madurai Lens Blueprint
- Eidolon Vazarin Lens Blueprint
- Eidolon Zenurik Lens Blueprint
- Eidolon Naramon Lens Blueprint
- Eidolon Unairu Lens Blueprint
- Crimson Archon Shard
- Azure Archon Shard
- Amber Archon Shard
New Descendia Somachord Tones
The following Somachord Tones can be found throughout the Precipice:
- Decrypted
- Roses from the Abyss
- The Cardinal Calls
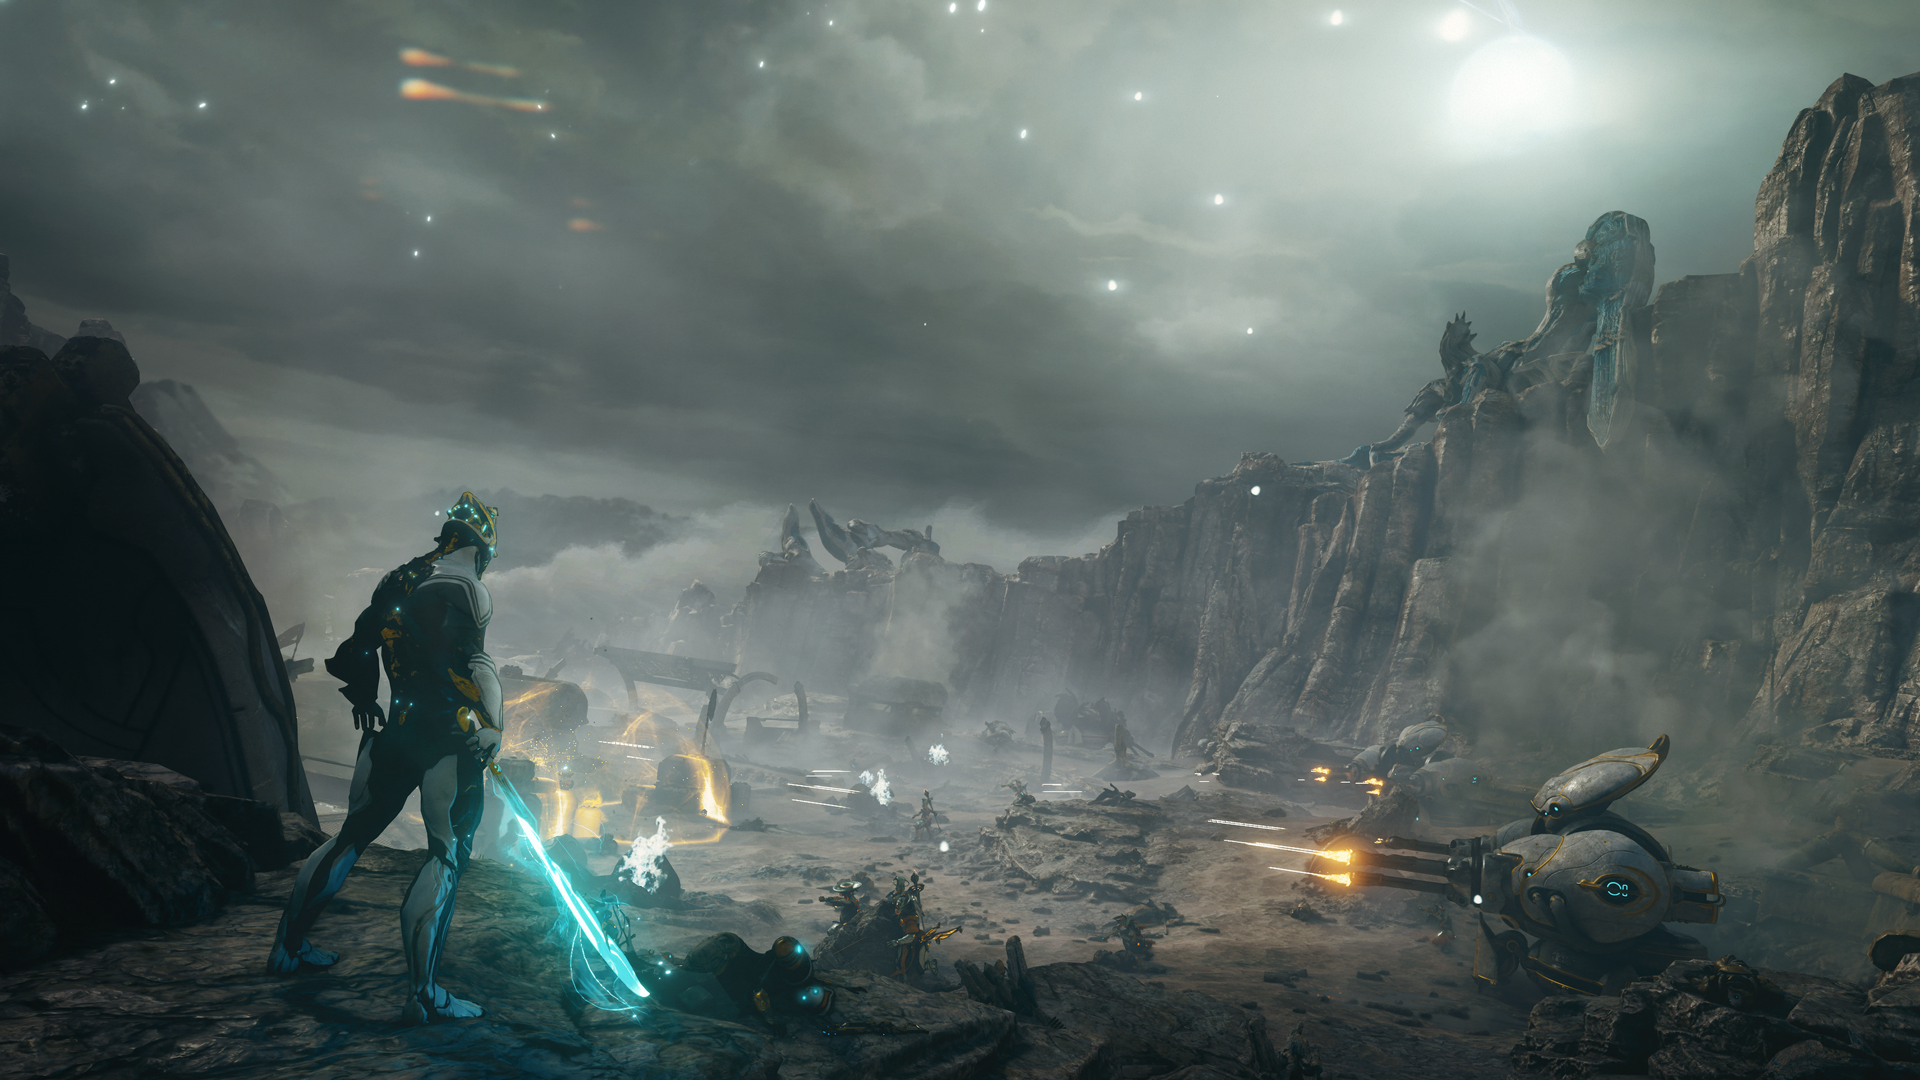
Image Description: On the Tau moon, Excalibur Prime watches with Exalted Blade in hand as The Perita Rebellion unfolds. Turrets are locked in heated gunfire across the vast desolate landscape punctuated by smoke and the glowing aura from an Anarch soldier’s barrier.
NEW GAMEMODE: THE PERITA REBELLION
Memory is a powerful tool. Return to the battlefields of old and relive your experiences in the Perita Rebellion on Tau.
Each Perita Rebellion memory can be sustained for 12 minutes, culminating in a final boss battle with unique rewards. Accomplish as much as you can with the time available to you to earn upgrades for your final showdown.
Mission Selection

Image Description: Screenshot of the Mission Selection UI for The Perita Rebellion. Three memories are available to be recalled: Hunhullus, Dactolyst, and Vanguard as well as the choice of Focus School to represent while recalling.
Choose which memory to return to — and which foe to face off against — via the new Dark Refractory menu available from the Navigation console.
In this menu, you are presented with the following missions:
- Recall: Hunhullus
- Recall: Dactolyst
- Recall: Vanguard
Each Recall mission determines which foe you will face at the end — they each come with their own rewards, which we will cover later on!
On this screen, you can choose which Focus School to use during The Perita Rebellion. Your Operator retains their knowledge of Tauron Strikes, so you will be able to use the Strike of your chosen Focus School, regardless of if you have unlocked the corresponding Tektolyst Artifact. For more information on Tauron Strikes, check out the “Focus School Expansion” section.

Image Description: A closeup of the Focus School selection in The Perita Rebellion screen. From left to right the icons of each school are displayed: Naramon, Zenurik, Vazarin (highlighted to indicate it is the current selection), Unairu, and Madurai.
Your chosen Focus School also determines what Initiative Buffs your Warframe can earn throughout your mission, by completing Encounters and finding Initiative Fragments. These fragments are similar to Decree Fragments in the Undercroft, in that they are squad wide pickups.
The Perita Rebellion can be experienced on the Normal and Steel Path (if players have unlocked The Steel Path on the Star Chart).
Gameplay
Entering your memories of the Perita Rebellion starts a 12 minute timer. Your objective is to further the Rebellion’s cause with the time available to you, earning additional rewards and upgrades as you complete Encounters.
Encounters are mission objectives that serve to help your allies — eliminating foes, destroying scanners, and more. The more Encounters you complete, the better prepared you will be for your final showdown.
The Perita Rebellion takes place in large battle grounds and sprawling trenches on the first known Tau moon. With the clock ticking down, traversing the landscape quickly is a must. Anchors (grapple points) hover above the war torn fields that can be used to launch you where you need to go.
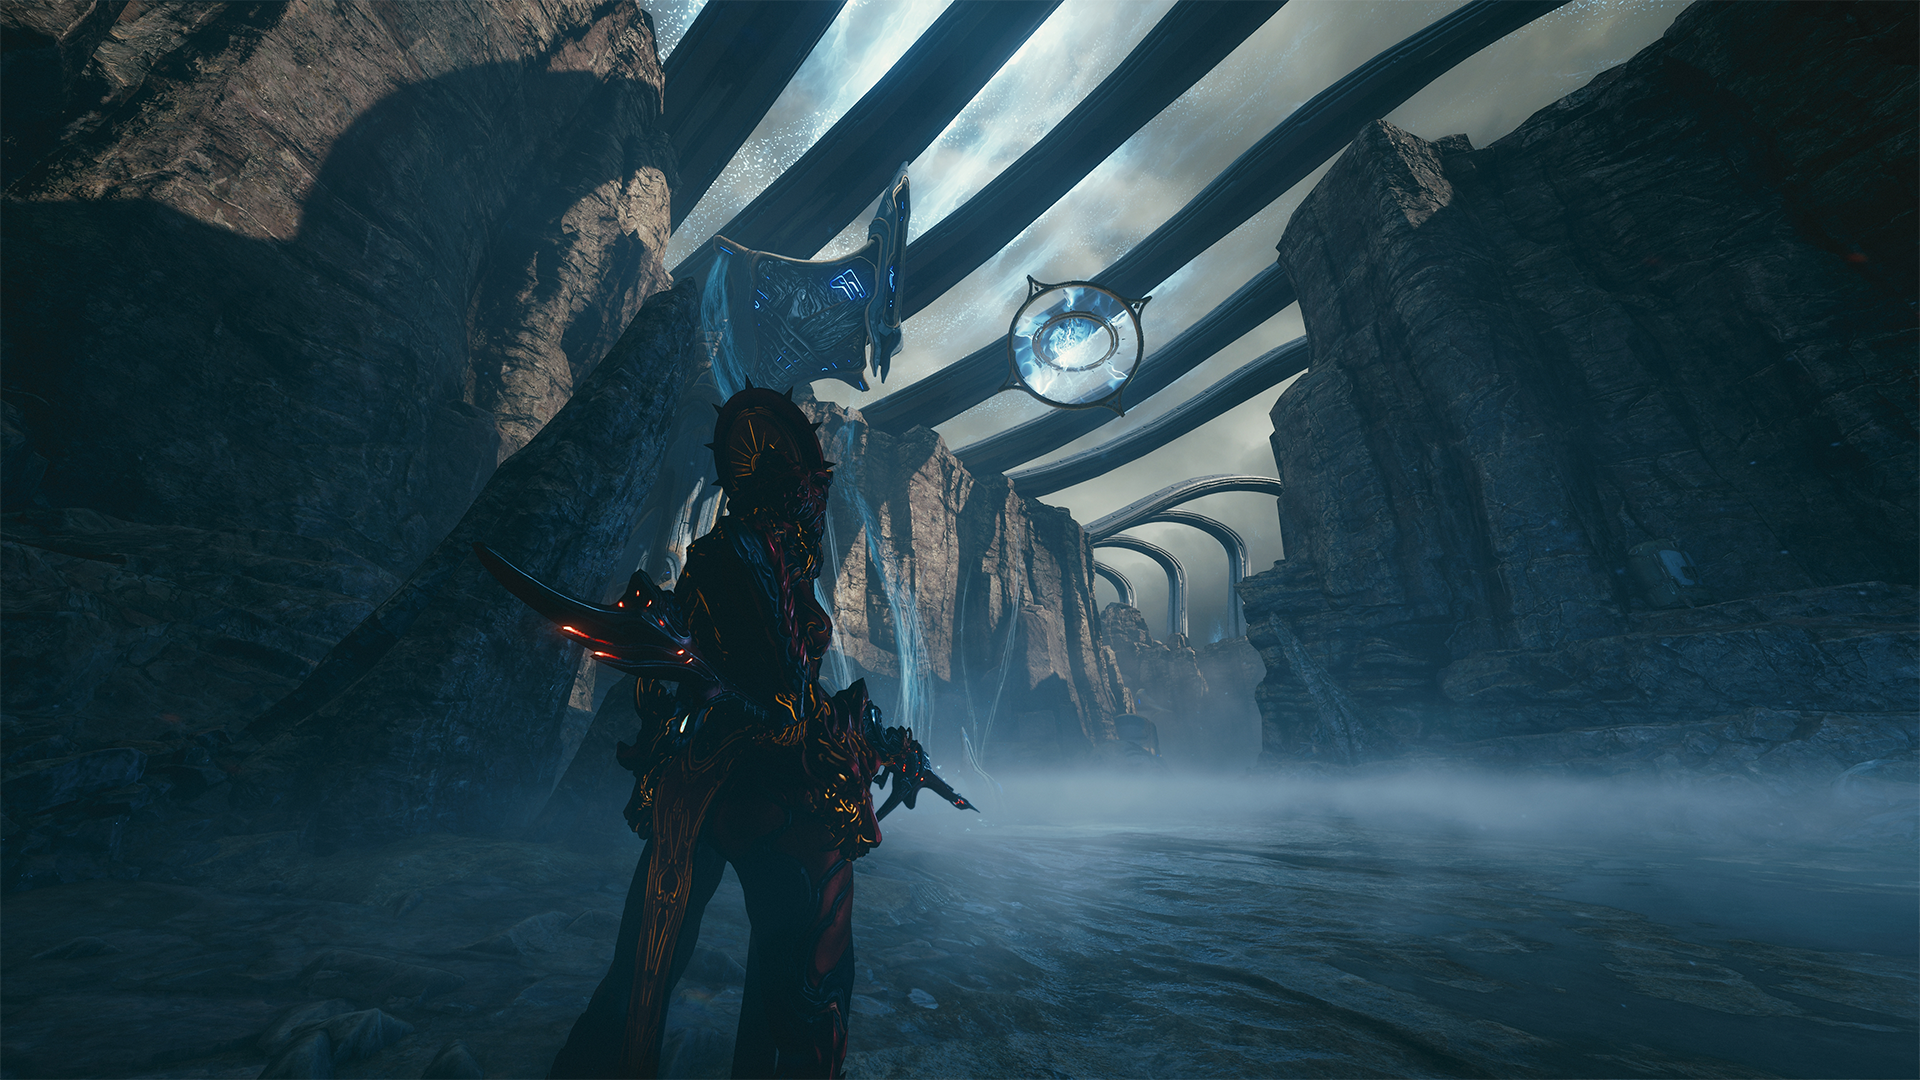
Image Description: A Warframe stands within one of the expansive trenches of The Perita Rebellion landscape with an Anchor floating above. The Anchor, composed of two concentric gold rings, contains crackling energy.
These are directional launching points that allow you to change your travel direction while in the air – which can be canceled at any time by jumping. Using Anchors also applies the Void’s Grasp buff that temporarily applies Void Damage to your weapons.
Keyboard Functionality with Anchors: If you have an older keyboard that has limited input functionality (in other words, not “n-key rollover” eligible), you may need to release a movement input (such as, moving forward) to allow the Anchors to function. If you encounter this, we suggest rebinding your “Context Action” to “G” as a possible solution. You may also be able to verify if your keyboard model is “n-key rollover” eligible online beforehand (no guarantees of results).
Rewards from Encounters:
- Initiative Upgrades: every 1 Encounter
-
Tektolyst Artifact Resource: every 1 Encounter
- The resource you earn is determined by your mission choice. See “Final Showdown” for more information.
-
Reward from Rotation A on the mission droptable: every 3 Encounters
- See “General Mission Rewards” section below for more information on how to read mission droptables.
Commandeered Primes:
While on the battlefield, your foes may send a Commandeered Prime Warframe your way in hopes of cutting you down. These foes drop additional rewards when defeated!
- Normal Path: Chance to drop a Tektolyst Mod
-
Steel Path: Chance to drop a Tektolyst Mod and guaranteed chance to drop a Tektolyst Arcane
- Commandeered Primes also drop 1 Steel Essence on The Steel Path.
Earning Initiative Buffs
Completing Encounters or collecting three Initiative Fragments (seen in screenshot below) will earn buffs for your Warframe, determined by your chosen Focus School. Earning subsequent Upgrades will stack their effects.
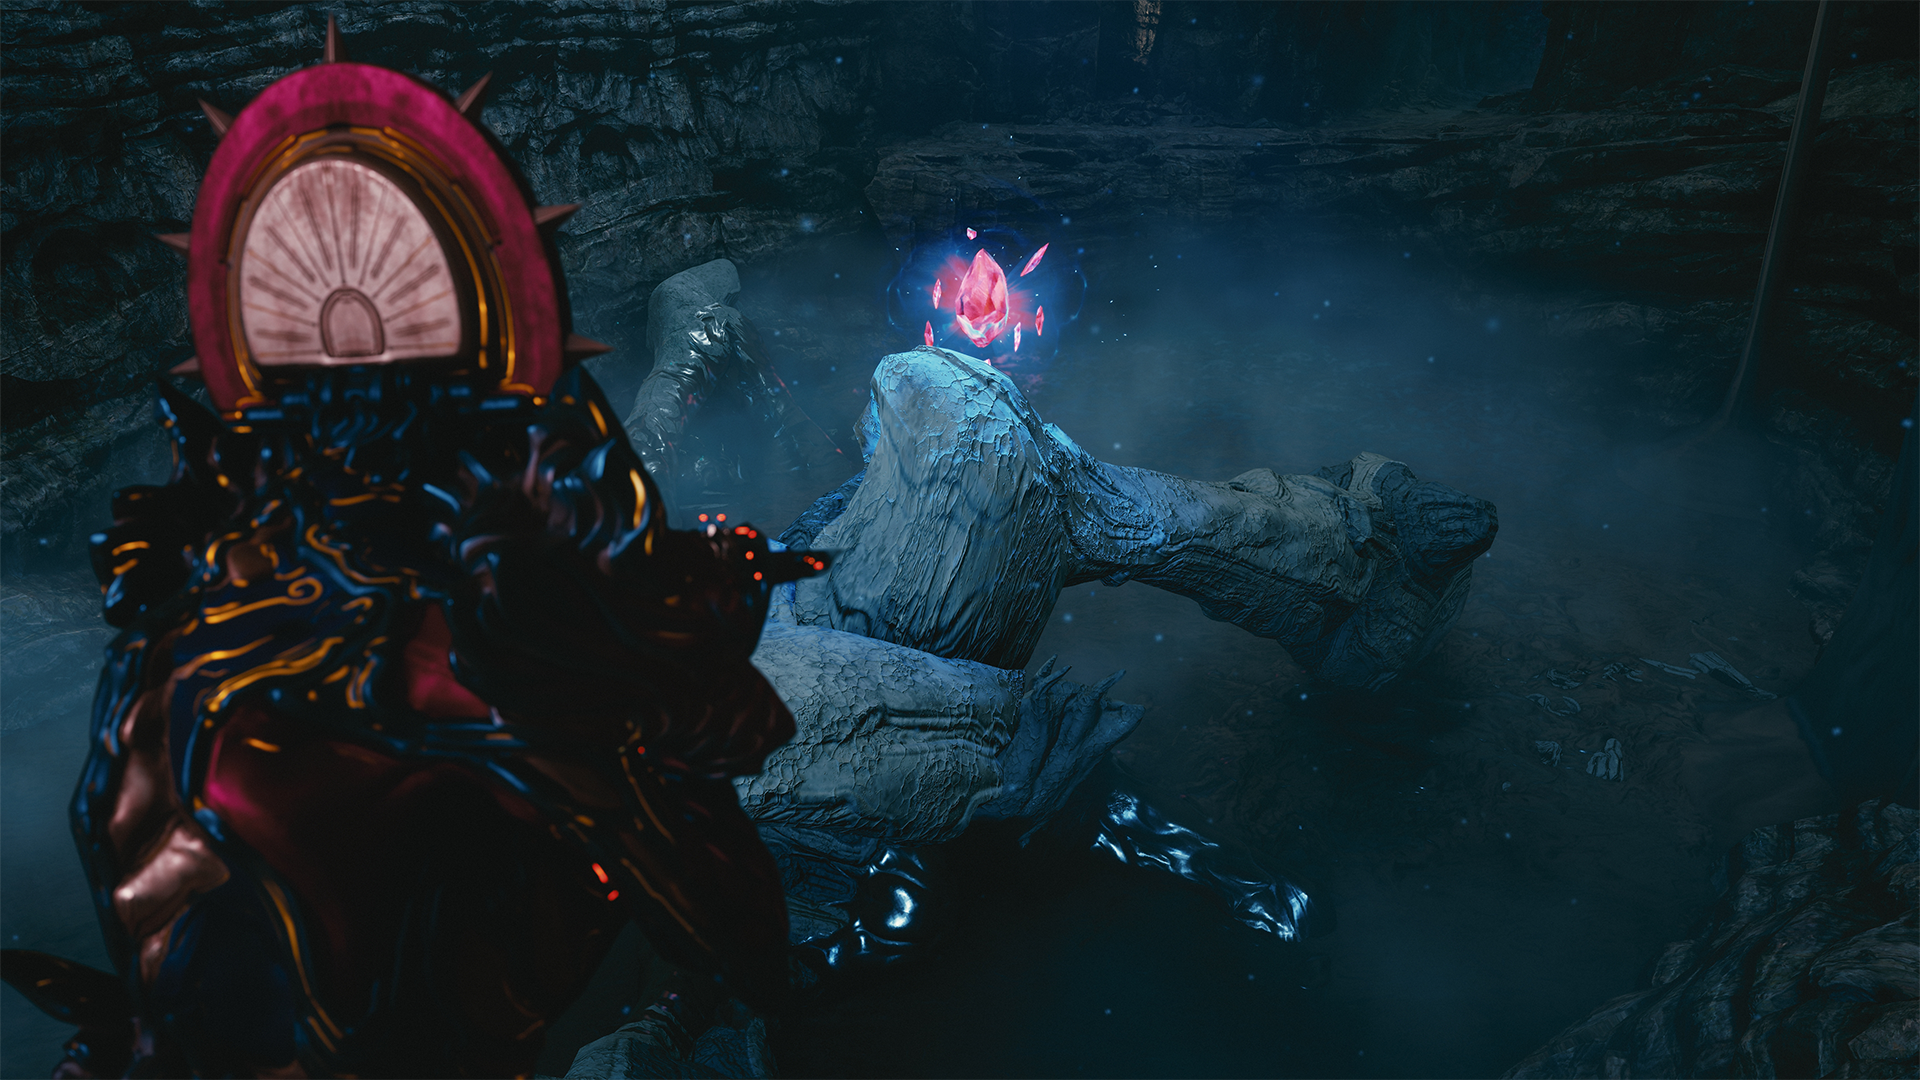
Image Description: An Initiative Fragment floats atop a rock formation deep within a cave in The Perita Rebellion landscape as a small group of red crystal shards. Its soft blue glow stands out across the mist that has filled the lower sections of the cave.
Available upgrades are as follows:
- Madurai: +25% Primary and Secondary Damage, and +25% Fire Rate
- Vazarin: +25% Max Health and +25% Status Chance
- Naramon: +25% Melee Critical Chance and +25% Melee damage
- Unairu: +25% Armor and +25% Impact Damage
- Zenurik: +25% Ability Strength and +25% Ability Duration
- Any Focus School: +25% Max Health and +25% Multishot
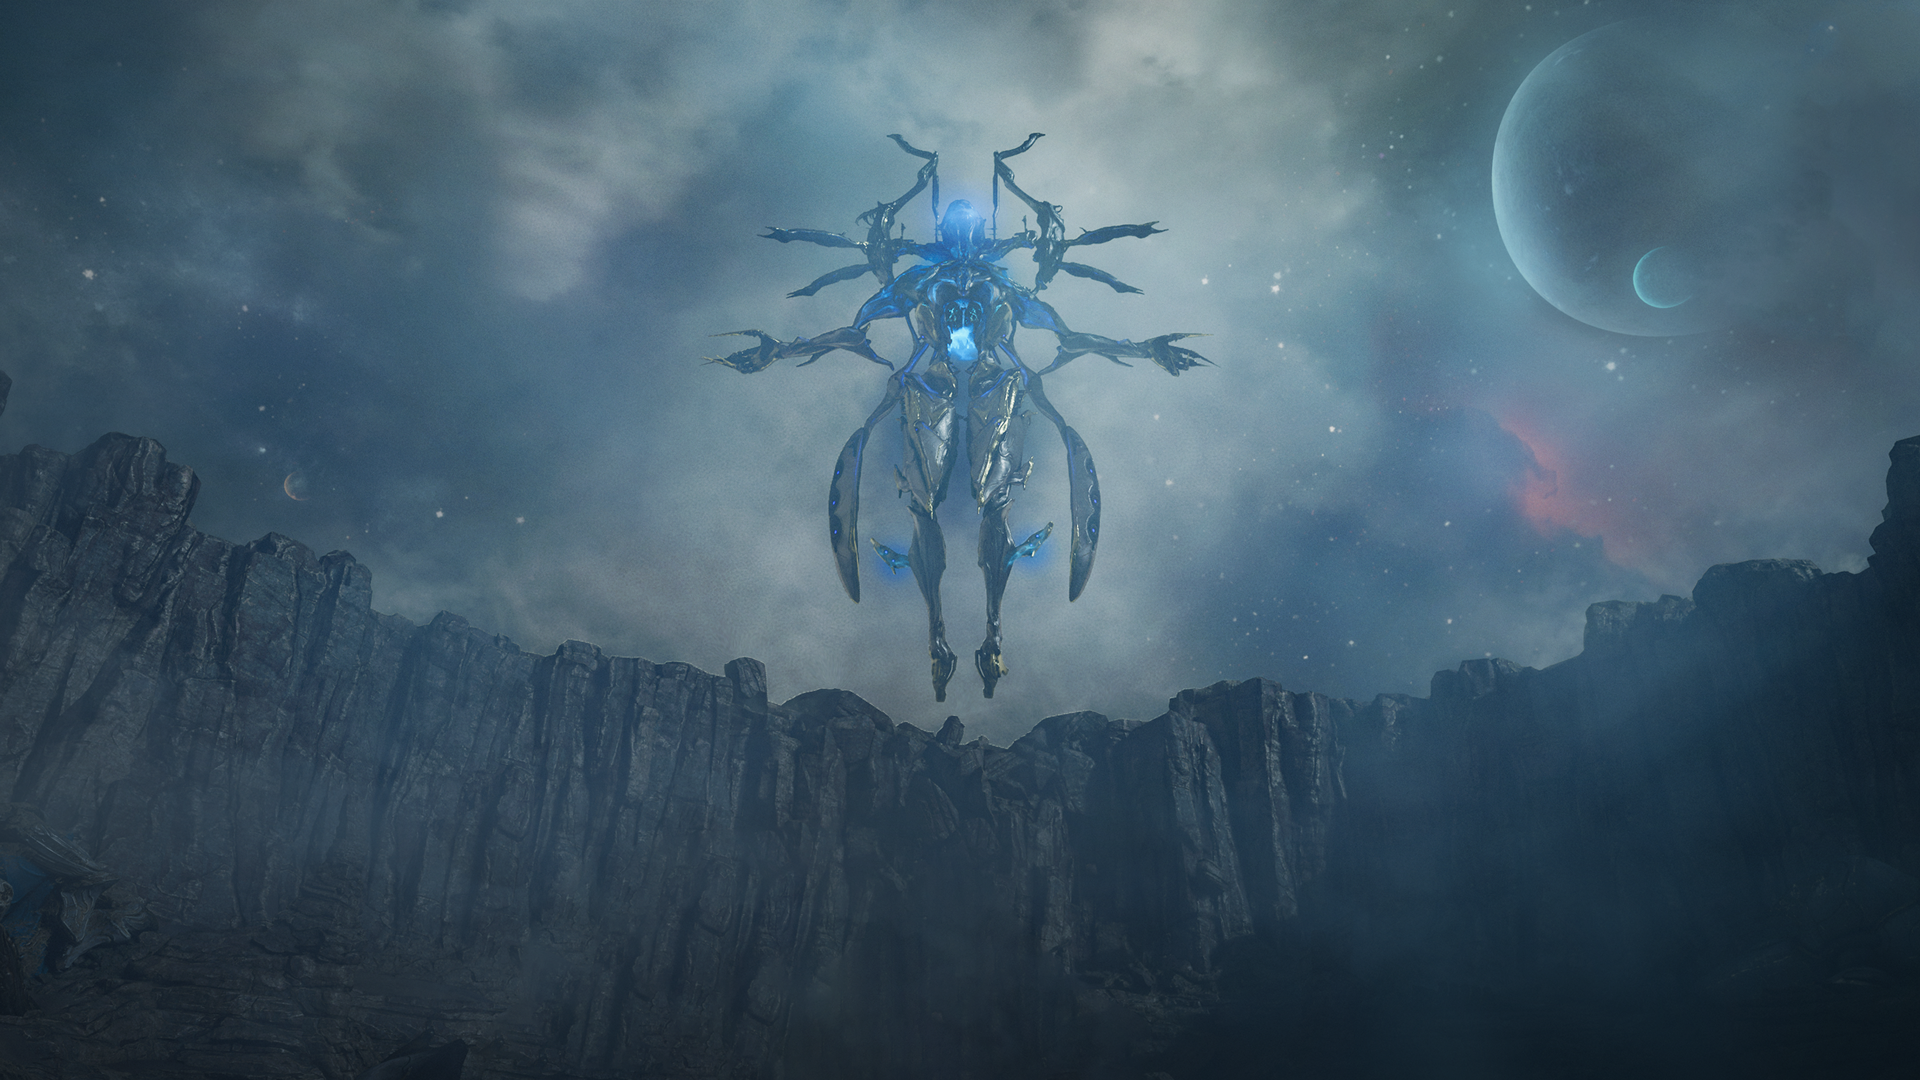
Image Description: The Hunhullus, a colossal Sentient looms in the sky in The Perita Rebellion landscape. Its size rivals the crater walls below it as its blue energy glows in the night sky.
Final Showdown
After your 12 minutes have elapsed, you will be transported to a boss Arena to face off against your chosen foe. In addition to the listed rewards, players will receive 3 Steel Essence after completing any Steel Path mission in The Perita Rebellion.
Recall: Hunhullus
Take on the giant Hunhullus and master the use of Marrowtics to optimize your damage output against its Synovias. An enemy of this size requires use of all the tools available to you — we recommend ensuring that your Archwing loadout is up to snuff before venturing into this battle.
Defeating the Hunhullus rewards Lyroic Bridges, which can be exchanged with Marie for Tektolyst Artifacts.
Recall: Dactolyst
Guilt is a strange beast, and this is just one way to face it.
Defeating the Dactolyst rewards Ren Hypercores, which can be exchanged with Marie for Tektolyst Artifacts.
Recall: Prime Vanguard
Warframes appeared on both sides of the battlefield. Take on Ash Prime, Protea Prime, Mesa Prime, Caliban Prime, Volt Prime and Ember Prime all at once!
Defeating the Prime Vanguard rewards Ascaris Primes, which can be exchanged with Marie for Tektolyst Artifacts.
General Mission Rewards:
In addition to the specialized rewards from each boss, completing The Perita Rebellion will reward the following:
- Resources: Agnovidisc, Laudavi, and Servoris
- Tektolyst Artifact Mods
- Tektolyst Artifact Arcanes
- Sagek Prime Blueprints
- Galariak Prime Blueprints
As mentioned in the “Rewards from Encounters” section, these rewards are pulled from different rotations in The Perita Rebellion droptables when players achieve certain criteria.
Rotation A:
- Rewarded every 3 Encounters Completed
The Rotation A droptable includes:
- Endo, Credits, and The Perita Rebellion resources (Agnovidisc, Laudavi, and Servoris)
- Void Relics
- Sagek Prime and Galariak Prime Blueprints
- Tektolyst Artifact Mods
Rotation B:
- Rewarded every 1 Encounter Completed
The Rotation B droptable includes:
- The resource associated with the Recall mission type (i.e. Lyroic Bridges for Recall: Hunhullus, etc.).
Rotation C:
- Rewarded upon mission completion
The Rotation C droptable includes:
- Tektolyst Artifact Arcanes
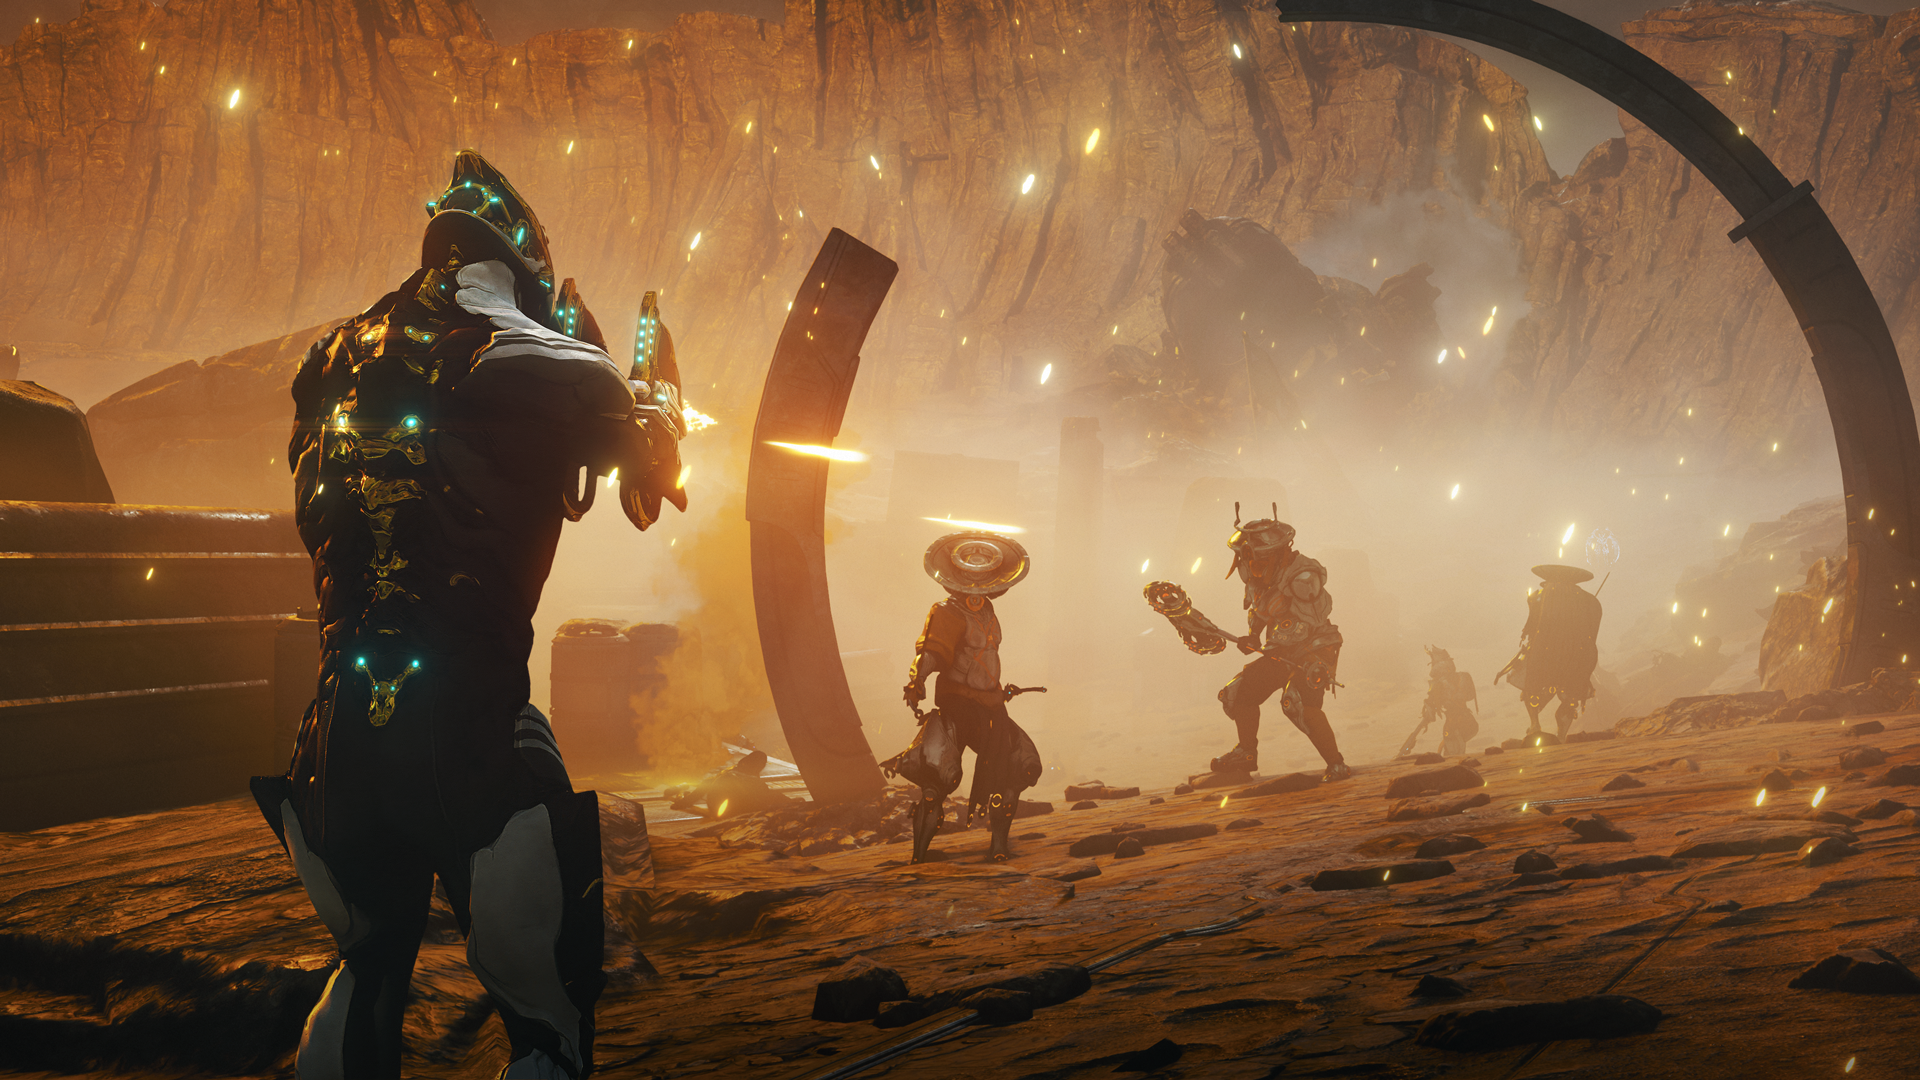
Image Description: Excalibur Prime fires his guns into a wave of Anarch soldiers on the battlefield. Embers and sparks from nearby gunfire cast an orange hue on the field against the grey smoke in the distance.
New Enemy Faction: Anarchs
Out in the war torn fields of Perita you will encounter the Anarchs, a new faction comprised of separatist Dax units and the six Commandeered Prime Warframes. Scan them out in battle to learn more in your Codex.
Anarchs are vulnerable to Impact and Electricity damage and resistant to Radiation.
Anarch Arcus
A ranged unit with precise aim.
Anarch Capsarii
A field medic for the fallen, wielding a shield and staff.
Anarch Gladius
Proficient with the blade, this sword wielding melee unit seeks to eliminate effectively.
Anarch Libritor
Wielding the Libritor Archgun, this unit packs a thunderous punch.
Anarch Tenebra
Agile and elusive, this thrown blade unit will keep you on your toes.
Anarch Grineer Lancer
The front line of the Orokin legions.
Anarch Grineer Trapper
Trained in the operation of Trapper Drones.
With the introduction of the Anarchs, we’ve also added a “Anarch Battlegroup” to the Simulacrum enemy spawner. As a reminder, you need to have scanned 30% of a Faction for their battlegroup to appear.
New The Perita Rebellion Somachord Tones
The following Somachord Tones can be found throughout The Perita Rebellion landscape:
- Deepest Dark
- Flowers Fall
- Ironclad
- Executor
- The Unremembered
- His Light
- Lullaby of the Manifold
- Lullaby of the Manifold - Adis’s Lament
- Lullaby of the Manifold - Dusk
FOCUS SCHOOL EXPANSION
Bring the essence of the ultimate Tenno power to the battlefield. Pierce the front with a mighty bow, bring low mechanical terror with a glorious sword and shatter ground with a whirlpooling vortex. Find power in the antiquity of the Orokin empire with Tauron Strikes — a new Focus power harnessed by the Tenno.
Before diving into the details, let’s start first by quickly defining Tektolyst Artifacts and Tauron Stikes, as well as the relationship between the two:
- Tektolyst Artifacts are Focus School weapons that perform Tauron Strikes in-mission. Artifacts are upgraded with specialized Arcanes and Mods in the Operator/Drifter Equipment management. You must first own an Artifact in order to gain access to its respective Tauron Strike.
- Tauron Strikes are the abilities and persistent effects that originate from Tektolyst Artifacts. They are upgraded from new Focus School nodes that are unveiled per school upon acquiring their Artifacts. They are also very effective against true bosses (boss with HUD Health bar)!
Image Description: Excalibur Prime wielding the Vexoric - Naramon’s Tektolyst Artifact mid strike. The massive longsword overflows with Void energy as it prepares to release a strike at a towering enemy turret in the distance.
TAURON STRIKES
Accessing Tauron Strikes
There are two way to accessing the Tauron Strikes:
1. Temporarily in The Perita Rebellion missions:
Your chosen Focus School in The Perita Rebellion screen grants you access to the associated Tauron Strike, regardless if you own the associated Tektolyst Artifact.
This is a great way to try out each of the Tektolyst Artifacts prior to acquiring them permanently from Marie (more information below).
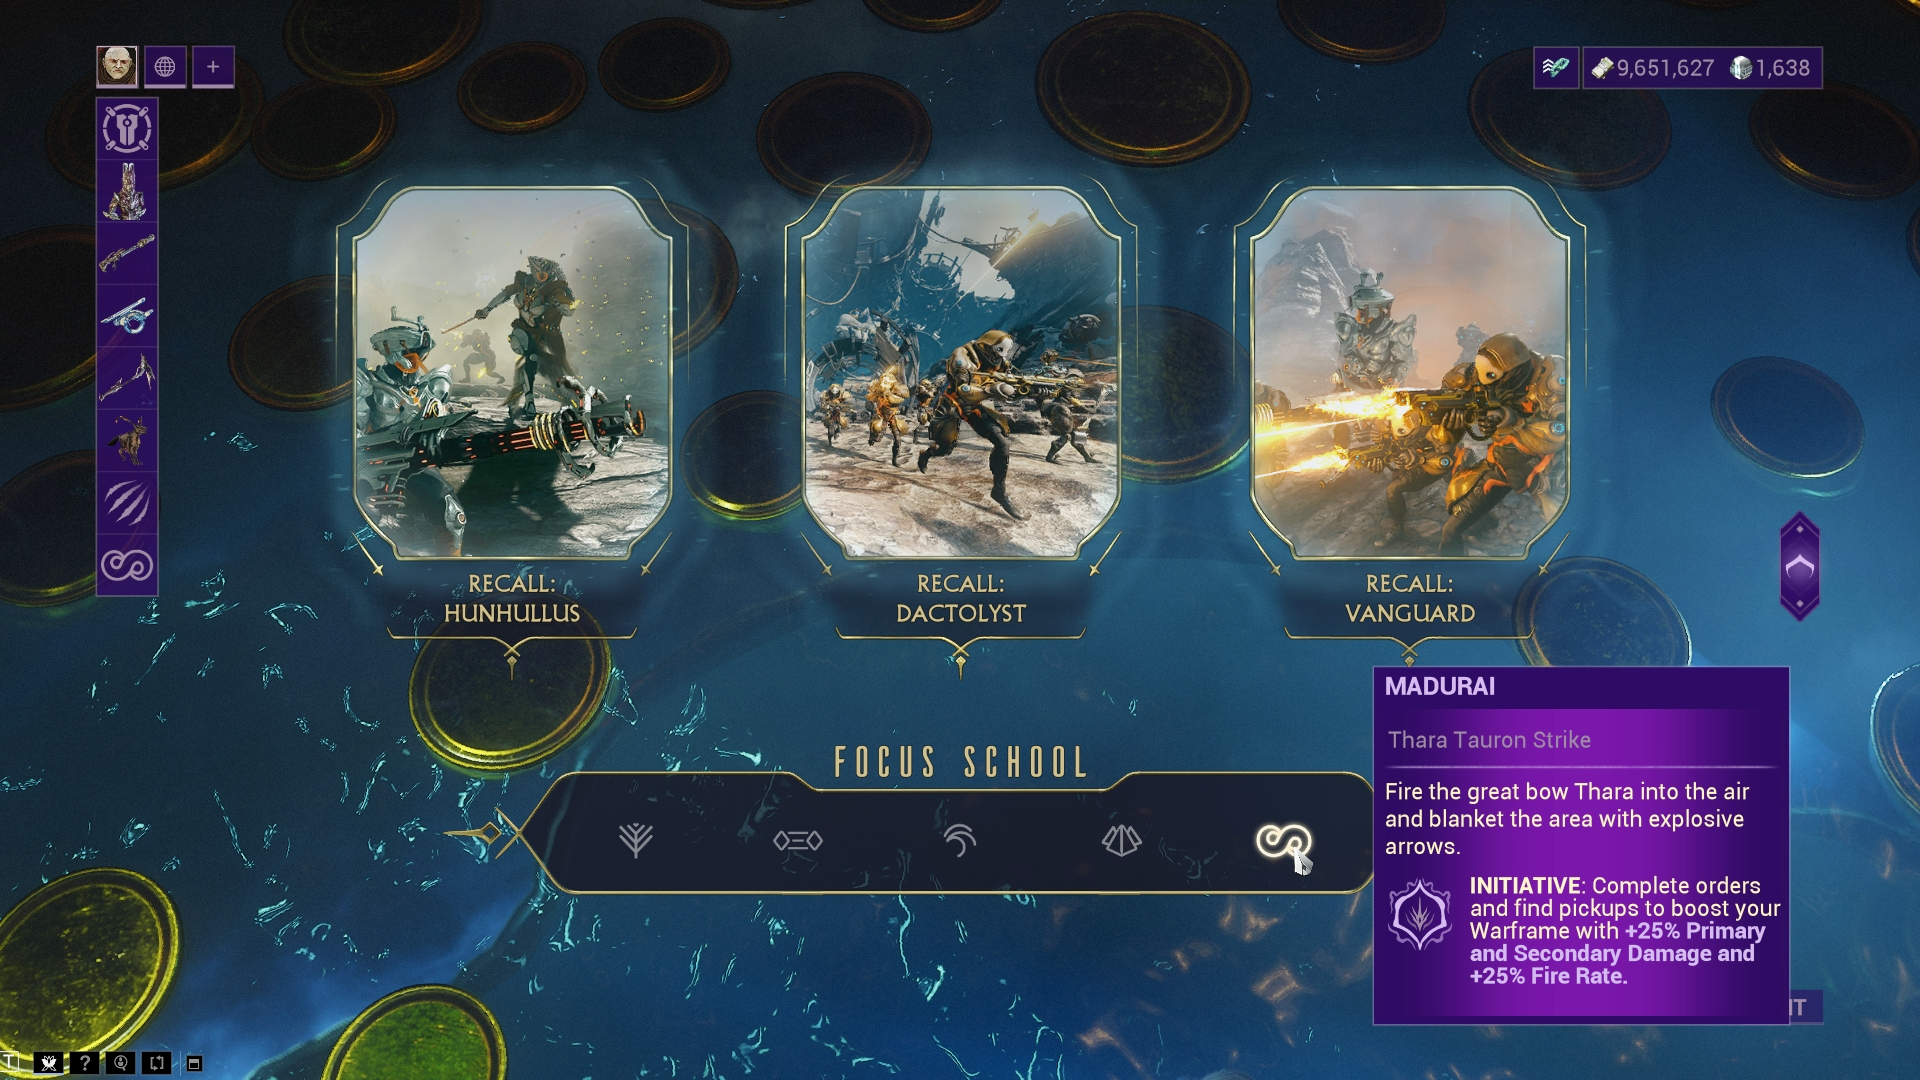
Image Description: Screenshot of the Perita Rebellion UI with the cursor hovering over the Madurai Focus School. The hover reveals the Thara Tauron Strike and bonuses to primary and secondary damage along with increased fire rate if selected.
2. Permanently by acquiring Tektolyst Artifacts and unlocking Tauron Strike Focus nodes:
To unlock a Focus School’s Tauron Strike for gameplay outside of The Perita Rebellion, you must first acquire its Tektolyst Artifact from Marie in La Cathédrale in the Sanctum Anatomica.
Purchasing Artifacts from Marie requires new resources earned from completing the final encounter in the following Perita Rebellion missions:
- Ren Hypercore: Rewarded from defeating the Dactolyst
- Ascaris Prime: Rewarded from defeating the Vanguard
- Lyroic Bridge: Rewarded from defeating the Hunhullus
The Tektolyst Artifact Acquisition Pack (one time purchase) is also available in the Market, which provides the exact amount of each (150) to acquire one Tektolyst Artifact from Marie.
You must have the Focus School unlocked first before being able to purchase its Tektolyst Artifact.
Once you’ve acquired a Tektolyst Artifact, the corresponding Focus School will expand with new nodes dedicated to increasing the power of your Tauron Strike! We cover specifics of the nodes in the “New Focus School Nodes” section.
Tektolyst Artifacts
Tektolyst Artifacts are equipped by activating the associated Focus School. For example, activating Madurai will auto-equip the Thara Tektolyst Artifact in the Equipment screen.
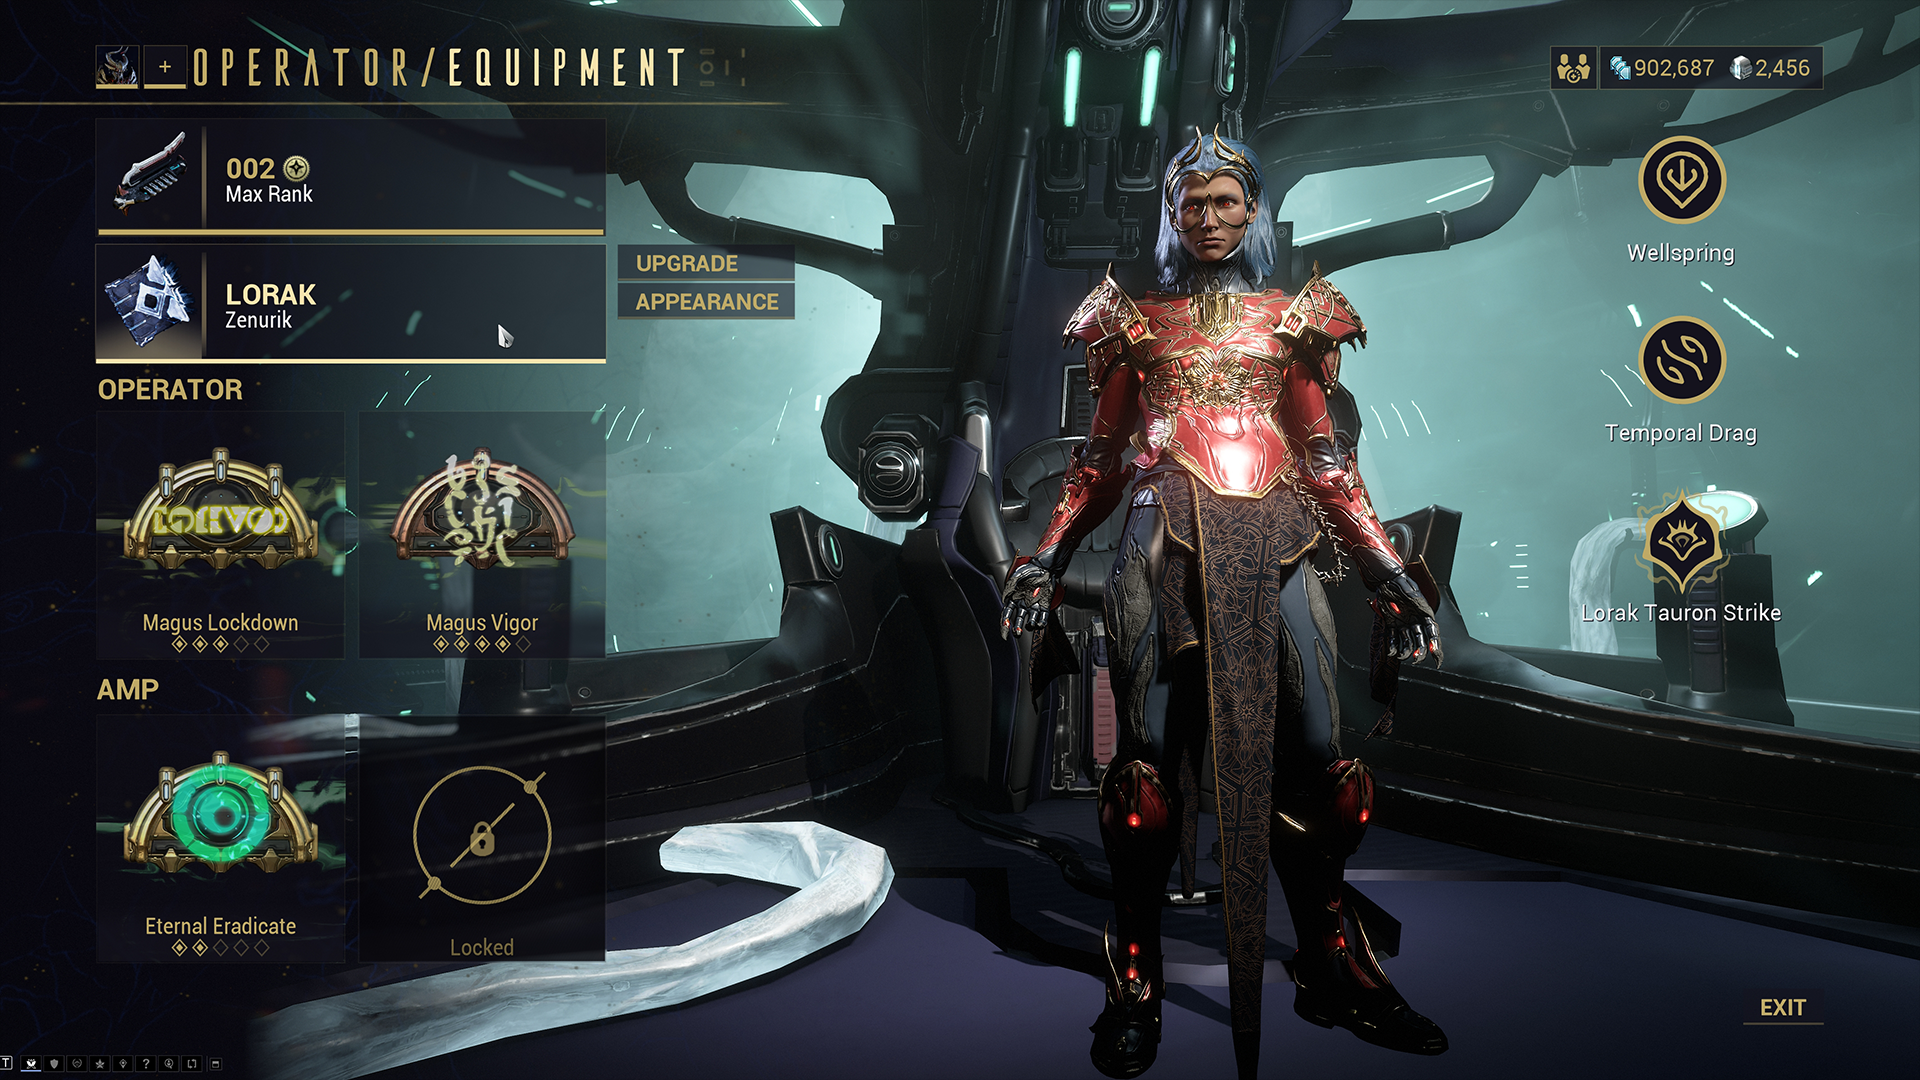
Image Description: Screenshot of the Operator Equipment UI with the cursor hovering on the Lorak - Zenurik’s Tektolyst Artifact. The hover reveals the Upgrade and Appearance options.
From the Operator Equipment screen you can a) upgrade your Artifact and b) customize its appearance! You can also access these options from the Arsenal.
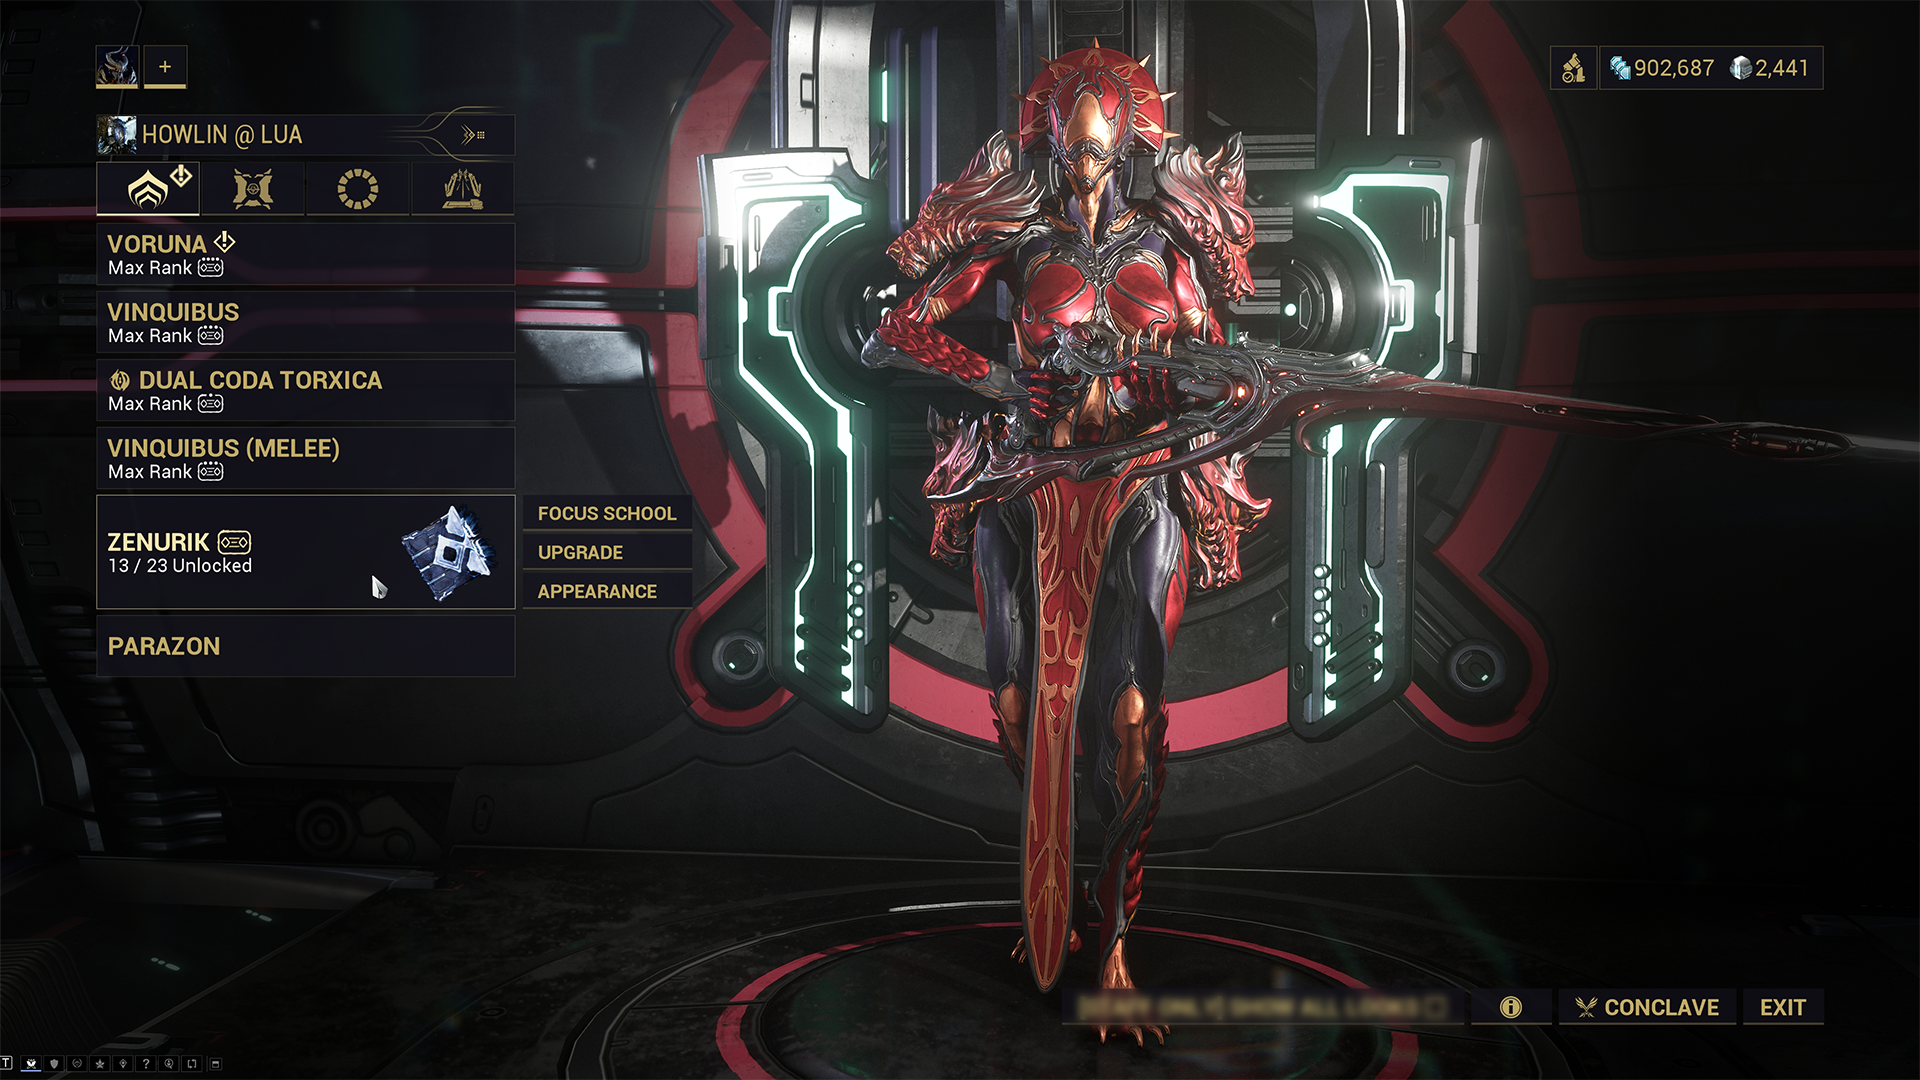
Image Description: Screenshot of the Arsenal UI with the cursor hovering on the new slot for the Tektolyst Artifact. The hover reveals three options: Focus School, Upgrade, and Appearance.
We’ll get into the specifics of upgrading your Artifact down below, but first let’s take a look at each Focus School’s Tektolyst Artifact!
Thara (Madurai)
The unwavering Bow of the school of Madurai. To face its wielder is to fight against its Tauron Strike, the tempestuous power of the Void itself; and there it has been lost since time immemorial.
Vexoric (Naramon)
The incisive Blade of the school of Naramon. A sword that cleaves fate as cleanly as its Tauron Strike would any mountain, should it ever be discovered in the vastness of the Void.
Cogron (Unairu)
The mighty Hammer of the school of Unairu. Now lost to the Void, but if found, its Tauron Strike would be granted strength enough to topple armies.
Nidri (Vazarin)
The righteous Staff of the school of Vazarin. Before being lost to the Void, it was a weapon whose very presence could signal the end to a conflict, such is the destructive power of its Tauron Strike.
Lorak (Zenurik)
The overpowering Grimoire of the school of Zenurik was perhaps ever destined for the Void. Though powerful, the ruinous secrets it whispers through its Tauron Strike can drive even the clearheaded to madness.
Using Tauron Strikes
To use your Tauron Strike, you must charge it up to full! There are three ways to accomplish this:
1. Eliminating Enemies
All killed enemies grant a flat amount of Tauron Strike Charge with or without Focus Lenses. Ally kills within Affinity range also provide charge.
2. Focus Lenses
Focus Lenses provide a bonus increase to the Charge Rate of your Tauron Strike. Each Lens type (Base, Greater, Eidolon and Lua) all grant +10% charge rate.
3. Picking up Convergence Orbs, which now have three functions:
- Granting a base amount of Focus on pickup and multiplying the amount of Affinity converted to Focus Points (unchanged)
-
Granting an instant amount of Tauron Strike charge (20% per Orb), as well as buffing the charge rate from killing enemies during a 45s window.
-
Tauron Strike charge is granted regardless of Daily Focus Cap! The Orbs will change from yellow to blue to indicate that you are at cap, but that you will still receive Tauron Strike charge on pickup.
-
Tauron Strike charge is granted regardless of Daily Focus Cap! The Orbs will change from yellow to blue to indicate that you are at cap, but that you will still receive Tauron Strike charge on pickup.
4. Automatically in The Perita Rebellion boss fights
- Your Tauron Strike will automatically charge up overtime once while in a Perita Rebellion boss fight (Hunhullus, Dactolyst and the Vanguard). However, if you already have a fully charged Tauron Strike upon entering the arena, it will not automatically charge after use. In other words, this automatic charging only applies if you enter the area without a charge already ready to go.
- The previously mentioned methods also apply on top of the automatic charging.
Once charged, activate your Tauron Strike by using Transference and pressing the corresponding binding, unleashing an Activation effect, followed by a Persistent effect (learn more in the “New Focus School Nodes” section).
- Activation effects are your big, dramatic swings, summoning Warframe with Operator to bring forth the Void manifest to the battlefield.
- Persistent effects provide long-lasting buffs, area of effect hotspots or enemy debuffs.
Operator HUD Changes
The Operator HUD has been updated to communicate Tauron Strike charge rate in addition to Amp Magazine and Operator Energy.
-
Circular gauge:
- Previous: Operator Energy
- Now: Displays the charge of your Tauron Strike. Once the gauge is full, your Tauron Strike is ready to use!
-
Bar underneath ability icons:
- Previous: Amp Magazine
- Now: Operator Energy
- Amp Magazine is now displayed numerically above the Tauron Strike gauge!

Image Description: A closeup screenshot of the updated Operator HUD showing the new icon and gauge to indicate the Tauron Strike Charge. Numbered from the top in position one is the Amp Magazine, below to the left in position two is Operator Energy, and to the right in position three is the Tauron Strike Charge.
New Focus School Nodes
Once you have acquired a Tektolyst Artifact, the associated Focus School tree will branch out with new Tauron Strike nodes. There are 5 new nodes per School.
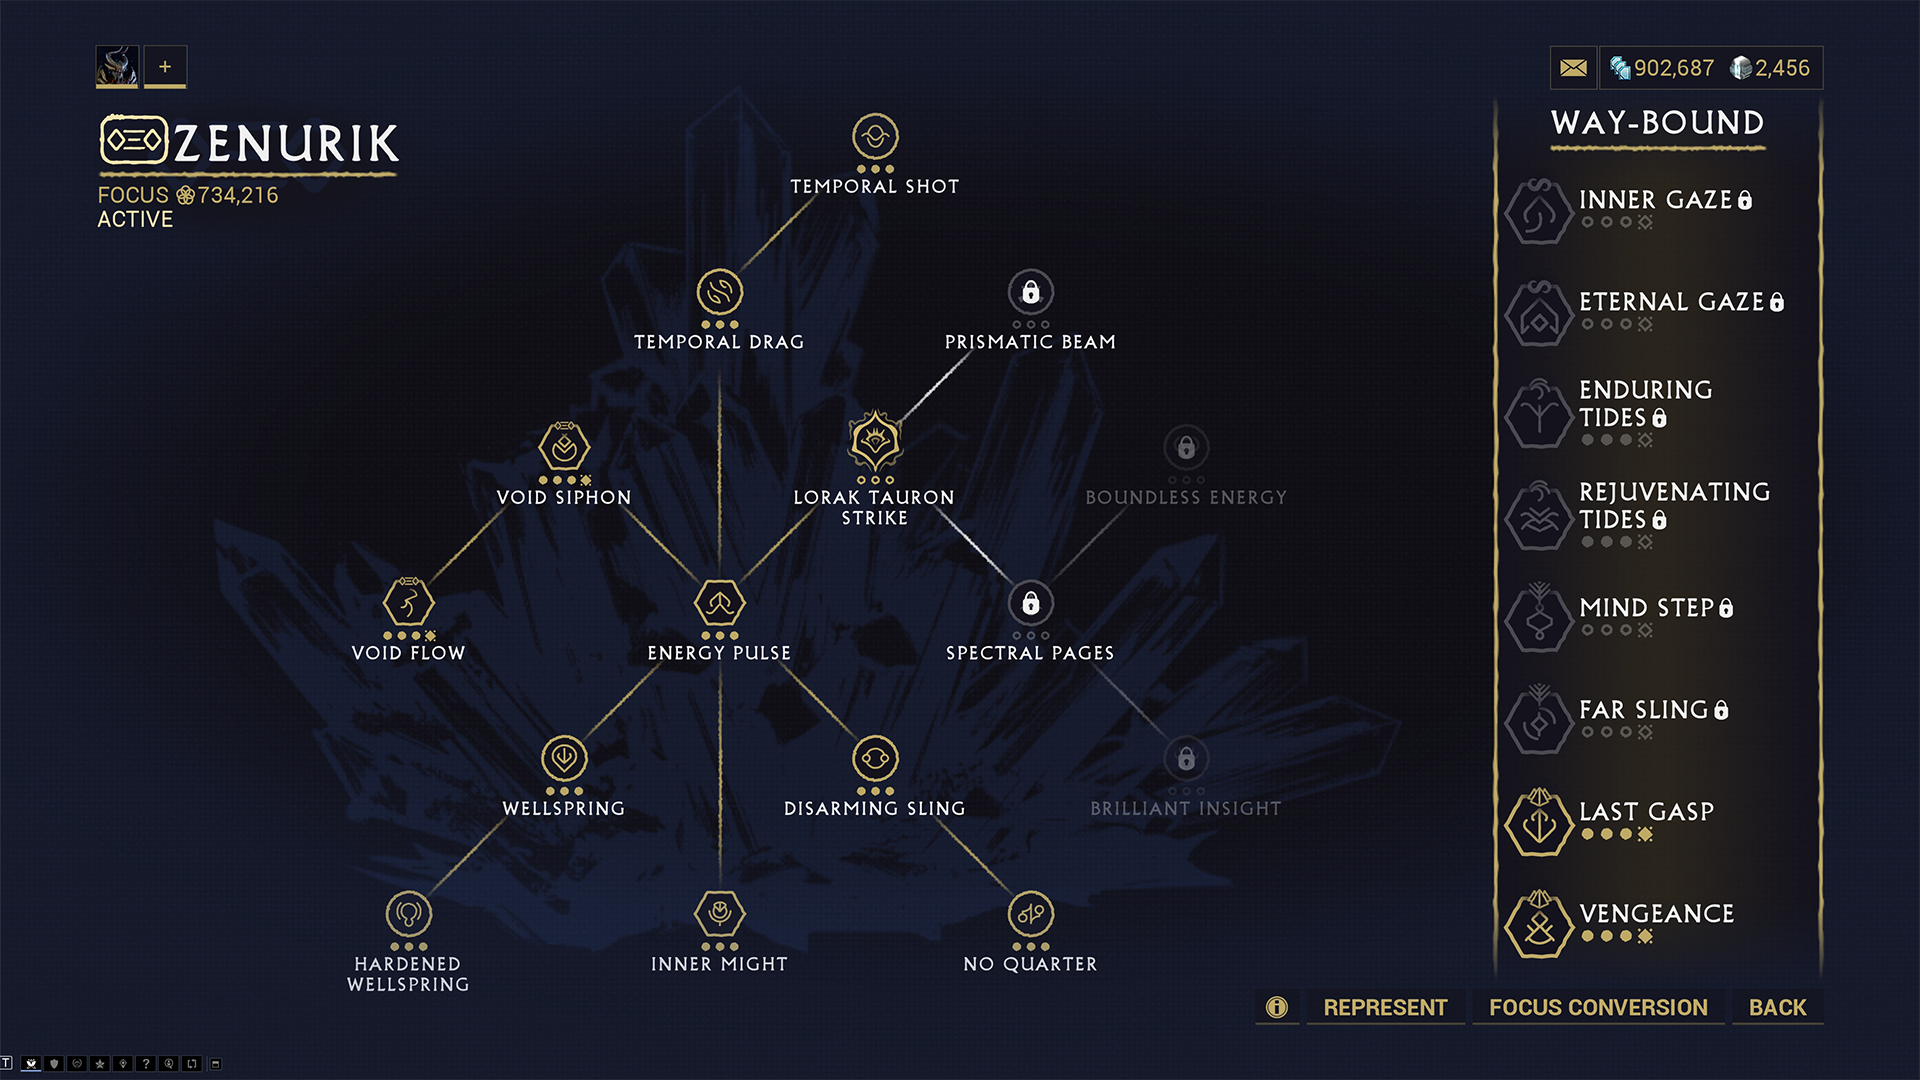
Image Description: The Zenurik Focus School with its expanded nodes. Branching off from the Lorak Tauron Strike node are Prismatic Beam and Boundless Energy with the latter also having two additional nodes of Spectral Pages and Brilliant Insight.
The Tauron Strike node is unlocked by default. Unlock and upgrade additional nodes at the cost of Focus Points and new resources (amounts and types vary per node and rank): Ren Hypercores, Ascaris Primes, and Lyroic Bridges.
These new nodes will not impact your Represent store access. The Represent store only requires the non-Tau nodes to be completed for the Focus School (i.e. its unlock criteria remains unchanged).
Stats below are shown at max rank.
Zenurik
- Lorak Tauron Strike: Summon forth Lorak from the Void and conjure its ruinous spells, calling forth a beam of energy from within. Enemies pierced by the beam have a 100% chance to drop Energy Orbs if killed within 10 seconds.
- Prismatic Beam: Enemies struck by the Tauron Strike fire off smaller beams at other enemies within 20m.
- Boundless Energy: Create 4 spectral pages granting additional Cast Speed, Ability Strength, Duration and 100 bonus Energy per page.
- Spectral Pages: Ability Strength, Duration, and Cast Speed granted by spectral pages increased by 40%.
- Brilliant Insight: Spectral pages also fire off beams that blind enemies within 16m.
Naramon
- Vexoric Tauron Strike: Summon forth Vexoric from the Void and swing the colossal sword, unleashing a wave of devastating energy. Gain +8 Melee Combo from each enemy hit.
- Spectral Blades: Summon 4 spectral swords that are copies of equipped melee weapon. Melee attacks will simultaneously trigger spectral attacks on any enemies within 10m. Spectral sword hits increase Combo Count and grant extra Tauron Strike Charge. Spectral swords are granted to all players in Affinity Range.
- Astral Cut: Tauron Strike slash size is increased by 80%.
- Flowing Strikes: Increase the range of spectral melee attacks to 26m.
- Hungering Blades: Spectral weapons have a 100% chance to attack the same enemy a second time.
Madurai
- Thara Tauron Strike: Summon forth Thara from the Void and fire the great bow into the air, blanketing the area with a rain of explosive arrows for 7s.
-
Rain Of Arrows: On dealing damage, fire an arrow at an enemy with 0.35s cooldown
between arrows. - Downpour: Rain of Arrows will also target 4 additional enemies within 10m.
- Overwhelming Power: Gain +5% Ability Strength for each enemy hit by the initial Tauron Strike for 30s. Max +50%
- Surging Storm: Increase Rain of Arrows radius to 5m.
Unairu
- Cogron Tauron Strike: Summon forth Cogron from the Void and brandish the mighty hammer, slamming it into the ground to create a cataclysmic shockwave that ripples 4 times.
- Great Quake: Increase shockwave radius by +40%
- Sundered Bounty: Shockwaves generate 5 pickups, in the form of Universal Orbs or Ammo.
- Tempered Benison: Shockwaves create 5 Armor Motes that grant +450 temporary Armor. Max 5.
- Seismic Impact: Cogron Tauron Strikes enable their shockwave effect for the next 4 aerial Melee slam attacks.
Vazarin
- Nidri Tauron Strike: Summon forth Nidri from the Void and plant the noble staff into the ground, creating a titanic splash of water that becomes a lingering vortex. 50% of damage dealt to enemies caught in the vortex is also inflicted upon all other enemies within it.
- Rift Waters: Vortex strips enemy Overguard 25% per second.
- Eroding Rapids: Vortex applies 100% status vulnerability to all enemies within it.
- Deathless Currents: Vortex heals allies for 250 health/s. Downed players inside the vortex will be instantly revived, and dead players will be resummoned.
- Swelling Deluge: Increase vortex duration to 40s.
Tektolyst Artifact Upgrades
Tektolyst Artifacts grant additional buildcrafting options that can bolster your Operator, Amp and Tauron Strike! Each Artifact has six Mod slots and one Arcane slot to further empower your Warframe and Operator.
Your active Focus School determines which Tektolyst Artifact is equipped. You can upgrade your Artifact by navigating to the Equipment tab in the Focus Menu and select “Upgrade”.
Image Description: Screenshot of the Tektolyst Artifact Upgrades UI. In the center is the Arcane Zid-an Asheir and from left to right there are six mods equipped: Da-Ren, Esti Vel-Ikha, Hok-Kaal, Lorun-Tash, and Kaal-zidi.
Tektolyst Artifact Mods
There are four Mods per Focus School that can be used on any Tekolyst Artifacts, displayed with the maximum Mod Rank. Certain Mods feature unique interactions between other School’s, including bonuses for each Mod from a unique School.
These Mods can be equipped onto any and all Tektolyst Artifacts, regardless of their School association. For example, you can equip the Madurai Sil-Tabol Mod onto Naramon’s Vexoric Artifact.
Stats below are shown at max rank.
Madurai
- Sil-Tabol: +60% Amp Status Chance. +15% Status Damage for each Vazarin School Mod.
- Ubri-Kaneph: +60% Damage to Amps. +10% bonus for each Mod from a unique School.
- Hayan-Dabor: +60% Amp Multishot.
- Vikla-Safor: +30% Amp Fire Rate. +30% Amp Ammo Efficiency.
Naramon
- Omn-Evi: +60% Amp Critical Chance. +10% Amp Critical Damage for each Zenurik School Mod.
- Metem-Erun: Increase Operator Sprint Speed by 30%. +5% bonus for each Mod from a unique School.
- Evir-Ti: +60% Operator Jump Height.
- Hok-Kaal: After using Void Mode, the next Amp attack deals x3.0 bonus damage (cooldown 5s).
Zenurik
- Vik-Anam: +30% Maximum Amp Energy. +5% Amp Energy Regen Rate for each Madurai School Mod.
- Empazu-Shol: +12% Tauron Strike Initial Charge. +2% bonus for each Mod from a unique School.
- Esti Vel-Ikha: Increased maximum Void Sling distance by 30%. +10% Void Sling radius for each Mod from a unique School.
- Sey-Taph: +30% Void Sling Efficiency.
Vazarin
- Da-Ren: +300 Operator Shields. +30 bonus for each Unairu School Mod.
- Metem-Hakh: +30% Operator Health & Shields. +5% bonus for each Mod from a Unique School.
- Lorun-Tash: +400 Operator Armor.
- Yar Dal: +300 Operator Health.
Unairu
- Kaal-zidi: +30% Void Mode efficiency. +5% Movement Speed in Void Mode for each Naramon School Mod
- Lashta-Vak: Void Sling breaks Containers within 12m. +2m bonus for each Mod from a Unique School.
- Talsek-An: Gain knockdown immunity. When knockdown is blocked, enter Void Mode for 3s (cooldown 7.5s).
- Ulashta-Shol: -60% Transference Static duration.
How To Obtain Tektolyst Artifact Mods
Players can obtain these new Mods in a variety of ways:
- Earned from The Perita Rebellion Encounter droptables (every 3 Encounters), and dropped from Commandeered Primes in The Perita Rebellion missions via The Dark Refractory.
- Exchanged for The Perita Rebellion resources via Marie Leroux’s [Browse Wares] shop in La Cathédrale.
Tektolyst Artifact Arcanes
Find five new Arcanes that can be equipped onto any Tektolyst Artifact.
Stats below are shown at max rank.
Zid-An Asheir
6% Status Chance for all Warframe weapons for each enemy hit with a Tauron Strike, up to 300%. Buff lasts for 30s.
+18% Tauron Strike Initial Charge.
Zid-An Haras
48% Warframe Ammo Efficiency for 30s after executing a Tauron Strike. +18% Amp Ammo Efficiency.
Zid-An Sek-Eel
Gain invisibility for 30s after activating a Tauron Strike. +9% Tauron Strike Charge Rate.
Zid-An Uskos
On Operator and Tauron Strike Kill: 2.4% Heat Damage for Primary Weapons for duration of mission, max 250%.
Zid-An Osbok
Void Slings strip 30% of enemy Overguard. When Overguard is stripped: +3x Amp Critical Damage for 15s.
How To Obtain Tektolyst Artifact Arcanes:
Players can obtain these new Arcanes in a variety of ways:
- Dropped from Commandeered Primes in The Perita Rebellion missions on the Steel Path via The Dark Refractory.
- Exchanged for The Perita Rebellion resources via Marie Leroux’s [Browse Wares] shop in La Cathédrale.

Image Description: Two remastered Operators stand in strong poses side by side. Featuring the updated hairstyles with a more realistic look and new makeup options with the Operator on the left sporting a bold red and white look, while the right has smokey and gold metallic.
OPERATOR & DRIFTER REMASTER
It’s December 03, 2015 in London, Ontario Canada. The DE team is up late glued to their screens watching players react to the reveal of… the Operator! A complete overflow of shock and delight with equal amounts of excited confusion are expressed upon meeting the Operator, a name that up to that point had been heard but not seen. A momentous moment in Warframe’s history that launched the many chapters that have followed since.
The best part? We’ve been able to relieve that moment over again throughout the years as new players join and share their reactions with us. The same can be said about Drifter’s arrival in The New War! Both keystones in the Warframe experience.
Now, 10 years since that first major reveal, a new groundbreaking chapter is here with the Operator at the heart of it all once again. So let us reintroduce you to the Operator and Drifter! With a significant remaster that has gloriously upgraded every feature, we are thrilled for you to continue the journey on with this improved version that comes coupled with several new customizations, appearance options and overhauled UI that takes the character customizing experience to the next level.
What to Expect on Login
Players that have unlocked their Operator or Drifter will receive a prompt on login explaining that we have released this rework! Fear not, your customizations have not been reset. Your existing looks for both Operator and Drifter have been ported over with our best approximation using the new setup.
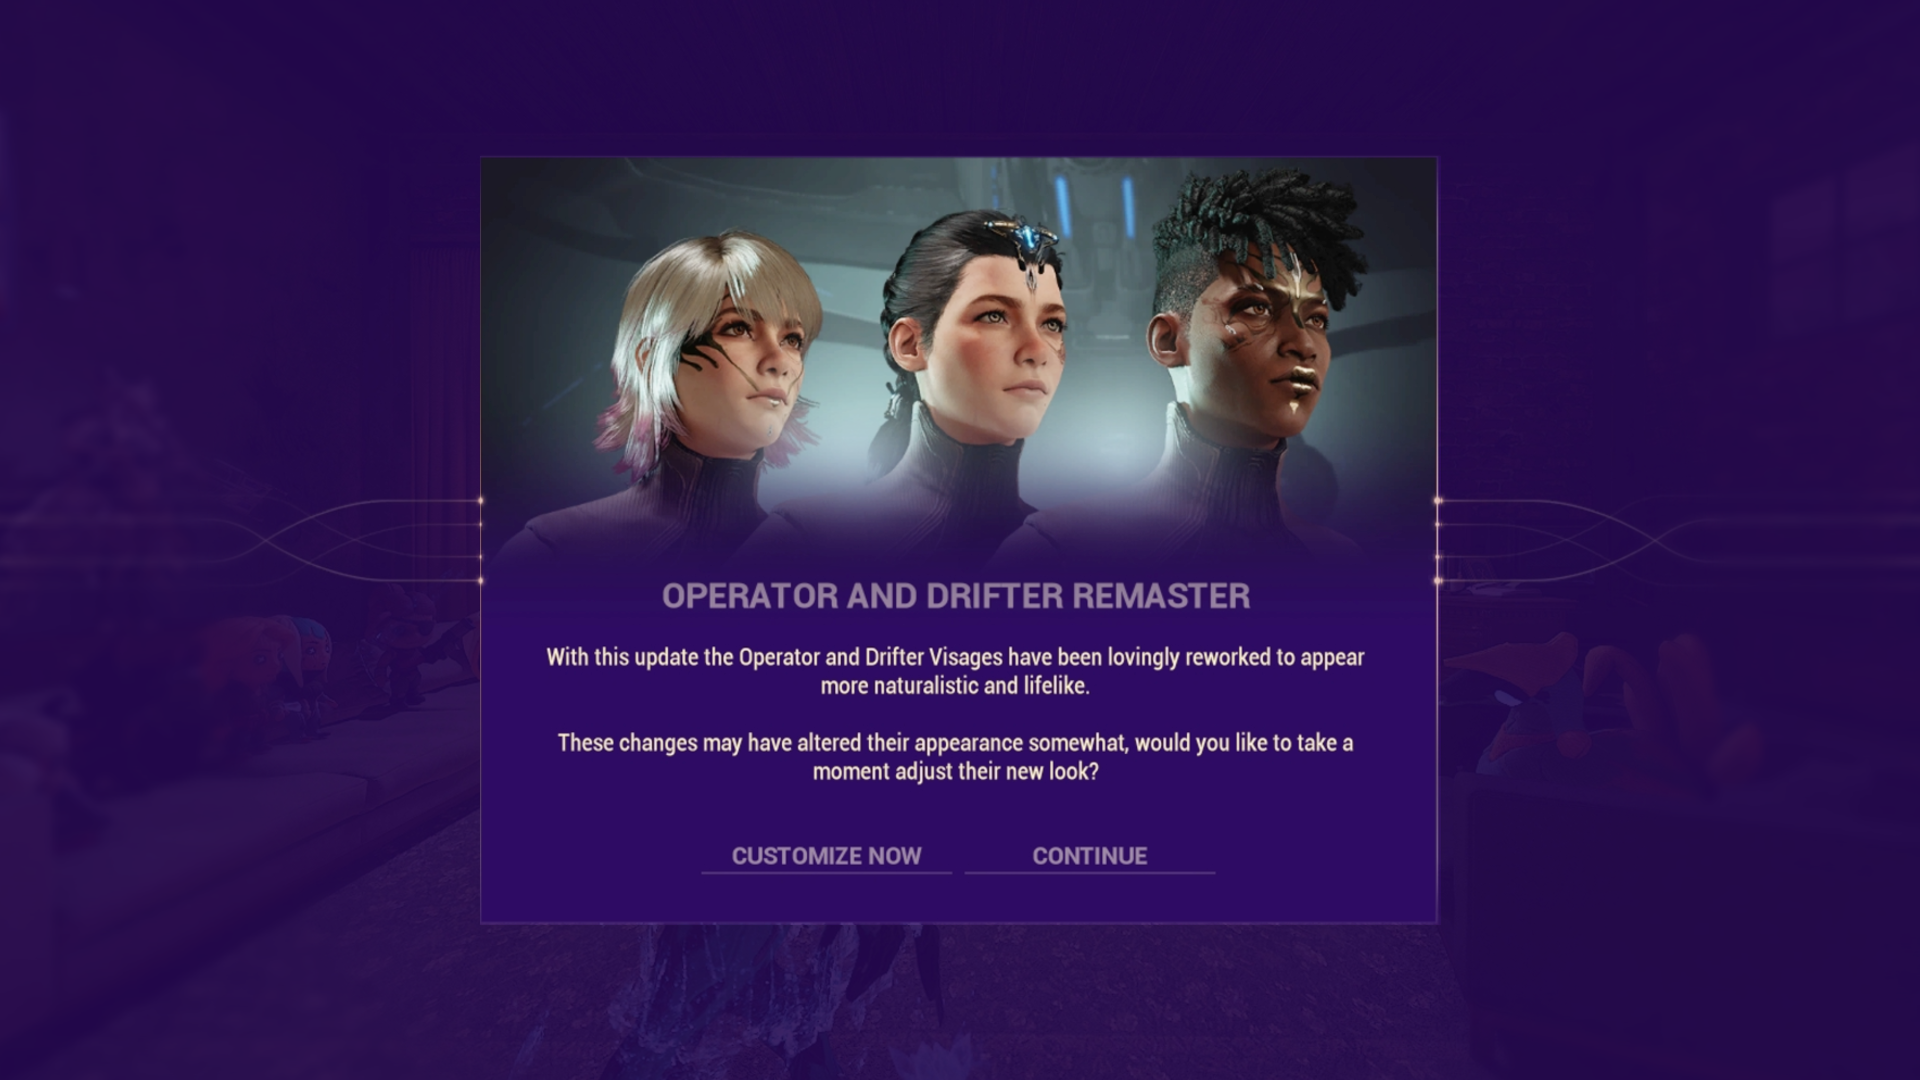
Image Description: Screenshot of the Operator and Drifter Remaster screen that will appear on login. Three Operators with varying makeup, hairstyles, and complexions are displayed in addition to the two choices of “Customize Now” or “Continue”.
We understand the connection to your character (especially after 10 years!) and our team crafted this adaptation to the best of our ability. That being said, this is not a one-to-one transition! While the remaster offers more naturalistic and lifelike customization, your Operator and Drifter may need some fine tuning.
Players should expect some changes to hair and complexion, and we highly recommend selecting “Customize” to apply these adjustments straight away. If you’d rather go right into gameplay, hit “Continue” and you can return to your Operator and Drifter at a later time!
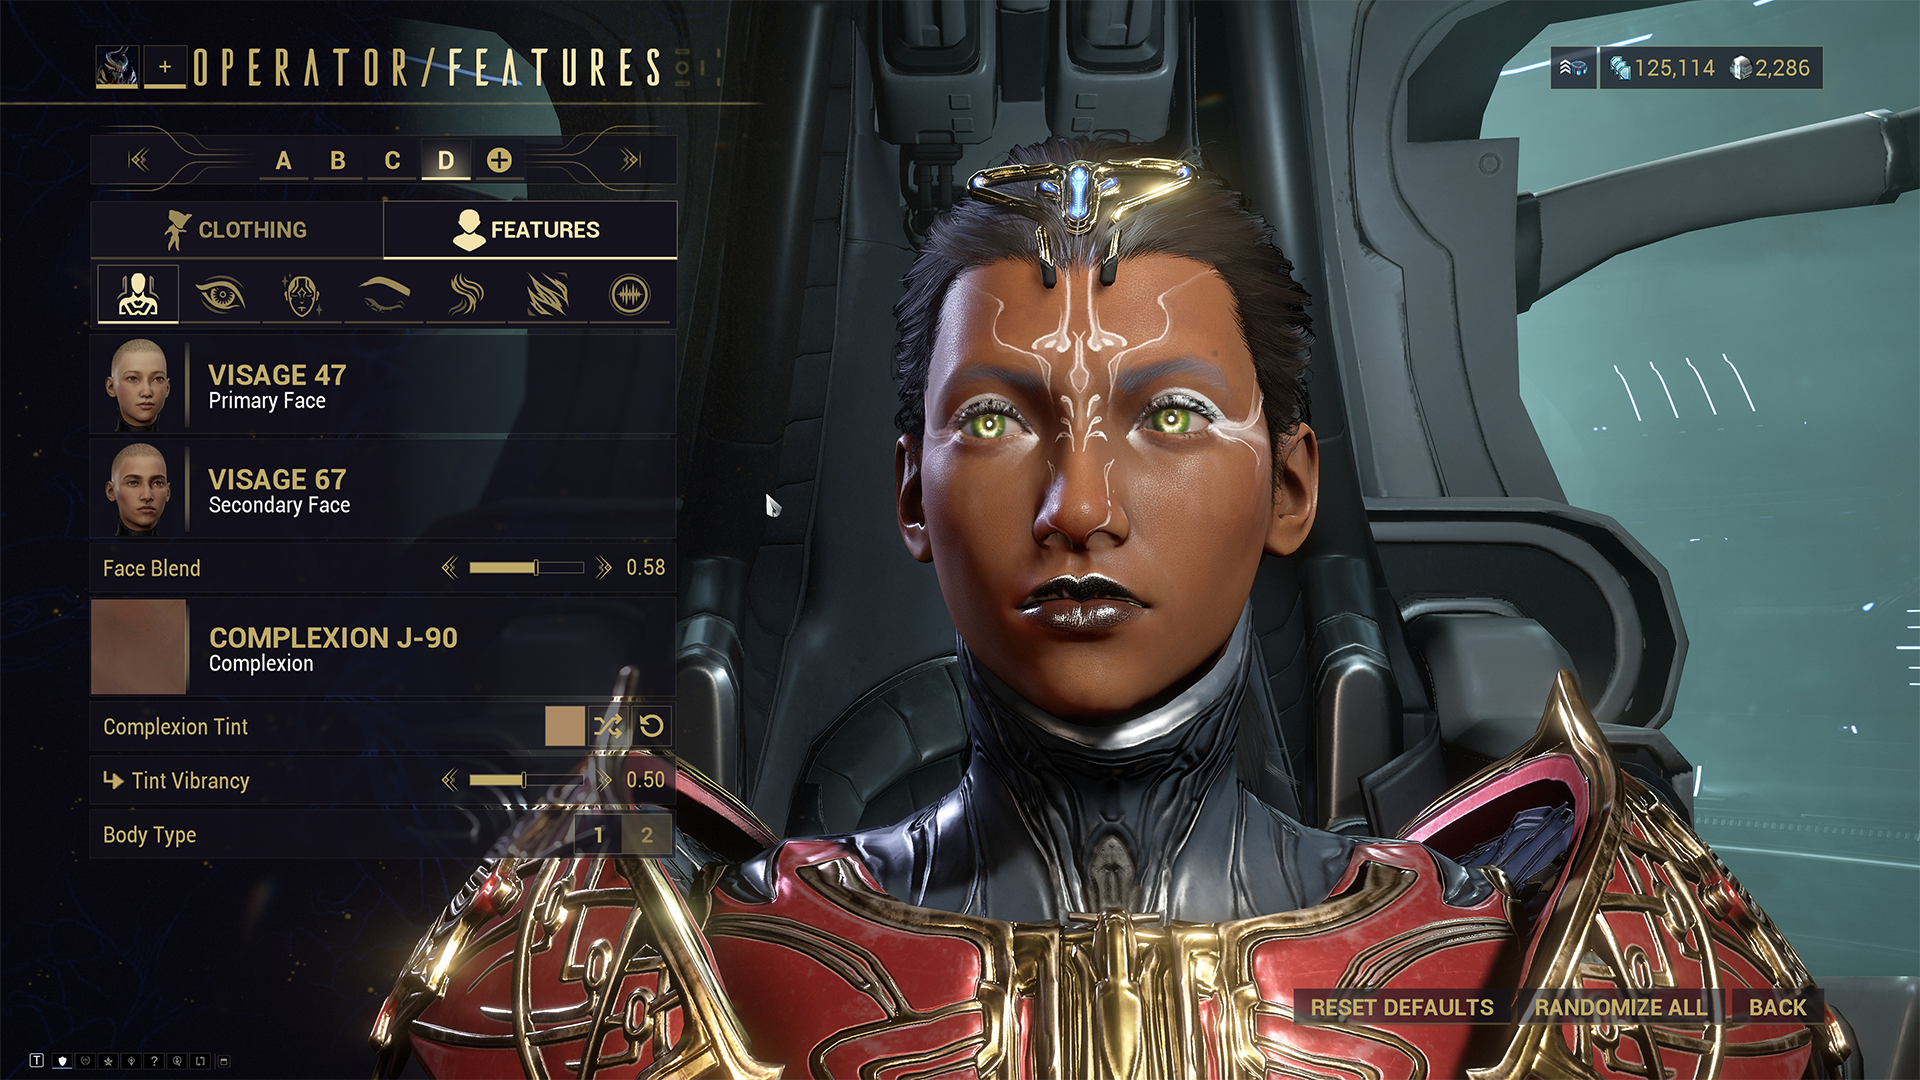
Image Description: Screenshot of the updated Operator Features UI displays options for primary and secondary faces, complexion, and body type. An Operator with a gold headpiece, light green eyes, white makeup, and chestnut complexion stares off into the distance in red gilded armor.
New Appearance UI
We have updated the Appearance UI to make customizing your Operator and Drifter a breeze.
-
The Appearance Configs now incorporate your Hair, Somatics (Operator), Visage Inks (Drifter) and Makeup customizations in addition to Clothing.
-
The config bar also now persists across all the clothing and feature options so that you have access to your outfits throughout your customization process!
- Previously, you could only swap between configs while in the Clothing tab.
- Now, you can seamlessly swap between configs regardless of where you are in the features options to better coordinate your Operator/Drifter's features with your OOTDs.
-
The config bar also now persists across all the clothing and feature options so that you have access to your outfits throughout your customization process!
- Both the clothing and features UI now have a sub-tab bar to easily switch between the many options available.
- Added “Reset Defaults” and “Randomize All” buttons. When used, resetting to default or randomizing applies to whichever tab you are in (Clothing or Features).
Improved Lighting for Operator/Drifter Customization
We have also relit the Orbiter Transference Room while you are in the Operator/Drifter customization UI! It now matches the experience in the Backrooms with more realistic lighting.
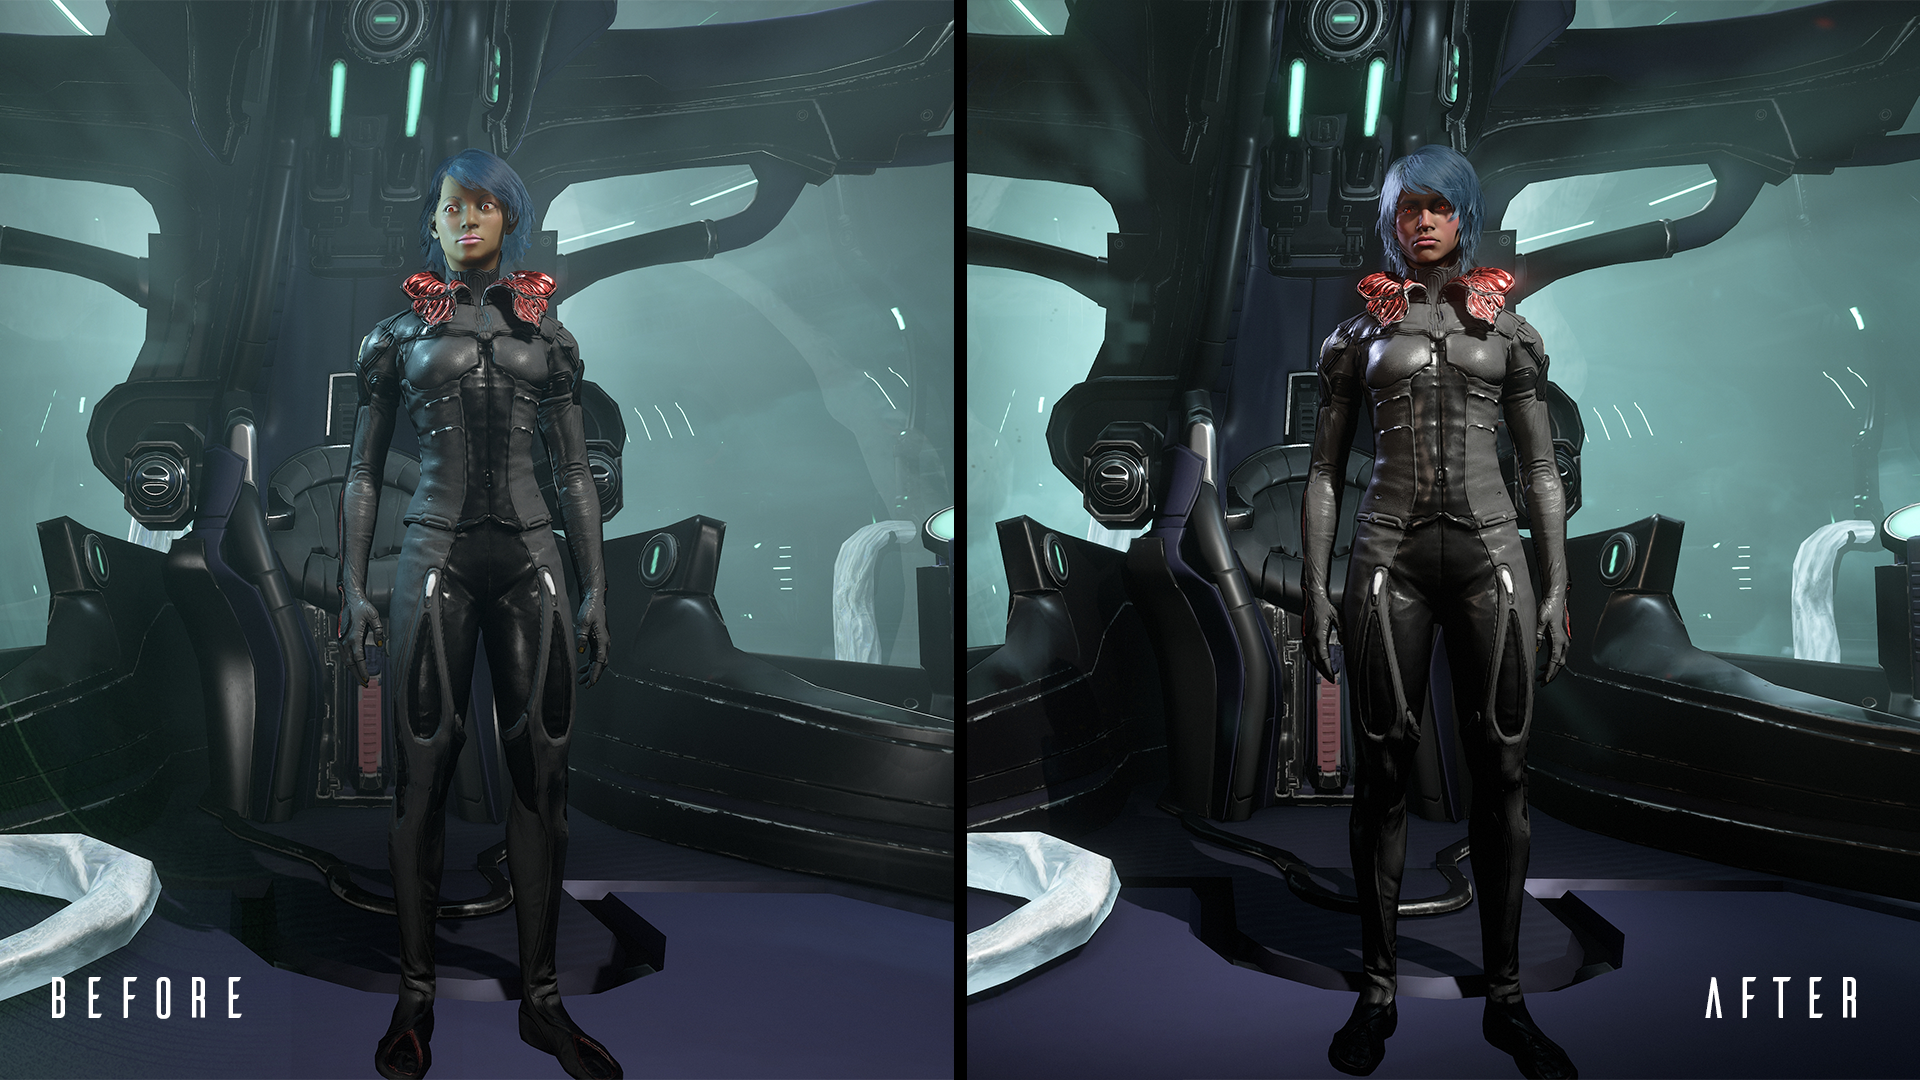
Image Description: A side-by-side comparison of an Operator in the Transference Room during customization, before (left) and after (right) the new lighting update. The after shows more realistic lighting in comparison to before, with improved contrast and shadows.
What you see in the Orbiter is now more accurate to what you see in missions that have GI lighting. Additionally, this real time lighting improves the realism of certain textures (metallics for example), meaning that you may have to tweak your current clothing and accessories to your liking.
We essentially hooked you up with a sick ring light setup to better customize and screenshot the drip!
Remastered Faces
From forehead to chin, ear to ear, brand new remastered faces are here! Your Operator and Drifter each have 10 faces to choose from offering a variety of facial features that can be blended together to create any number of desired variations.
Primary & Secondary Faces Blending
You can now blend female and male presenting faces!
Previously, primary faces determined which secondary faces you could blend it with. So if you selected a female-presenting primary face, only the female-presenting secondary faces would be available to choose from and blend with.
Now, you can select any of the Primary and Secondary faces and blend them together.
Complexion
You can now select from 14 different complexions (including default) to change the base tone, texture and other skin features (freckles, pigmentation, etc.)
Previously, complexion was solely determined by the Primary Face. Now, you have the ability to select those features separately and apply them to any of the faces.
Once you have selected your complexion, you can select the Complexion Tint from the following palettes, which offer a far wider range of Tints than before:
- Natural Tones: 108 natural complexion tones for every day looks!
-
Legacy Tones: Complexion tones used to match tints from the premaster palettes.
- Both the legacy natural and Refacia Kit* (if owned) tones are available in this palette. Keep in mind that the overall improvement and overhaul of skin won’t be an exact match to pre-remaster tones and will require some playing around with the new customization features to land on a look you like!
- Cool Tones: 108 cool artificial complexion tones, including imitation Orokin Blue. This palette appears if you own the Refacia Kit.
*As a reminder, the Refacia Kit can be acquired from any Focus School’s Represent store for Focus Points!
The blend between complexion and tint can be adjusted using the Tint Vibrancy slider.
Body Type
We have completely decoupled faces from determining body type!
Previously, Primary Face would determine your Operator and Drifter’s body type. An obviously limiting dependency that required you to find a balance between desired facial features and the associated body type.
Now, you can select Body Type independently from Faces in the “Head” tab. Choose from Body Type 1 (male presenting) and Body Type 2 (female presenting).
Remastered Eyes
Eyes have received entirely new textures for an improved and more realistic appearance. Eye Glow has also had a glow up (heh) with a new look that could light up a room.
Additional customizations are also here to really make those windows to the soul pop!
-
The UI now shows both color tints side by side, instead of listed independently:
- The first tint determines the “outer” color, while the second determines the “inner”.
-
Eye Glow now has two emissives tints.
- The first applies to the iris and the center of the pupil and softly pulses.
-
The second applies over the entirety of the eye (pupil, iris & scelera).
- Meaning the second emissive is layered over the first. So if you are looking to achieve a balance between the two, where the pulsing effect is most visible, use a lighter color in the first and a darker in the second.
- Added “Glow Strength” slider to set the intensity of the Eye Glow effect.
Remastered Hair
Luxe lustrous locks are here! We have completely remastered every single hairstyle for Operators and Drifters with the help of the wonderful people at Sumo Digital.
We’ve improved hair from top to bottom with completely new textures, shader improvements and a more complex cloth sim setup to give it a more realistic look and feel.
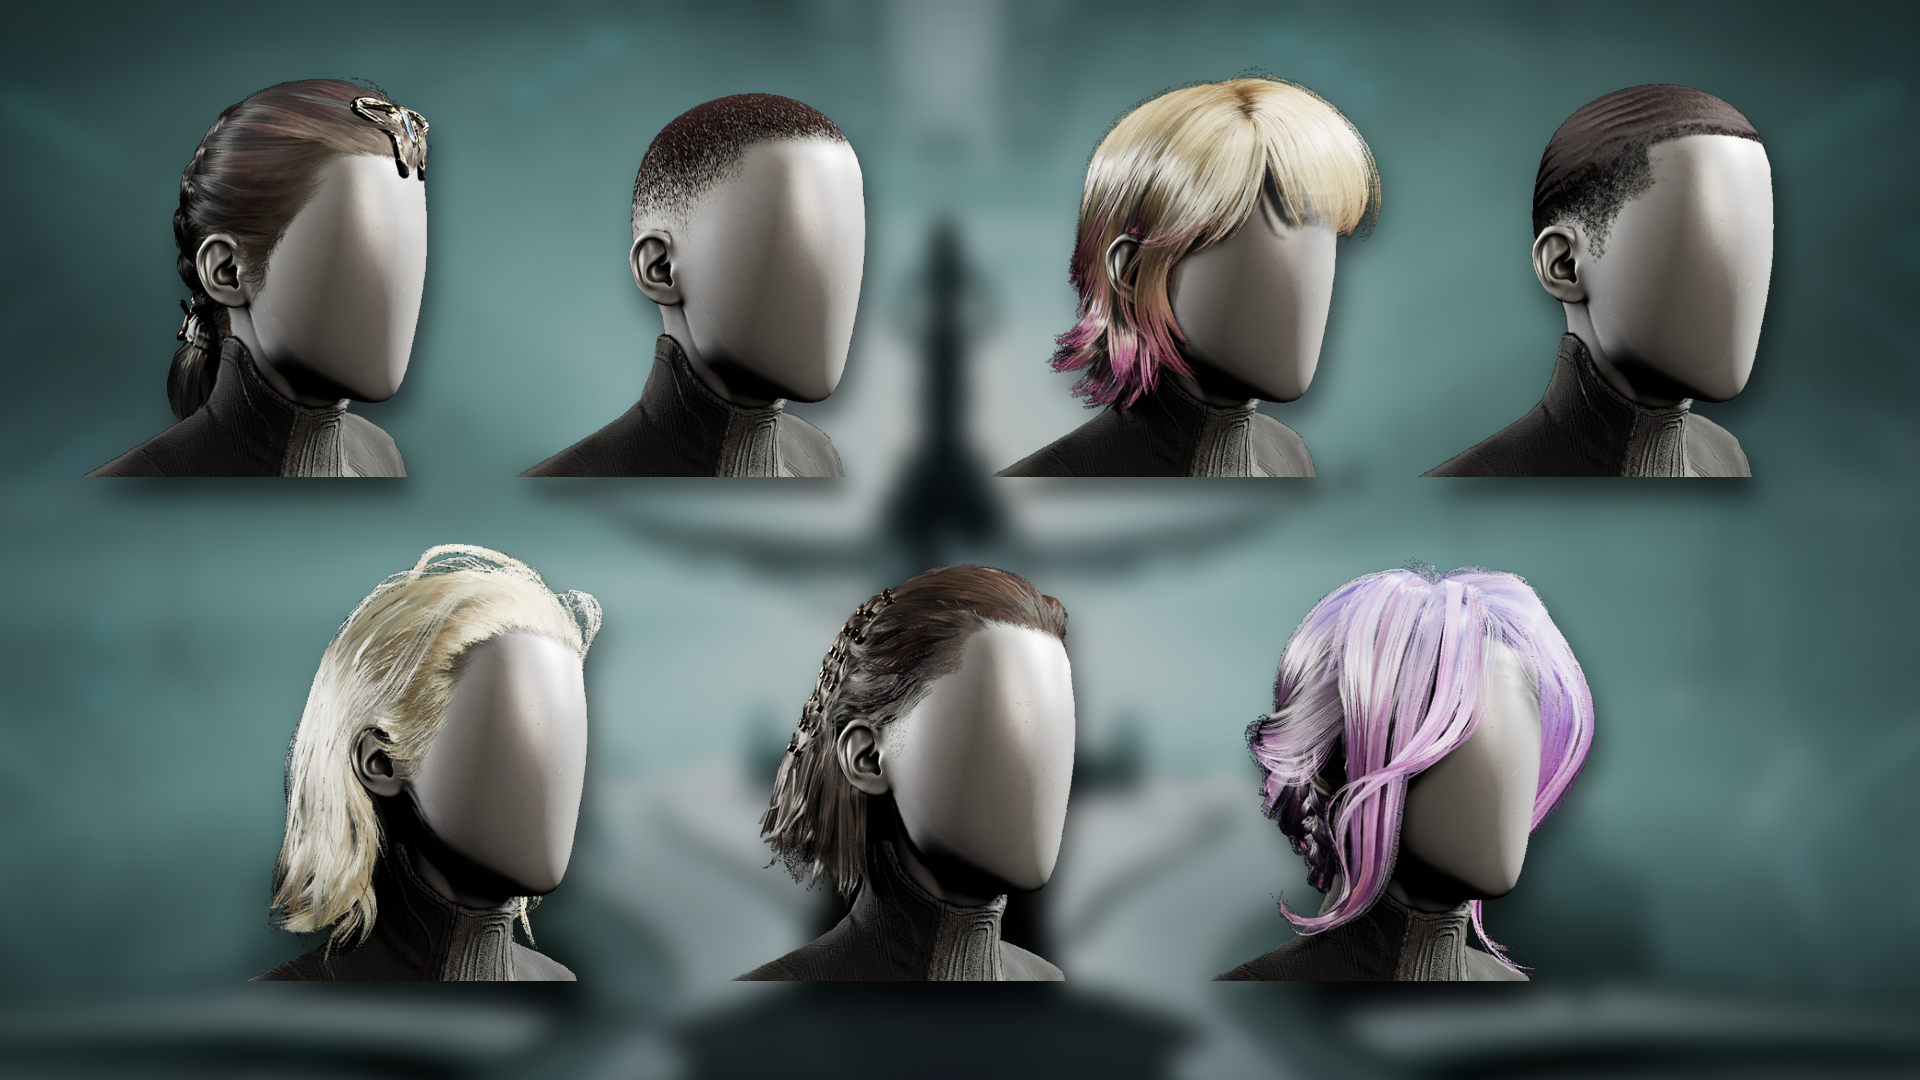
Image Description: Seven Hairstyles shown on mannequin heads spread across two rows. The first row features the Braid Headpiece, Cropped Buzz, Bob Bluntcut, Short Close, while the second features Lyon’s Hairstyle, Roathe’s Hairstyle, and Marie’s Hairstyle.
New Hairstyles
The following new hairstyles are available:
-
Free – available on login!
-
None: a proper bald option! Zero hair to be found, very bald.
- We moved the previous “None” buzzcut style into its own Hairstyle called “Cropped Buzz”
- Bob Bluntcut
- Braid Headpiece (featured in the TennoCon 2025 demo)
- Short Close
- Short Spiked
-
None: a proper bald option! Zero hair to be found, very bald.
-
For purchase – for Platinum!
-
The Devil’s Triad Hairstyles
- Marie’s Hairstyle
- Lyon’s Hairstyle
- Roathe’s Hairstyle
-
The Devil’s Triad Hairstyles
All of the previous, now remastered, hairstyles are also bundled into the Definitive Salon Pack which be bought from the Market.
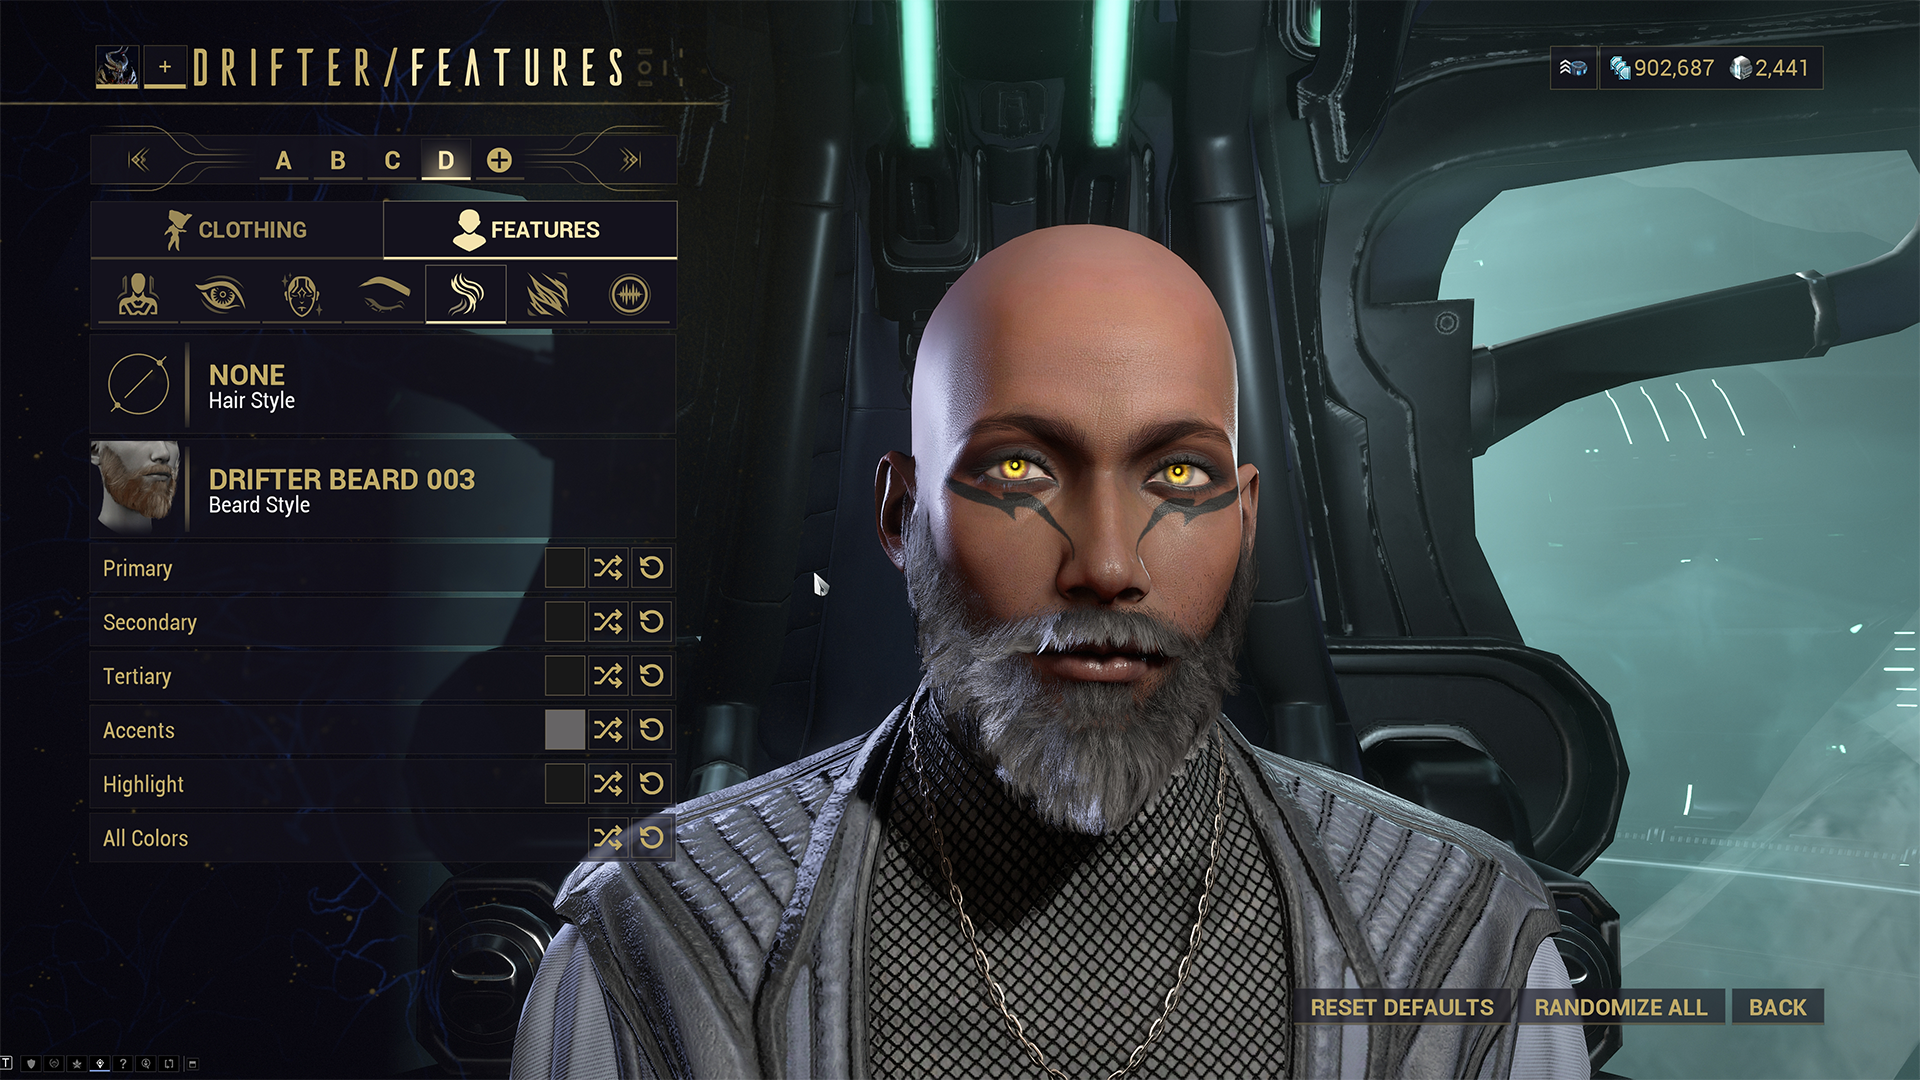
Remastered Beards (Drifter)
All beard styles have received the remastered treatment for elevated and more realistic looking facial hair.
We have also added a new beard style — achieve the ultimate lumberjack aura with Drifter Beard 003.
Improved Hair Color Customization
We have expanded your color customizing potentials with 5 color tints to the previous 3 for hair and beard styles. Embark on your dye journey and bring your Operator and Drifter to the next level with these tints:
- Primary
- Secondary
- Tertiary
- Accents
- Highlights
NOTE: With the inclusion of two color tints, some additional tweaking may be needed to achieve your pre-remaster look the way you desire.
Note on Color Customization for Beards:
The longer the beard, the more hair color tints apply! Previously, all beards would only take on the Primary color. Now, you can customize the longer beard styles using all of the tints (Drifter Beard 002 - 005).
The stubble beard style (Drifter Beard 001) remains Primary-only.
Additional Notes on Hair:
-
We’ve updated all Hairstyle names and categorized them based on their features to be more descriptive at a glance:
- Braid
- Bob
- Coiffed
- Crest
- Cropped
- Curls
- Midlength
- Short
- Tied Back
- Undercut
-
Removed the “Hair Part” toggle.
- The toggle only functioned with the original batch of hairs that were released with Operators in 2015. We haven’t supported function for hair parts with the later released hairstyles since and for that reason have decided to retire the toggle.
- Made overall improvements to the appearance of the Protoframe and other 1999 character’s Hairstyles on Operators.

New Feature: Eyebrows
There are 18 eyebrow styles to choose from (including default)! Frame your Operator and Drifter’s face with styles that range from 90s pencil brows to bushy beauty and everything in between. Tapered, arched, groomed or grown out, there are so many ways to completely change your Operator and Drifters aura.
You can further customize each style with the Brow Thickness slider and Eyebrow Color selector.
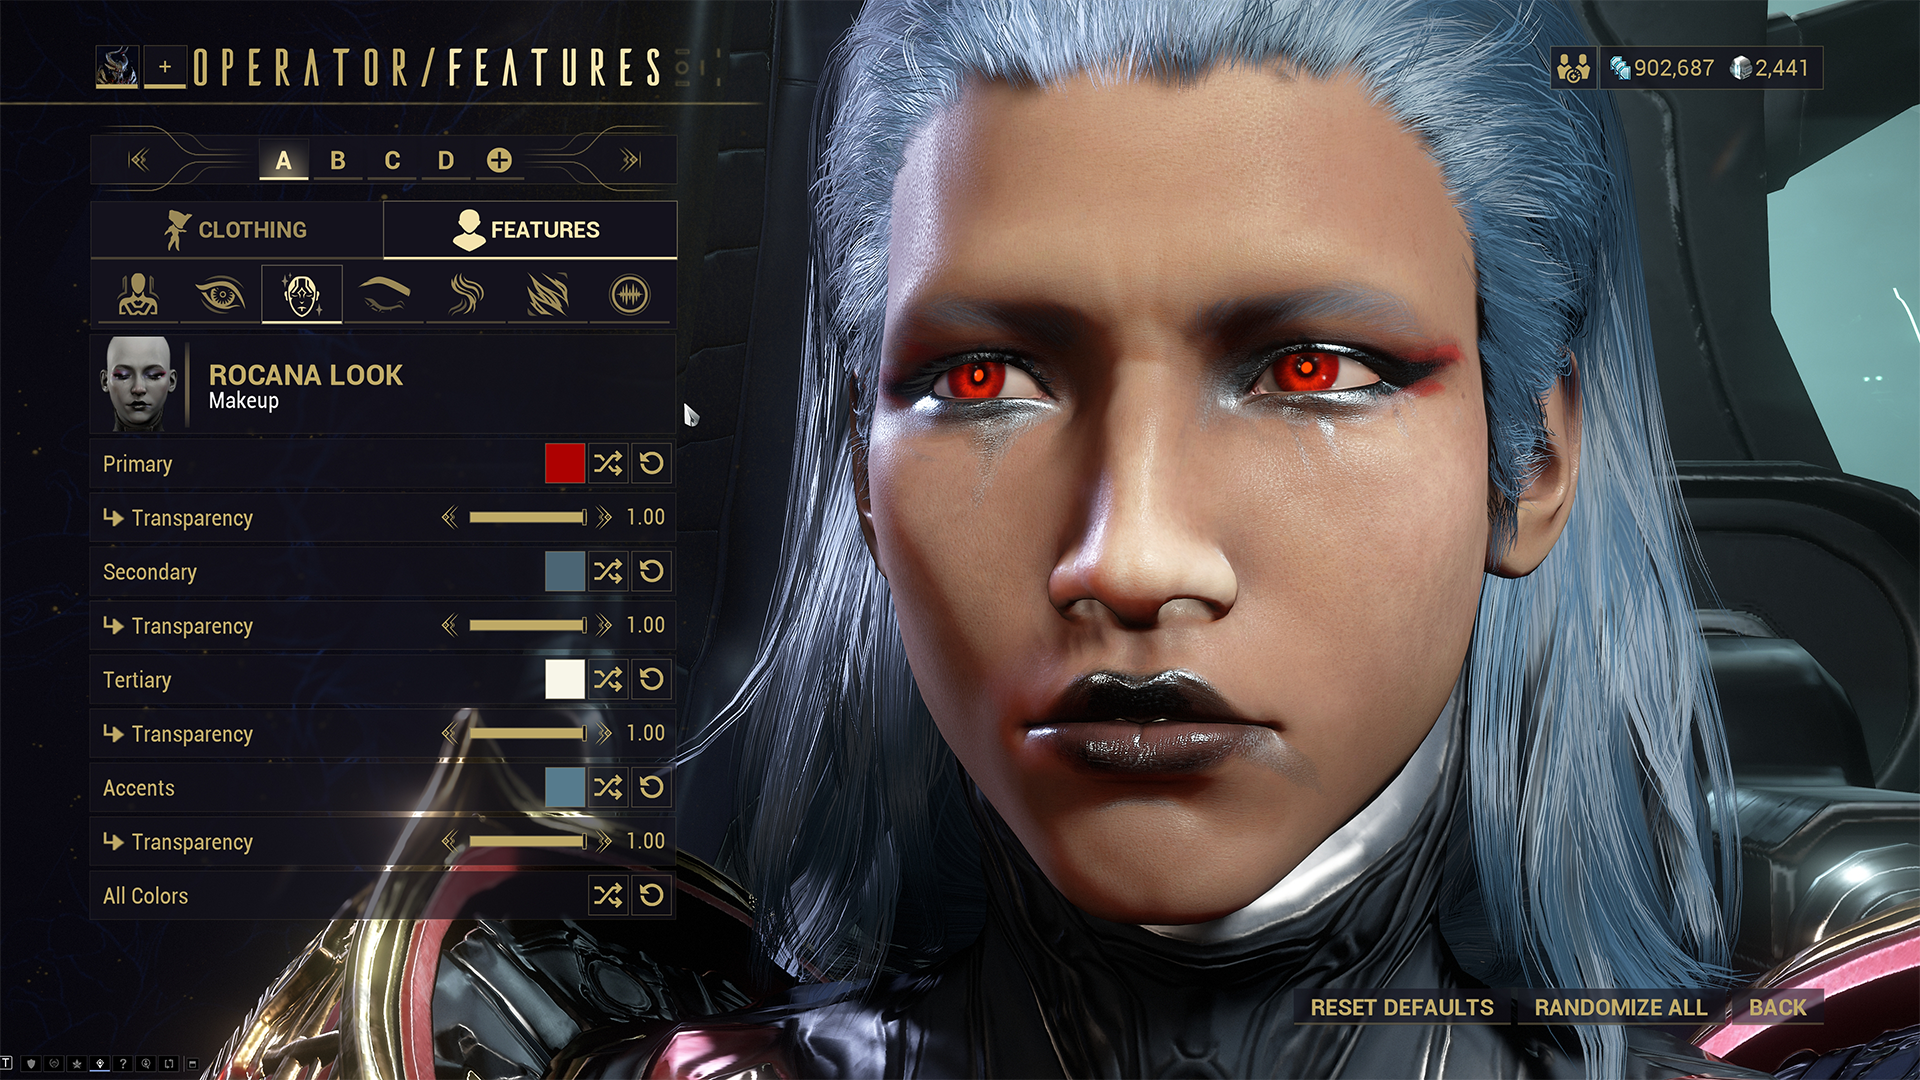
New Feature: Makeup
Origin System saving hero by day and MUA by night! Give your Operator and Drifter the gift of glam with looks that range from a subtle touch to full blown war paint that feature a mix of stunning matte, glossy, glittery and metallic* elements.
*Metallic makeup will appear more “matte” and dispersed if you have Anti-Aliasing disabled.
The following makeup looks are available for free:
- Balika Look
- Banva Look
- Kathaya Look
- Pithata Look
- Rocana Look
- Roshaka Look
- Sahoda Look
- Tarunya Look
- Virama Look
- Yotaka Look
Each Makeup Look is fully color customizable with the ability to adjust the transparency of each color tint.
Makeup can be combined with Visage Inks (Drifter) and Somatic Markings (Operator) to create even more unique looks!
Focus School Makeup Looks
Paint the Tenno Ways with brand new Focus School-themed makeup looks for your Operator and Drifter!
For those new to the Focus system, the Represent store is unlocked once you have unlocked and fully ranked each node in a Focus School*.
Unairu:
- Unairu Paint A
- Unairu Paint B
Zenurik:
- Zenurik Paint A
- Zenurik Paint B
Vazarin:
- Vazarin Paint A
- Vazarin Paint B
Naramon:
- Naramon Paint A
- Naramon Paint B
Madurai:
- Madurai Paint A
- Madurai Paint B
*As explained in the Focus School Expansion section, the Represent store’s unlock requirements are unchanged. Players do not need to complete the Tauron Focus Nodes to gain access to the Represent Store.
Remastered Markings (Operator)
Each Operator Somatic Marking has also received the remaster treatment! We’ve also added a new style called Somatics Zz-70 as well as a default option.
Additional Operator/Drifter Changes
-
Signas can now be equipped on Operators!
- Go to Operator Appearance settings > Clothing > Attachments > Signa > Select the Signa to equip and adjust the Y Offset and colors to your liking.
- We added the ability to equip them on Drifter in The Vallis Undermind, but due to issues with setup on Operators, this feature didn’t make it into that update. Now, both Operators and Drifters can wear Signas with style!!
-
The following Operator Suits, Masks, Pauldrons, Graves and Apparel have all been converted to be able to be equipped on Drifter.
-
Purchasing or crafting any of these customizations will now include both the Operator and Drifter variants! For those of you that already own these items, the Drifter versions will be added to your inventory upon login:
- Emissary Collection
- Koppra Collection
- Maduka Collection
- Outrider Collection
- Kubrodon Ventkid Collection
- Varida Collection
- Vent Pobber Ventkid Collection
- Vent Rat Collection
-
Purchasing or crafting any of these customizations will now include both the Operator and Drifter variants! For those of you that already own these items, the Drifter versions will be added to your inventory upon login:
- Every single outfit and accessory has been adjusted to better fit the new models, with some minor revisions to improve certain pieces.
-
Made the following changes to Sigil customizations:
- Added a secondary color channel to further customize Sigils with VFX. The primary color is dedicated to the static channel, while the secondary changes the VFX.
- The “Alpha” slider has been changed to “Transparency”.
- The remaster also applies to Operator NPCs (including Tenno in cutscenes and our “Hey Kiddo” doppelganger).
- Hovering over Suit color tints will now highlight them on your Operator/Drifter, so you know exactly where that color will apply.
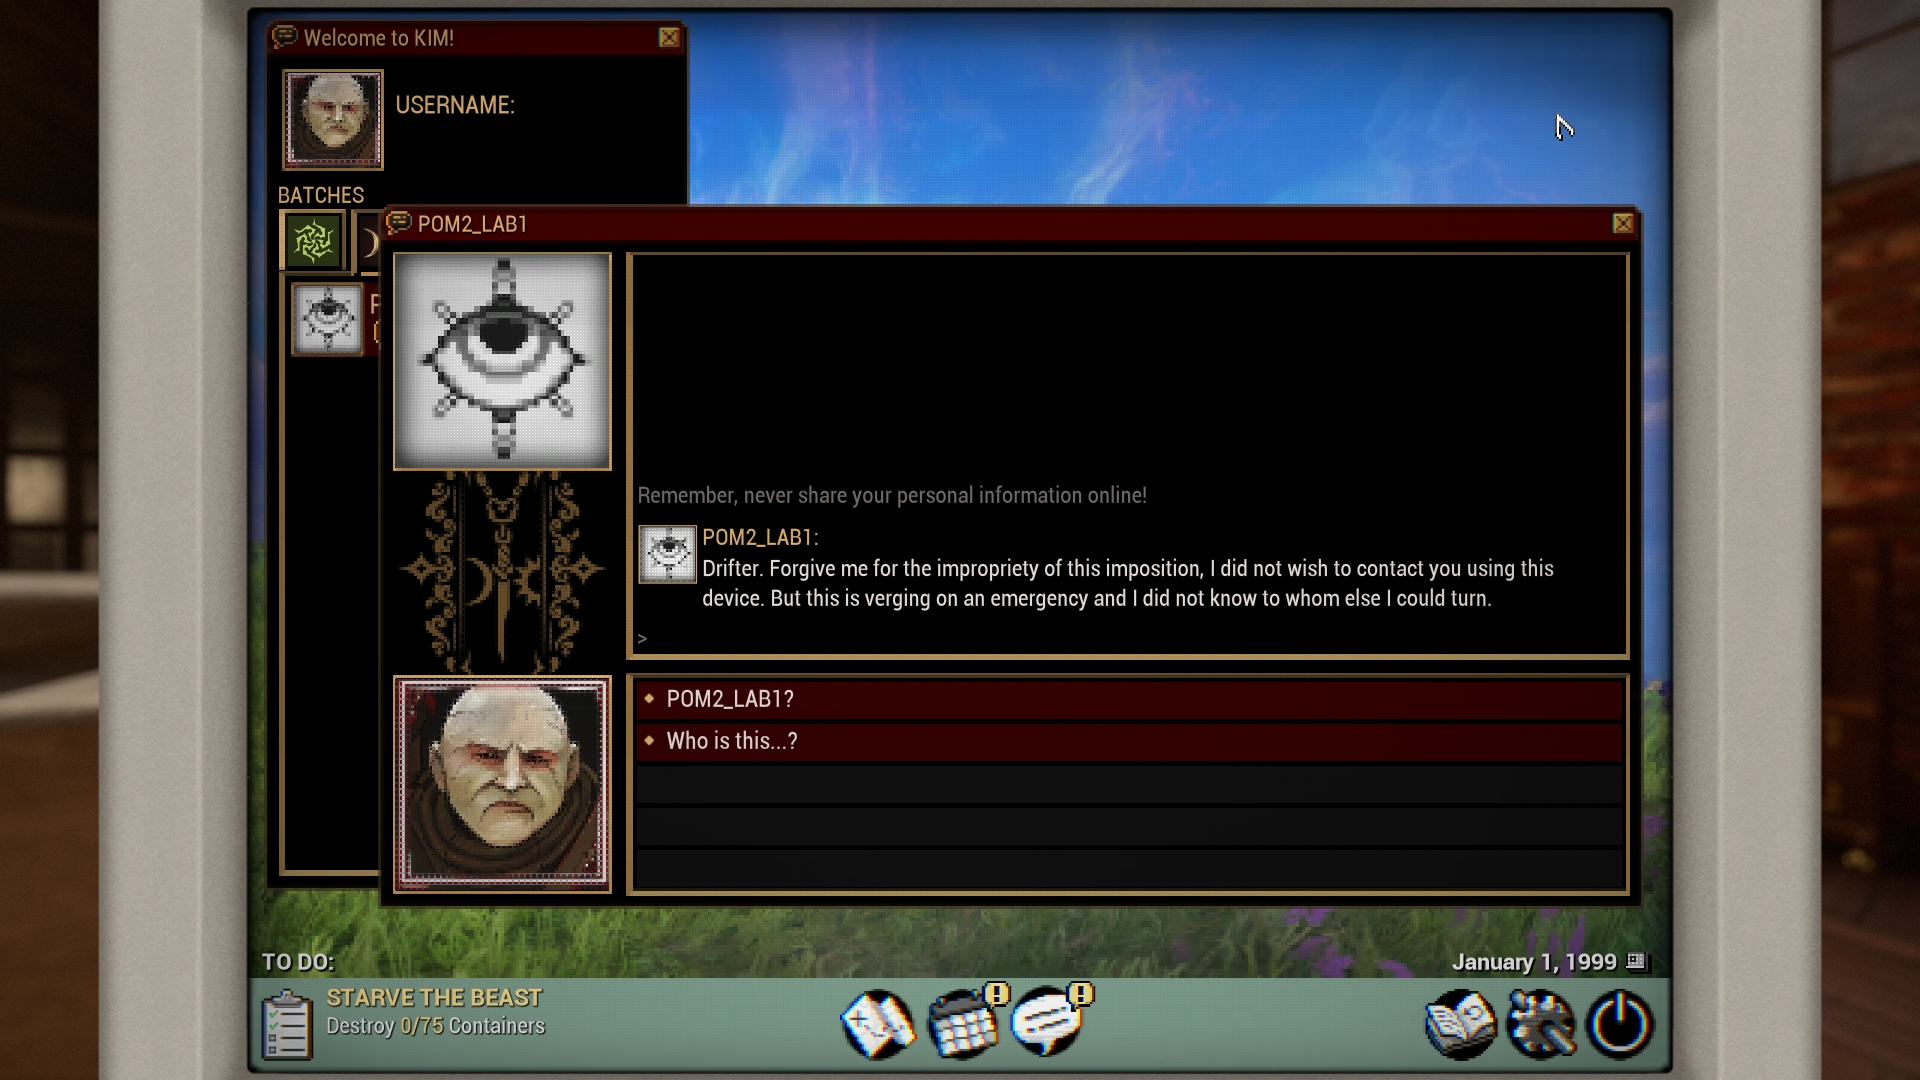
Image Description: Screenshot of the Kinemantik Messaging System UI displaying a conversation with the alias POM2_LAB1.
KINEMANTIK MESSAGING SYSTEM EXPANSION: THE DEVIL’S TRIAD
A new tab has appeared in the Kinemantic Messaging System on your POM-2!
In this appropriately-stylized interface you can unearth the secrets of the Devil’s Triad: Roathe, Lyon, and Marie! Loid has given them access to the terminal in the Sanctum Anatomica, for you to converse with (or court) them to your heart’s content.
Requirements
Players must complete The Old Peace quest to talk to The Devil’s Triad via the POM-2.
There are no other requirements, but we recommend getting to know the Entrati of Deimos if you haven’t already. You may see your efforts pay off as you further engage with this system.
Chemistry and Ranks
Similar to the Hex, you earn favour with The Devil’s Triad through Chemistry. With this batch, Chemistry can only be earned through KIM conversations. Forget gifting — Roathe, Marie, and Lyon shan’t be swayed by whatever trifles you can offer them.
While we have carefully balanced the Chemistry output to ensure players can rank up with the conversations available to them, our recommendation is to engage with this new KIM expansion with the “Play All Kim Conversations” setting toggled on.
As a refresher, earning Chemistry will progress your standing with each Protoframe through the following Ranks:
- Neutral
- Friendly
- Liked
- Trusted
- Close
- Best Friend (platonic) / Loved (dating)
Like with The Hex, if you want to date a Protoframe, you can confess your feelings to them either in a KIM conversation or by visiting them in La Cathédrale. The requirements to unlock this option (and have them reciprocate) vary per character.
If you’ve decided to try a new paramour, you can end your relationship with your soon-to-be Ex in La Cathédrale as well.
Lyon’s Chemistry Rank
If you approach Lyon Allard in La Cathédrale, you may have difficulty in getting him to speak with you. This reticence also applies to the KIM system — until you’ve proven yourself a worthy ally, you will be duly ignored.
Once you’ve reached Liked rank with Marie Leroux, he will deem you an acceptable conversation partner (and also allow you to buy his wares). Unlocking Lyon in the KIM will immediately increase his rank to Liked as well.
Resetting via the Digital Grimoire:
Another new icon has appeared in the POM-2, next to the Settings: the Digital Grimoire!
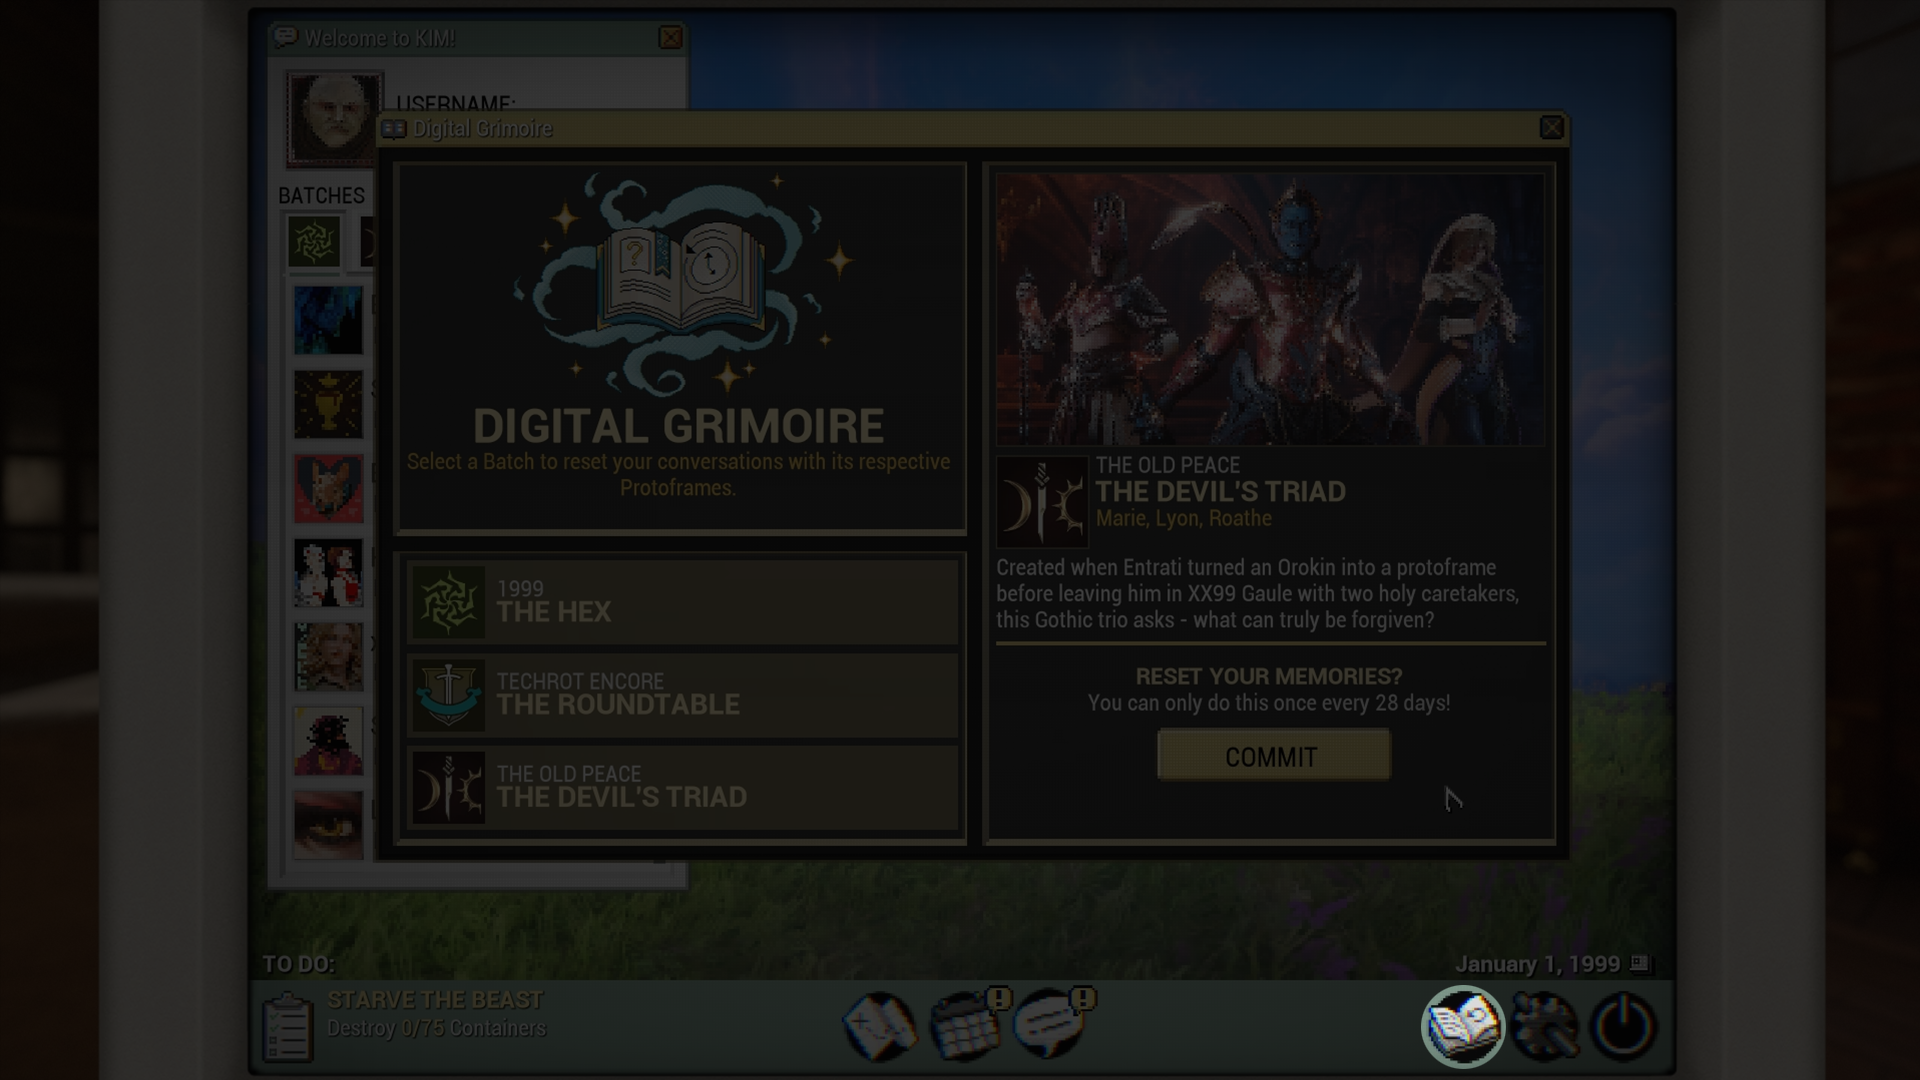
Image Description: Screenshot of a darkened POM-2 UI highlighting a new icon next to the Settings. This new icon is the Digital Grimoire and appears as an open book.
This new window serves as the home for Conversation Resetting — not only for The Devil’s Triad, but other Protoframe Batches as well! Gone are the pop-ups once the 1999 Calendar rotates. Instead, players can now venture to the Digital Grimoire and initiate a memory reset whenever they please.
Resetting Memories comes with a 28 Day cooldown that applies per Protoframe batch. (ex: if you reset The Roundtable, you will have to wait 28 days before wiping their memories again, but The Hex and The Devil’s Triad are unaffected.)
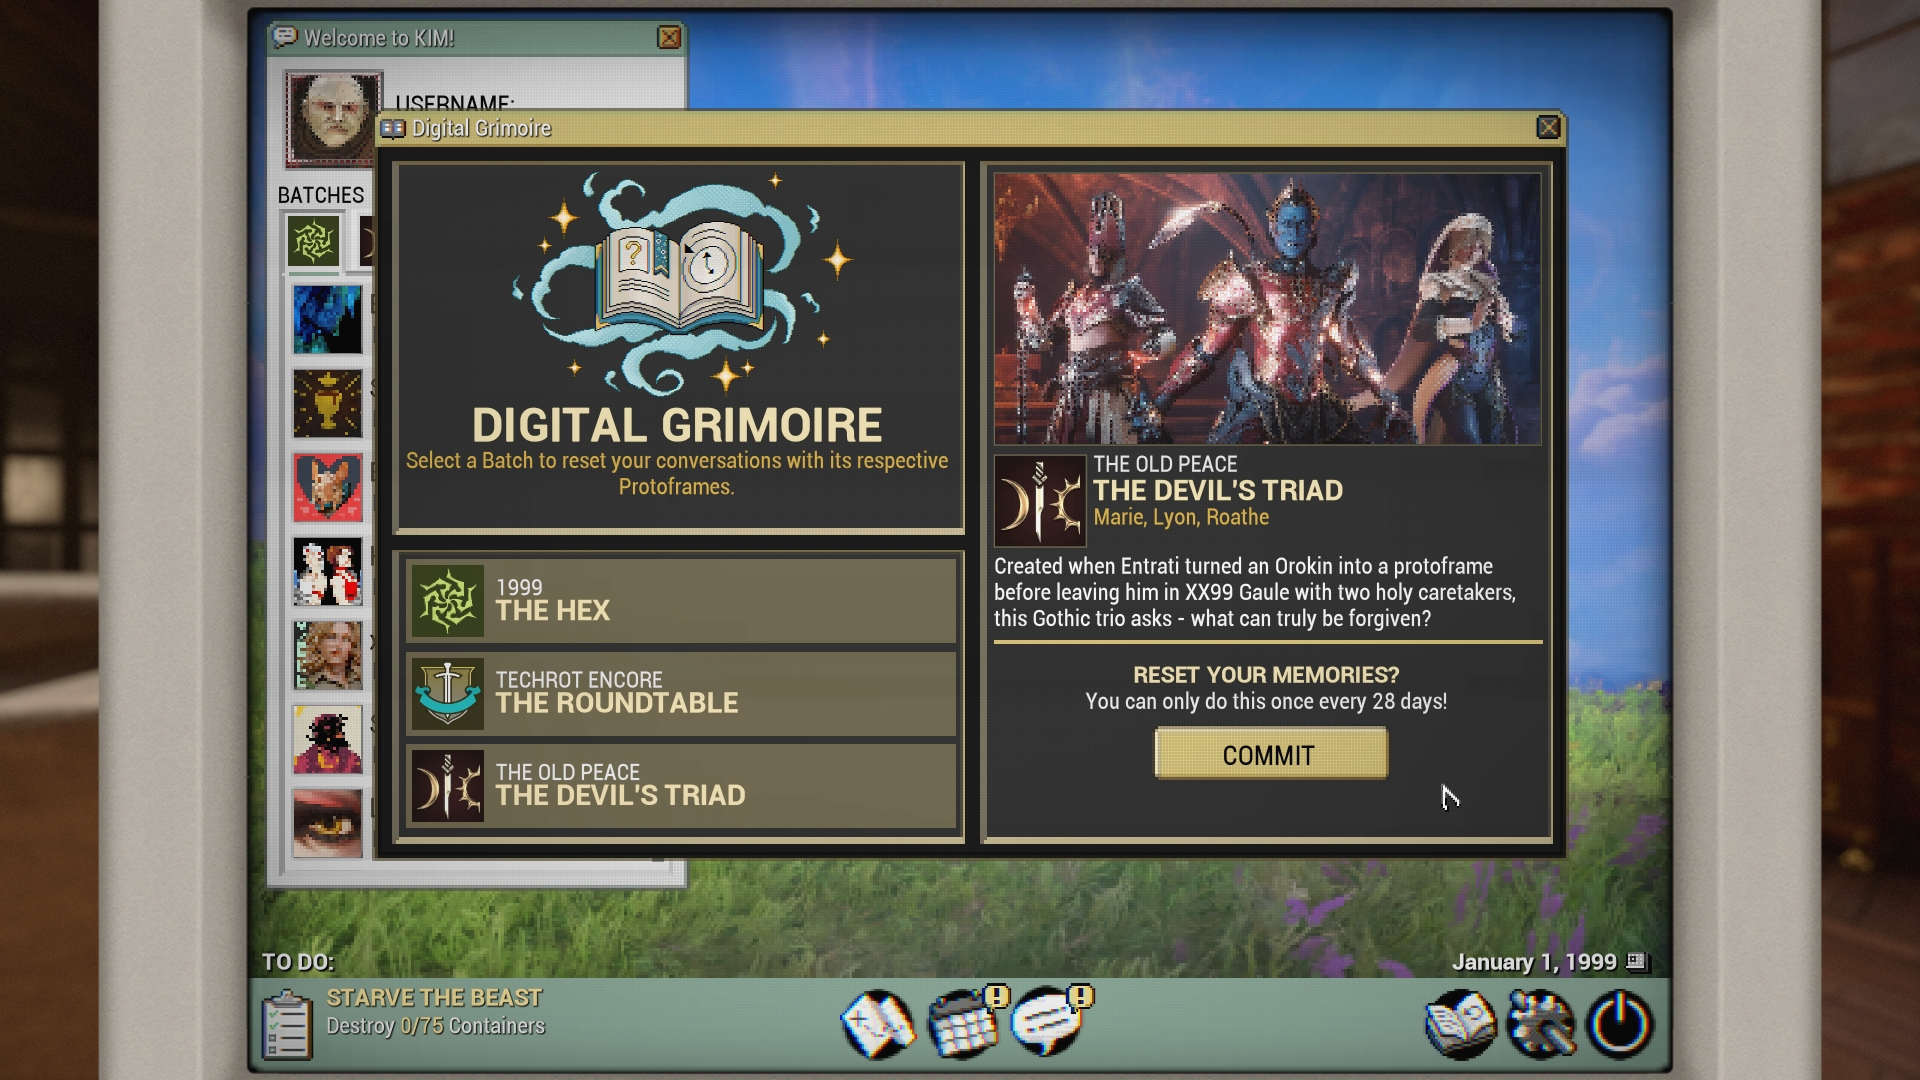
Image Description: Screenshot of the Reset Your Memories option in the KIM Digital Grimoire window. On the left side are the options to select The Hex, The Roundtable, and The Devil’s Triad. On the right, with the Devil’s Triad is selected with the “Commit” button to reset your memories.
Romantic Dalliances:
If you have expressed romantic interest in a Protoframe and have had it reciprocated, you can date them! Unlike The Hex, The Devil’s Triad will not move out of La Cathédrale upon dating, but you can still engage in some devilry with your beloved in a variety of ways:
Kissing Cinematic:
Your paramour will have a new prompt when you visit them in XX99: “Share some time alone…”.
Selecting this will trigger a kissing cinematic, with a 7 day cooldown.
Captura Scene Dates:
Sometimes, for romance to bloom, you need to get away from the world.
Once you have reached Loved with your Protoframe, they will send you a Captura Date Scene to your inbox every week. Each Protoframe has five Dates that you can earn in this way.
These Date Scenes allow you to spend some one-on-one time with your beau, and learn more about them through their Scene-exclusive voice lines. You can make use of the Captura tools to take photos with your beloved, or simply enjoy the pleasure of their company.
If you choose to break up with your Protoframe, you will retain any Captura Date Scenes you have earned — and you can continue to use them to revisit your old flames, as you desire. We won’t tell! Additionally, you will keep any Scenes you own upon resetting The Devil’s Triad’s memories*.
* Certain voice lines in these Date Scenes are tied to your conversation choices with the Protoframe, so you may see a change in dialogue after resetting.
Consent Across Spacetime:
The Hex were the first dateable characters added to the game, so introducing a new group of romanceable characters may give devoted Drifters some pause. We could get into the weeds with technicalities here — eternalism, etc. — but at the end of the day you can now successfully woo and smooch two individuals at the same time.
For those interested in taking this path, dating both a Hex and Devil’s Triad Protoframe will trigger a KIM conversation with each individual where they give consent for the Drifter to have multiple relationships.
General KIM Changes & Fixes
-
Profile Notes will now update dynamically to reflect key states in your relationship with the Protoframe. This will allow players to more easily identify if they’ve hit fail states for certain goals, so they know a reset may be needed.
- This was introduced with The Devil’s Triad, and has been extended to the other Protoframe batches as well.
- Fixed the KIM forcibly scrolling down while players are attempting to read earlier messages while new messages are being sent.
HONORIA
No Tenno is complete without an Honoria to show off their prowess. Honoria are titles that are displayed under player aliases in the pause menu, friends and clan member lists, on loading screens, and in your profile. A way for everyone to display their formidability!
How To Equip/Change Honoria
You can change your Honoria by opening the Pause menu > Profile > Honoria. From there you can select which Honoria you’d like to sport, with a preview of how it’ll appear in the UI at the top. If you’re not feeling particularly Honoria-ific, you can always select the “None” option to remove it.
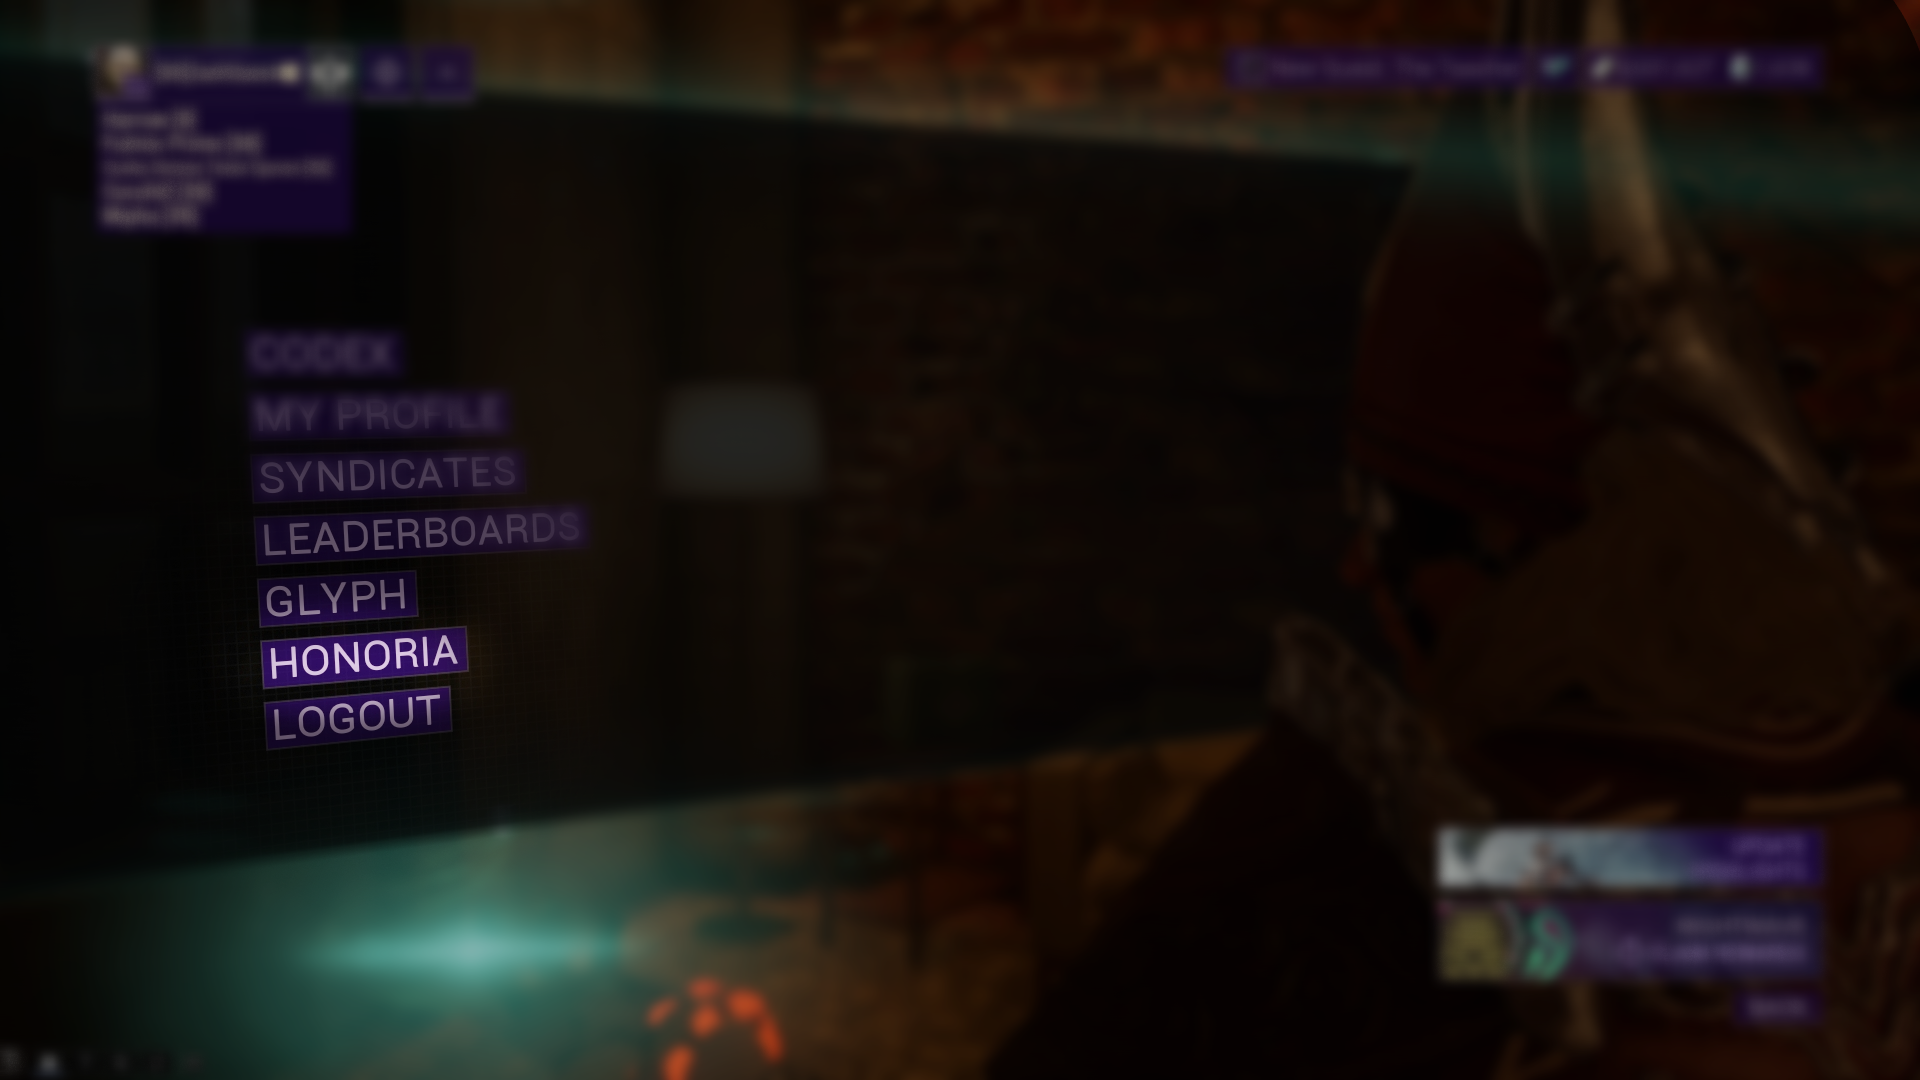
Image Description: Screenshot of the menu UI displaying the option to select Honoria. Found in between the Glyph and Logout options.
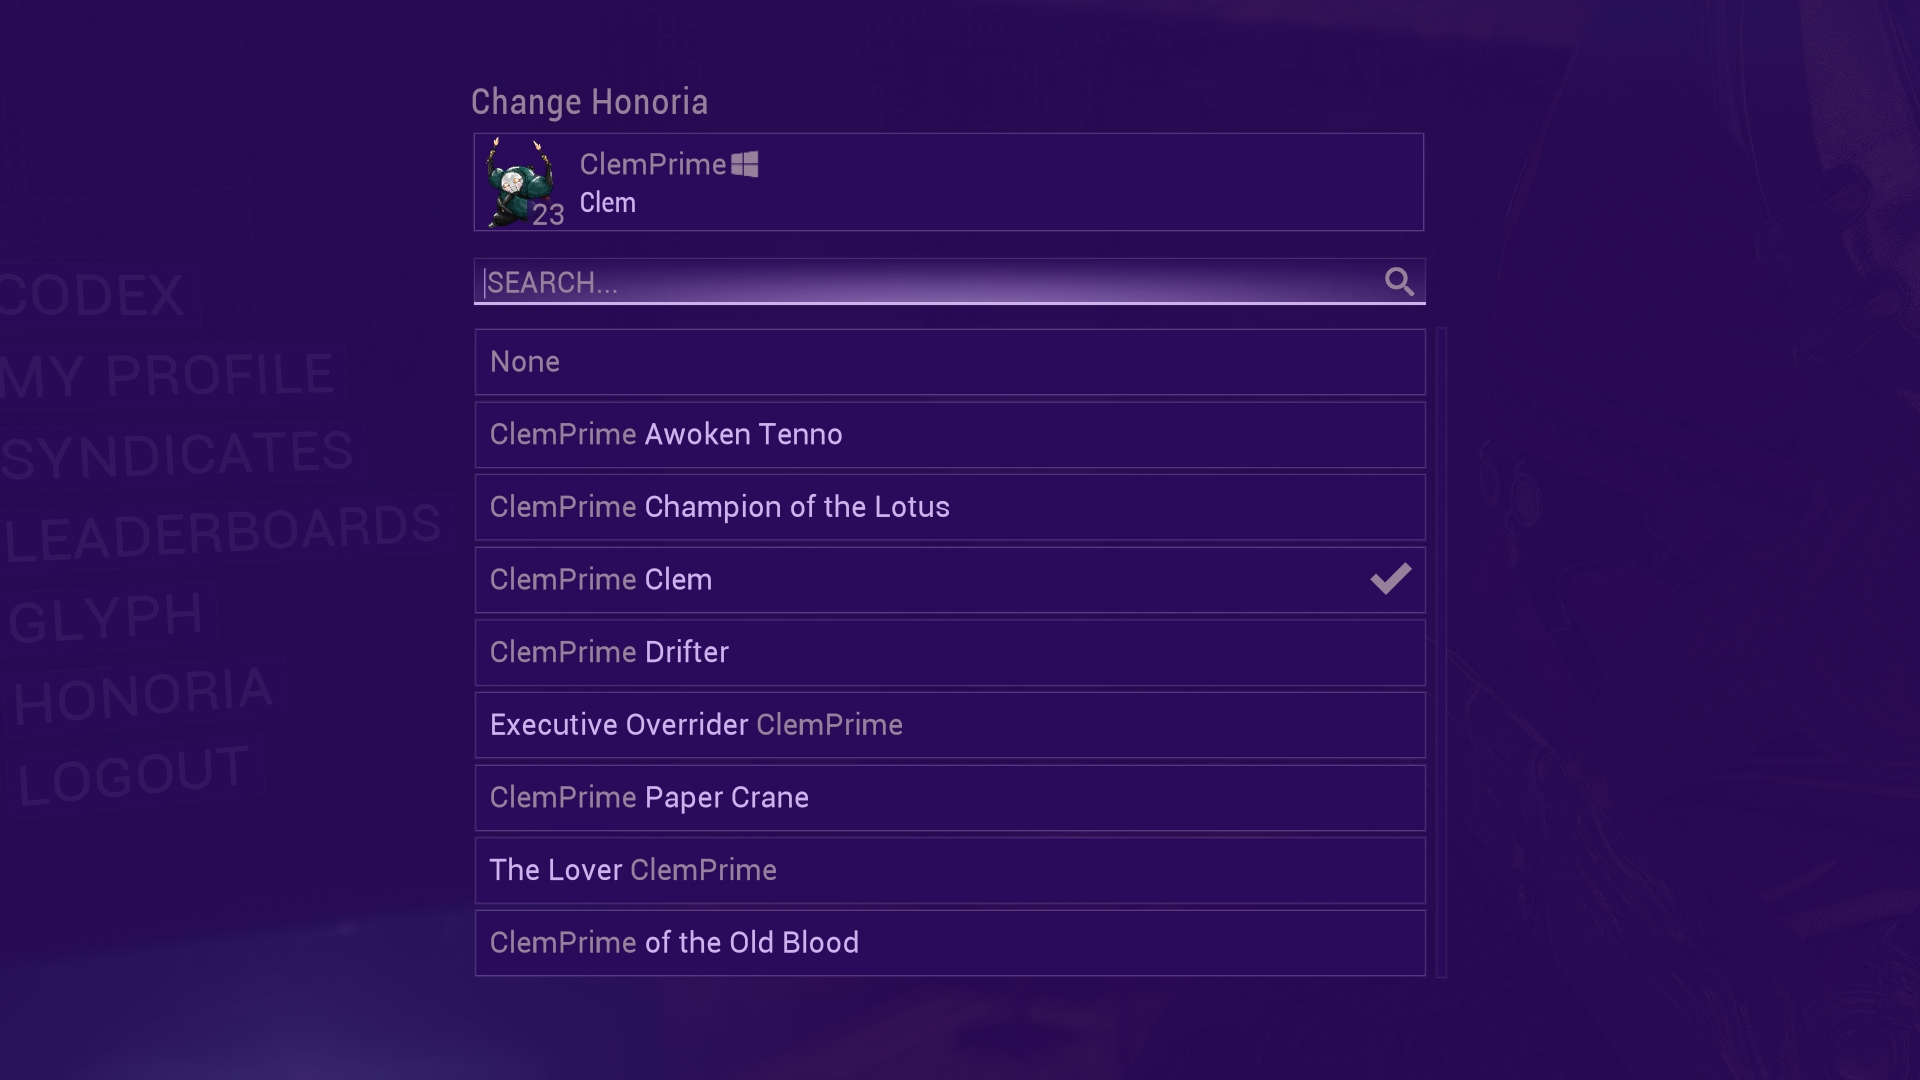
Image Description: Screenshot of the Honoria selection window showcasing some options for ClemPrime. ClemPrime can choose to have no Honoria, or they can select one that becomes either a prefix or suffix to their name such as The Lover ClemPrime or ClemPrime of the Old Blood.
How To Acquire Honoria
Honoria can be acquired in two ways:
-
Purchased from specific vendors and stores
- For The Old Peace, this includes from Roathe and the Focus School Represent Stores (specifics listed below).
-
Awarded from notable accomplishments, such as completing Quests, defeating certain enemies, conquering challenges, and more.
- On login, if eligible, you will retroactively receive certain Honoria! These will popup on screen to inform you of the Honoria earned.
We’re excited for you to discover all the various Honoria to be awarded and witness you sporting them proudly! While we want to keep the majority unlisted from the patch notes so that you can uncover them yourself, we’re happy to share the following which can be acquired from vendors:
You can purchase the following Honoria from Roathe in La Cathédrale (in the Sanctum Anatomica) for various resources associated with the theme of the title.
A preview of how the Honoria will appear with your alias is shown on the purchase screen.
- |NAME| Abyssal Thorn - 75 Vainthorns
- Along Came |NAME| - 100 Scuttler Husks
- |NAME| Big Spender - 100,000 Credits
- |NAME| Bigger Spender - 1,000,000 Credits
- |NAME| Biggest Spender - 2,500,000 Credits
- |NAME| Blazing Revolutionary - 150 Beating Heartstrings
- Demoness |NAME| - 20 Maphica
- Early Lunch for |NAME| - 100 Goopola Spleens
- A Fatuous Nymph |NAME| - 100 Heart Noctrul
- |NAME| Fire and Brimstone - 1,000 Ignia
- |NAME| Forever - 20 Argon Crystals
- Gyanburā, |NAME| - 150 Fate Pearls
- Hive-kin |NAME| - 20 Ascaris Prime
- |NAME| Hot Sludge - 200 Thermal Sludge
- Ironclad |NAME| - 400,000 Ferrite
- |NAME| Jade's Guardian - 200 Vestigial Motes
- Kaithe Tamer of Duviri, |NAME| - 100 Yao Shrub
- |NAME| Lamenting One - 200 Lamentus
- Matriarch |NAME| - 500 Mother Tokens
- |NAME| Mayor of Corpus City - 2,000 Hexenon
- |NAME| Night Gardener - 150 Fergolyte
- |NAME| On That Far Shore Forlorn - 10 Lyroic Bridge
- Orokin Cell Executor |NAME| - 150 Orokin Cells
- Patriarch |NAME| - 75 Father tokens
- |NAME| Payer of the Ferryman - 100,000 Entrati Obols
- Sentinel of Passion, |NAME| - 200 Belric Crystal Fragments & 200 Rania Crystal Fragments
- |NAME| Spore Bearer - 500,000 Nano Spores
- Steel Soldier |NAME| - 200 Steel Essence
- |NAME| Sworn Sister - 50 Spectral Debris
- The Copper Kid, |NAME| - 200 Coprun
- |NAME| The God Above Knowledge - 10 Echo Voca
- The Invincible |NAME| - 50 of each Juggernaut Part (Pulsating Tubercles, Infected Palpators, Chitinous Husks and Severed Bile Sacs)
- |NAME| The Learned - 150 Vessel Capillaries
- The Mad King |NAME| - 1,000 Thrax Plasm
- The Maniac of Deimos, |NAME| - 1,000 Ganglion
- |NAME| The Navigator - 1,000 Nav Coordinates
- |NAME| The Persecuted - 40 Kullervo’s Bane
- |NAME| The Power of Harrow Compels Thee - 250 Harrow Chassis Blueprints
- |NAME| The Scavenger - 600,000 Salvage
- The Sunderer |NAME| - 200 Riven Slivers
- |NAME| Ticker's Angel - 100 Familial Debt Bonds
- |NAME| Voyager - 5,000 Asterite
- |NAME| Wolfmother - 150 Lua Thrax Plasm
- |NAME| Yuvan Rising - 100,000 Kuva
The following Honoria can be purchased from their respective Focus School Represent Store:
- Naramon Vanguard |NAME| - 5 million Naramon Focus
- Zenurik Vanguard |NAME| - 5 million Zenurik Focus
- Madurai Vanguard |NAME| - 5 million Madurai Focus
- Unairu Vanguard |NAME| - 5 million Unairu Focus
- Vazarin Vanguard |NAME| - 5 million Vazarian Focus
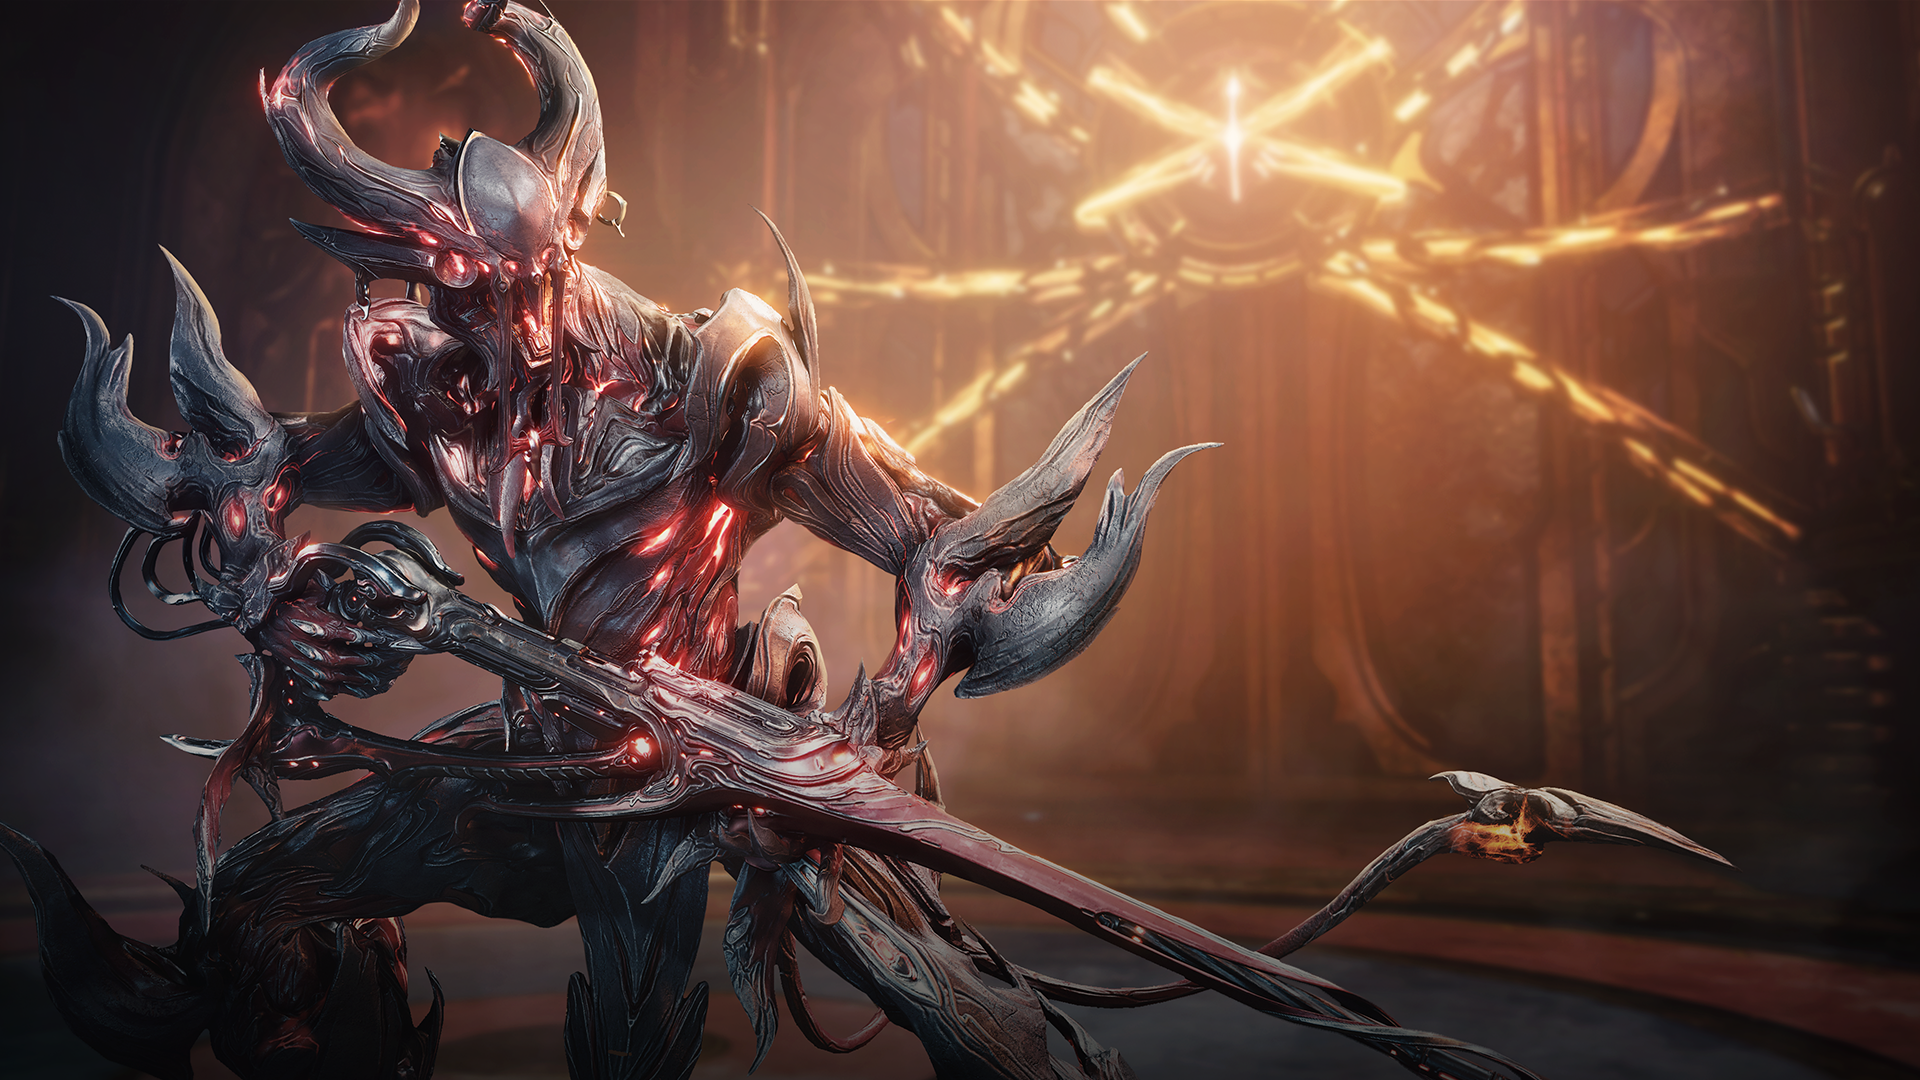
Image Description: Uriel, the devil-themed Warframe, stands at the ready with his trusted bayonet - the Vinquibus. The twin curved horns of his alternate helmet are accentuated by an open maw that evokes the feeling of a high shriek. Glowing binding chains can be seen in the background.
NEW WARFRAME: URIEL
To fight as the Heretic of Xata is to have demons at your back. Uriel incinerates foes with searing brimstone, and commands three fiendish summons to do his devil’s work.
Uriel’s Abilities
Passive: Legion
Uriel commands, empowers, and protects three unique demons.
CATENACH: Snares and slows enemies chaining them together. Damage dealt to any target in the chain is inflicted on all snared enemies. (Unlocks with Infernalis)
GULPHAGOR: Latches onto foes dealing damage over time. If killed, a circle of pain is spawned. (Unlocks with Remedium)
VYTHELAS: Inscribes demonic runes upon fallen foes that add stacks of Fire Rate and Heat Damage when collected. (Unlocks with Demonium)
Ability 1: Infernalis
Manifest an aura of flames inflicting Heat Damage and Status Effect on nearby enemies.
Tap Dodge while airborne* to take flight as a flaming meteor of destruction.
Infernalis is Uriel’s Railjack ability.
*On Devstream 191 we demonstrated that this can be done by tapping dodge from anywhere, but we changed it before release since dodging often is a common movement pattern for players. So to avoid accidentally triggering his meteor spin at times where you might not want to, it is now activated while airborne.
Ability 2: Remedium
Uriel heals himself and his demons. If his demons are dead, they are resurrected instead.
Remedium is Uriel’s Helminth ability — altered with reduced healing and Gulphagor is removed.
Ability 3: Demonium
Uriel rips out the souls of his demons, draining some of their health, and sends them in search of new victims. Souls explode on contact with an enemy, inflicting Damage Vulnerability.
Ability 4: Brimstone
Uriel and his demons create a growing ring of flaming brimstone. Charge the ability by utilizing demon abilities. Damage inflicted increases with each consecutive hit.
Note on replacing Uriel’s abilities at Helminth: Similar to Cyte-09 and other Warframes with damage buffs abilities, you can only have a single damage buffing ability on Uriel. Damage buffing abilities applied through the Helminth must override Demonium.
How to Acquire Uriel
- Uriel’s Main Blueprint is rewarded via inbox after completing The Old Peace Quest.
- Uriel’s component Blueprints can be earned from the Descendia reward drop tables.
- Uriel’s main and component Blueprints can be acquired from Roathe’s Surplus in La Cathédrale (Sanctum Anatomica) for Maphica.
- Purchase Uriel from Market individually or as part of The Old Peace Uriel Bundle and The Old Peace Complete Collection. Learn more in the “Market Additions” section.
Uriel’s Prex Card
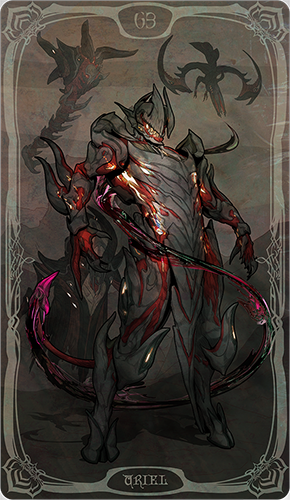
Image Description: Uriel’s Prex Card displays the devil-themed Warframe standing with a sinister grimace as his armor pulses with infernal flame. Behind him are the shadowy figures of his three devil servants.
Only those who survive penance can explore the area in which Uriel’s Prex Card resides…
Maximum Loadout Slot Increase
With the release of Uriel, the maximum number of purchasable Loadout Slots has been increased from 31 to 32.
Uriel’s Glyphs can also be purchased from the Glyph selection menu accessible from the Pause Menu > Profile > Glyph.
NEW WEAPONS
New Weapon Type: Bayonet (Vinquibus)
The Vinquibus introduces a brand new weapon class - the Bayonet!
Bring hell to the battlefield with Uriel's signature rifle and bayonet combination. Occupying both primary and melee slots, this unique weapon blends precision marksmanship with unrelenting melee combat.
Unique Traits:
- Vinquibus Precision (Primary Trait): Headshots grant +250% Melee Damage for next 2 Melee Attacks, stacking up to 16x.
- Vinquibus Ferocity (Melee Trait): Melee kills give 100% Rifle Ammo Efficiency for your next 4 shots, stacking up to 16x.
Vinquibus/Bayonet Specifics:
-
Affinity between the Primary and Melee are shared, so if you only get kills with the Melee in a mission, the Primary will receive the same amount so that they have the same rank.
- That said, the Vinquibus counts as one weapon for Mastery Rank purposes.
-
Upgrades are shared between both the Primary and Melee, meaning if you upgrade one, it’ll be mirrored on the other. This applies to the following:
- Orokin Catalyst
- Focus Lens
- Exilus Adapter
-
Forma (base, Omni and Umbra)
- Applying any type of Forma will reset rank to 0 for both the Primary and Melee.
-
The Polarized slot is shared between both. For example, if you add Madurai Polarity to the first slot of your Primary, it will also apply to the Melee in that same slot.
- NOTE: Umbra Forma equipped on the Melee will also apply the Umbra polarity to the Primary, something to keep in mind prior to upgrading as it’ll impact capacity room on the Primary.
- Arcane Adapters are not shared and require their respective Adapter type to unlock for the Primary and Melee.
- Due to its unique two slot nature, the Vinquibus will not appear as an option in Deep/Temporal Archimedea or Teshin’s Cave in Duviri.
- Vinquibus’s Melee Stance slot has the Omni polarity.
- Equipping it in either Primary or Melee will equip it for both.
- The Vinquibus is able to generate separate Rifle and Melee Rivens. You can have both a Rifle and Melee Riven equipped in their respective slots.
- Color customizations are shared between Primary and Melee.
How to Acquire Vinquibus
- Vinquibus’ main and component Blueprints can be acquired from Roathe’s Surplus in La Cathédrale.
New Bayonet Stance Mod: Harrowing Spire
Relentless jabs and powerful sweeping lunge.
How to Acquire Harrowing Spire:
- Drops from containers in Descendia. Visit the official Drop Tables for drop rates.
New Orokin-Era Grineer Weapons
Weapons once wielded by Orokin-era Grineer are yours to obtain!
Note: These are not your typical Prime weapons due to their Grineer nature. They share the same categorization as the existing Gotva Prime, which means that like the Gotva Prime, these can be traded but not sold for Ducats at Baro.
Galariak Prime
Orokin-era Grineer plated their scythes with gold as a symbol of dedication to their Golden Lords. Gains a percentage of Critical Chance with each Status Type affecting the target.
Sagek Prime
The sidearm of choice for Prime Grineer warriors, Sagek Prime blends Grineer brutality with Orokin aesthetics. When Sagek Prime inflicts a critical hit, its next shot has a chance to gain significant Status Chance.
How to acquire Sagek Prime and Galariak Prime:
- Earn Sagek and Galariak Prime’s main and component blueprints by completing The Perita Rebellion missions.
- Sagek and Galariak Prime’s main and component blueprints can be exchanged for Maphica at Roathe’s Surplus Wares in La Cathédrale.
NEW ARCANES
After completing The Old Peace, delve into Descendia for a chance to get your hands on new Arcanes!
These nine new Arcanes are used to bolster your Warframes and Weapons! Earn these new enhancements from Descendia, or in exchange for Maphica or Ignia at Roathe’s Surplus Wares in La Cathédrale.
Stats below shown at max rank.
Arcane Concentration (Warframe)
On Ability Cast: +60% Duration for 3s
Arcane Circumvent (Warframe)
Roll through enemies to steal 50% of their defenses for yourself. Stolen armor lasts 15s.
Arcane Expertise (Warframe)
100% Ability Strength modifiers are also applied to Max Shields.
Arcane Persistence (Warframe)
Remove all Shields. If Armor is above 700: Cannot be hit for more than 500 Damage/s.
Primary Bulwark
Gain stacks of +1% damage for each unit of armor past 1,000, up to a max of +500%.
Primary Debilitate
If an enemy has 10 stacks of a combined Status Effect, inflicting the same Status Effect again has a 100% chance to inflict one of the base Status Effects it is composed of.
Primary Overcharge
While at or above 90% Energy: Gain 35% of Max Energy as Multishot, capped at 100%.
Secondary Irradiate
On hitting enemies afflicted by 10 stacks of Radiation: Deal 180% of the hit damage to enemies within 7m.
Melee Careen
x2.50 Melee Damage against Frozen enemies. On Roll: Frozen enemies in a 5.5m radius with a 2s Cooldown.
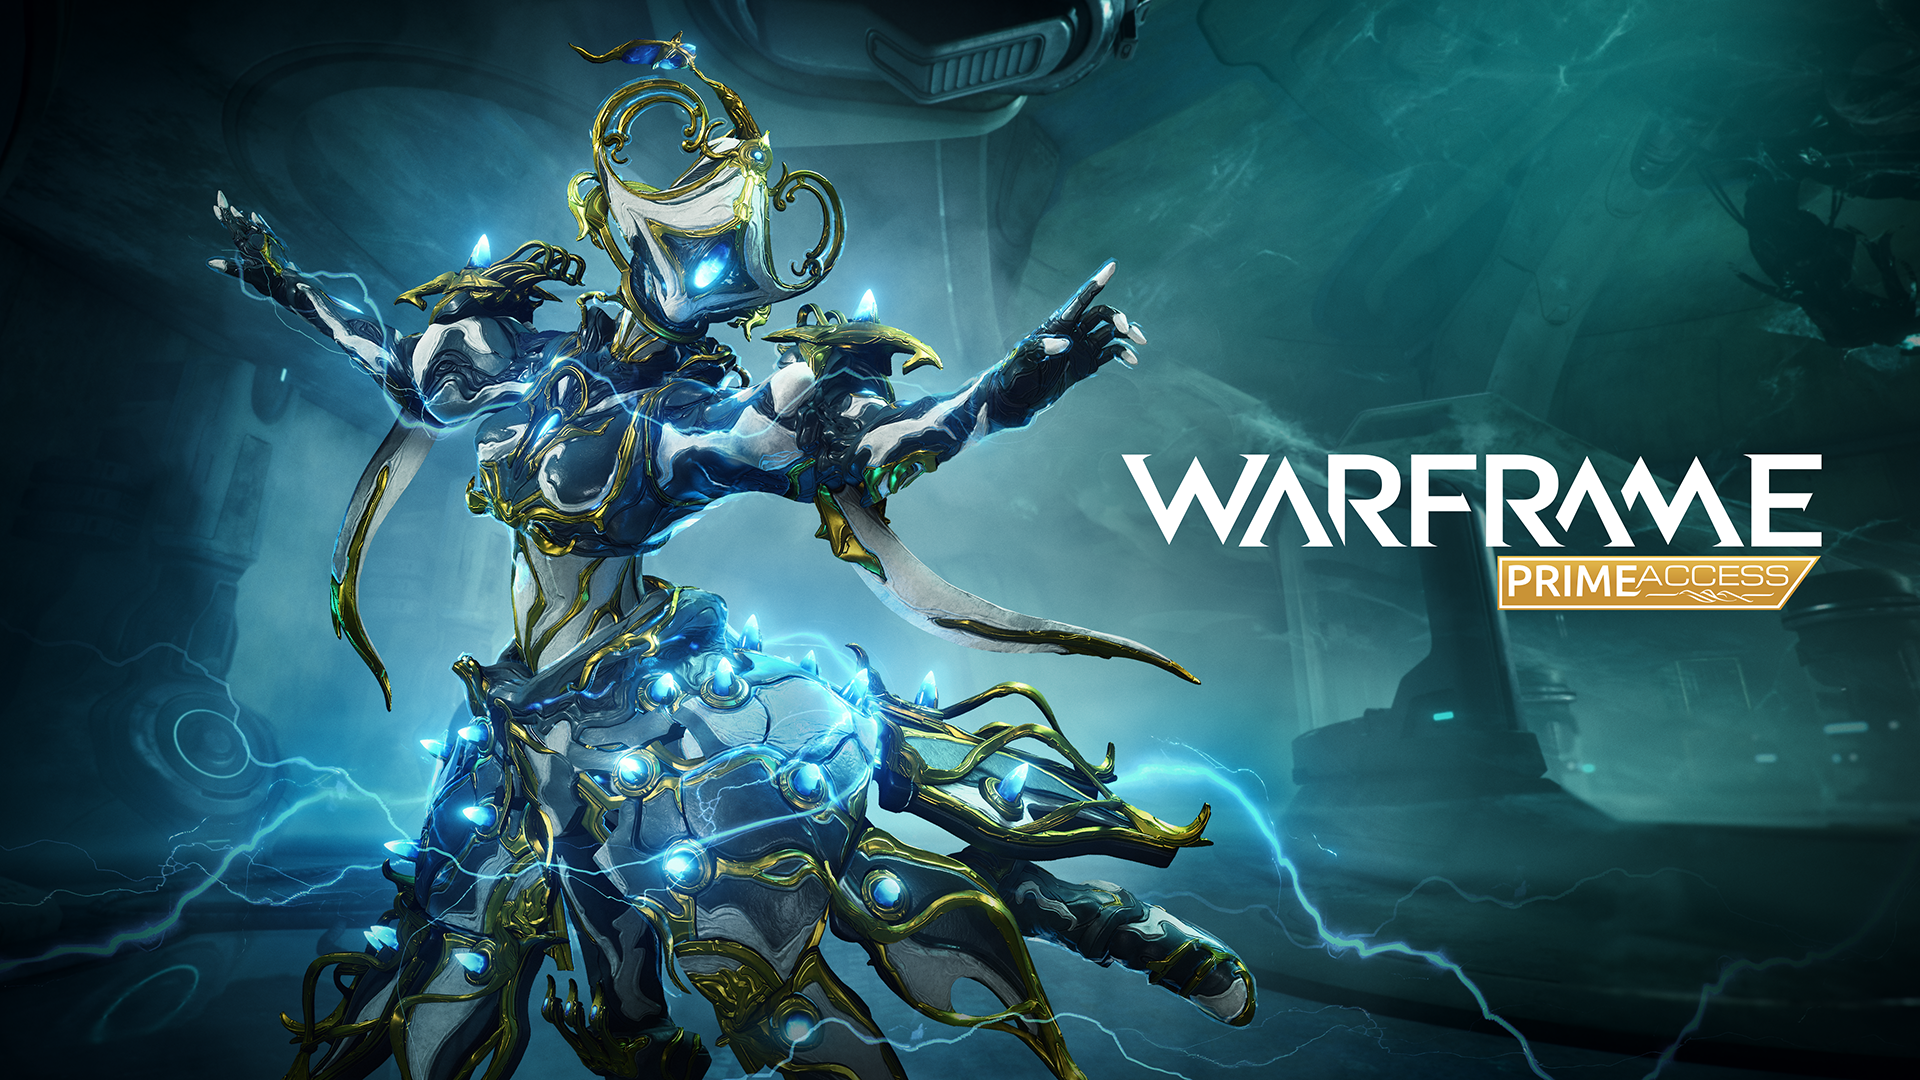
Image Description: Gyre Prime is posing gracefully with blue electricity circling her skirt.
GYRE PRIME ACCESS
Gyre Prime
Gilded circuits spark and energize frenetic movements that echo through the ages. Dance into eternity with Gyre Prime.
Alternox Prime
Orokin gold enhances the conductivity of Gyre Prime's signature rifle, enabling it to fire massive electrifying orbs.
Kestrel Prime
With its heightened agility and power the Kestrel Prime’s heavy attacks will easily knockdown foes, ensuring none shall stand before it.
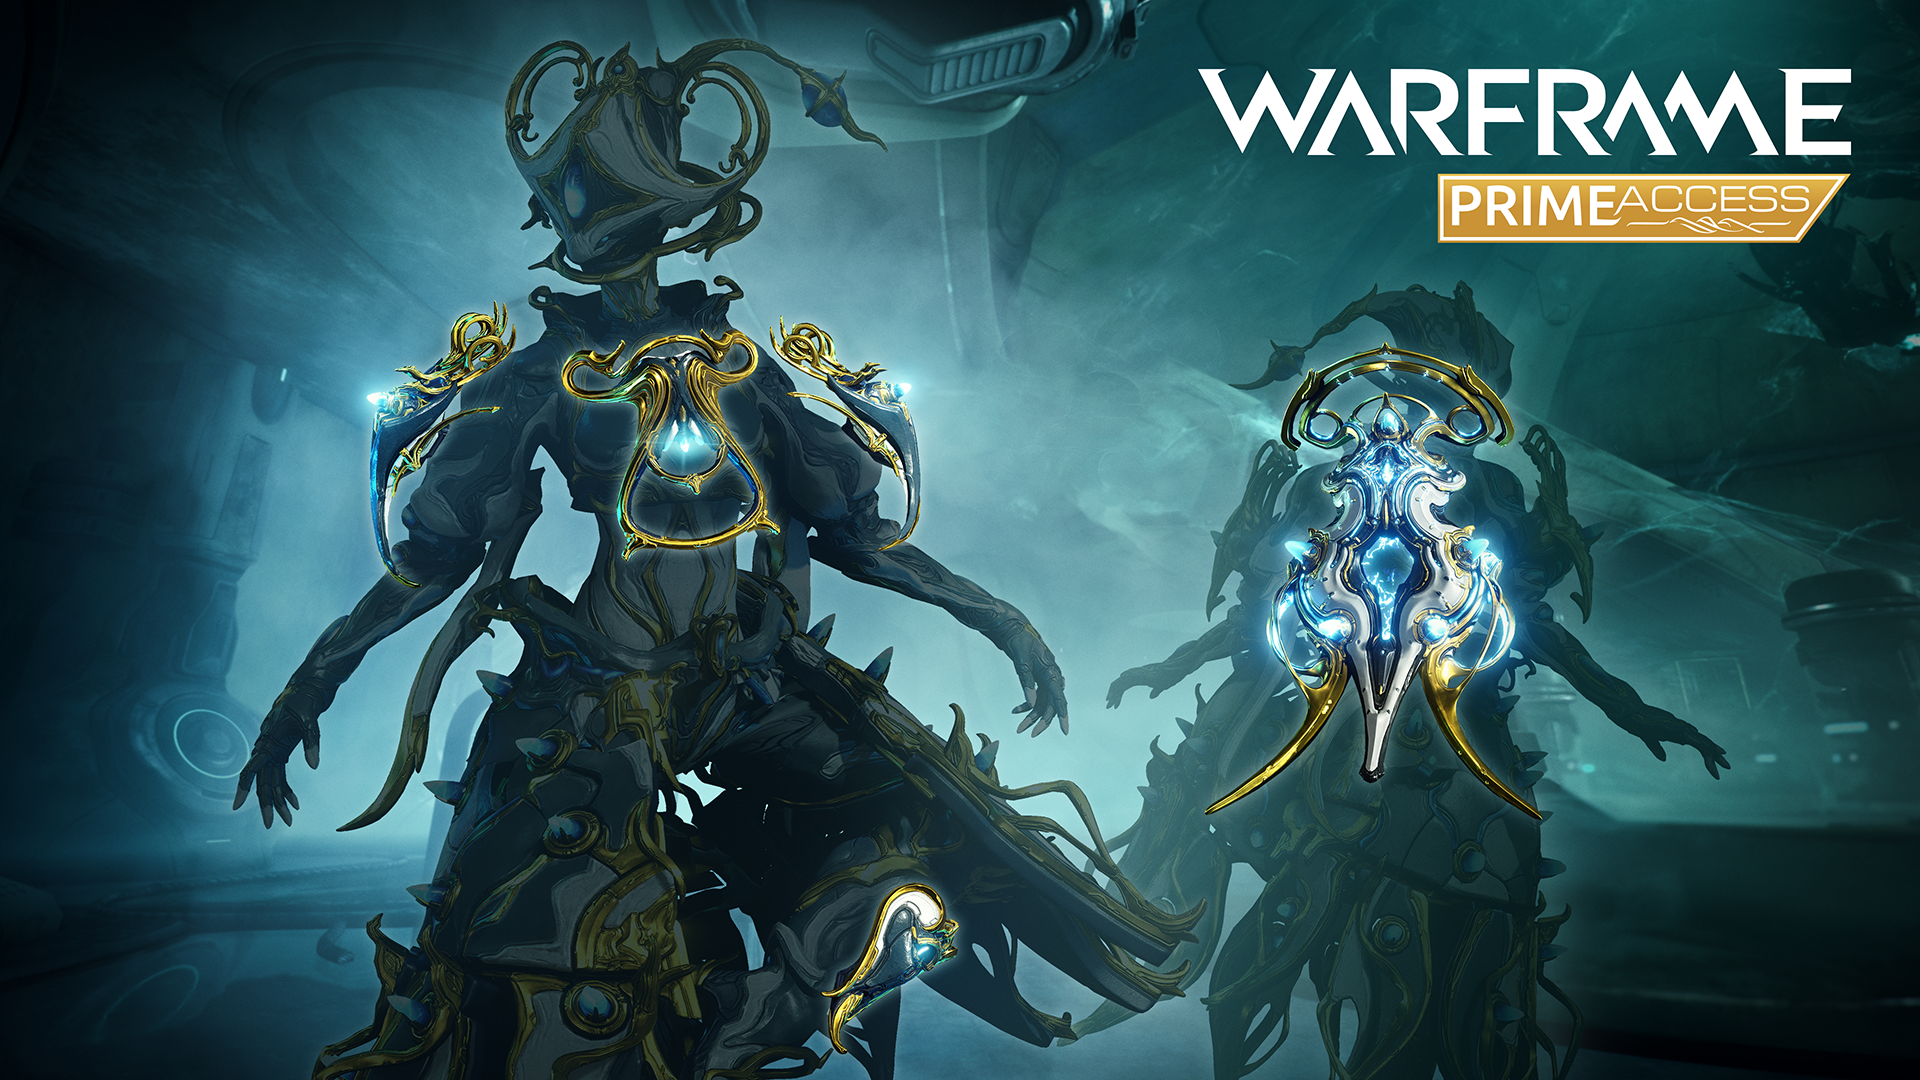
Image Description: Gyre Prime is shadowed to highlight the Gyre Prime Armor (chest, legs and shoulder pieces) and Triodic Prime Syandana.
Triodic Prime Syandana
Enchant onlookers with the crystalline adornments of Gyre Prime's signature syandana.
Gyre Prime Armor
Signature armor set for the Gyre Prime Warframe.
Items Moved To Prime Vault
Now that Gyre Prime Access is available, the following items have been added to the Prime Vault for a future Prime Resurgence rotation. If you have Relics that contain these items they will remain in your Inventory.
- Gauss Prime
- Acceltra Prime
- Akaris Prime
As with each round of Prime Access come updated Riven Disposition numbers — check the full details here: https://forums.warframe.com/topic/1478510-december-2025-riven-dispositions/
MARKET ADDITIONS

Image description: Operator is standing to the left of Uriel, the devil-warframe, wearing the Grand Carnus Regala - a blood red battledress with a golden face crown. Uriel is wielding the Vinquibus bayonet.
The Old Peace Uriel Bundle
Call down brimstone-laced devastation and take command of demonic servitors with Uriel, the Heretic of Xata.
This bundle contains the following items, which can all be purchased separately and as part of The Old Peace Complete Collection:
Uriel Warframe
To fight as the Heretic of Xata is to have demons at your back. Uriel incinerates foes with searing brimstone, and commands three fiendish summons to do his devil’s work.
Vinquibus Bayonet Weapon
Bring hell to the battlefield with Uriel's signature rifle and bayonet combination. Occupying both primary and melee slots, this unique weapon blends precision marksmanship with unrelenting melee combat.
Uriel Asmodion Helmet
Don the fearsome horns of a legendary commander. The mere rumor of Uriel’s alternate helmet inspired despair on ancient battlefields.
Grand Carnus Regalia
This blood-red battledress embodies the ultimate in Orokin style and luxury. Fitted for both Drifter and Operator. Includes:
- Grand Carnus Hood
- Grand Carnus Cuirass
- Grand Carnus Sleeves
- Grand Carnus Greaves
- Grand Carnus Regalia
The Grand Carnus Regalia Collection is also available for purchase outside of The Old Peace Uriel Bundle.
Infernum Throne (Decoration)
To one damned within his own mind, a throne can be a prison.
- Gift Bonus: Gift The Old Peace Uriel Bundle to another player and receive an Infernum Throne in return.
3 Day Affinity Booster
Doubles the rate at which you earn Affinity. Upgrade your weapons and Warframes faster. Boosters are immediately activated after purchase!
All of the contents of this bundle are also included in the The Old Peace Complete Collection.
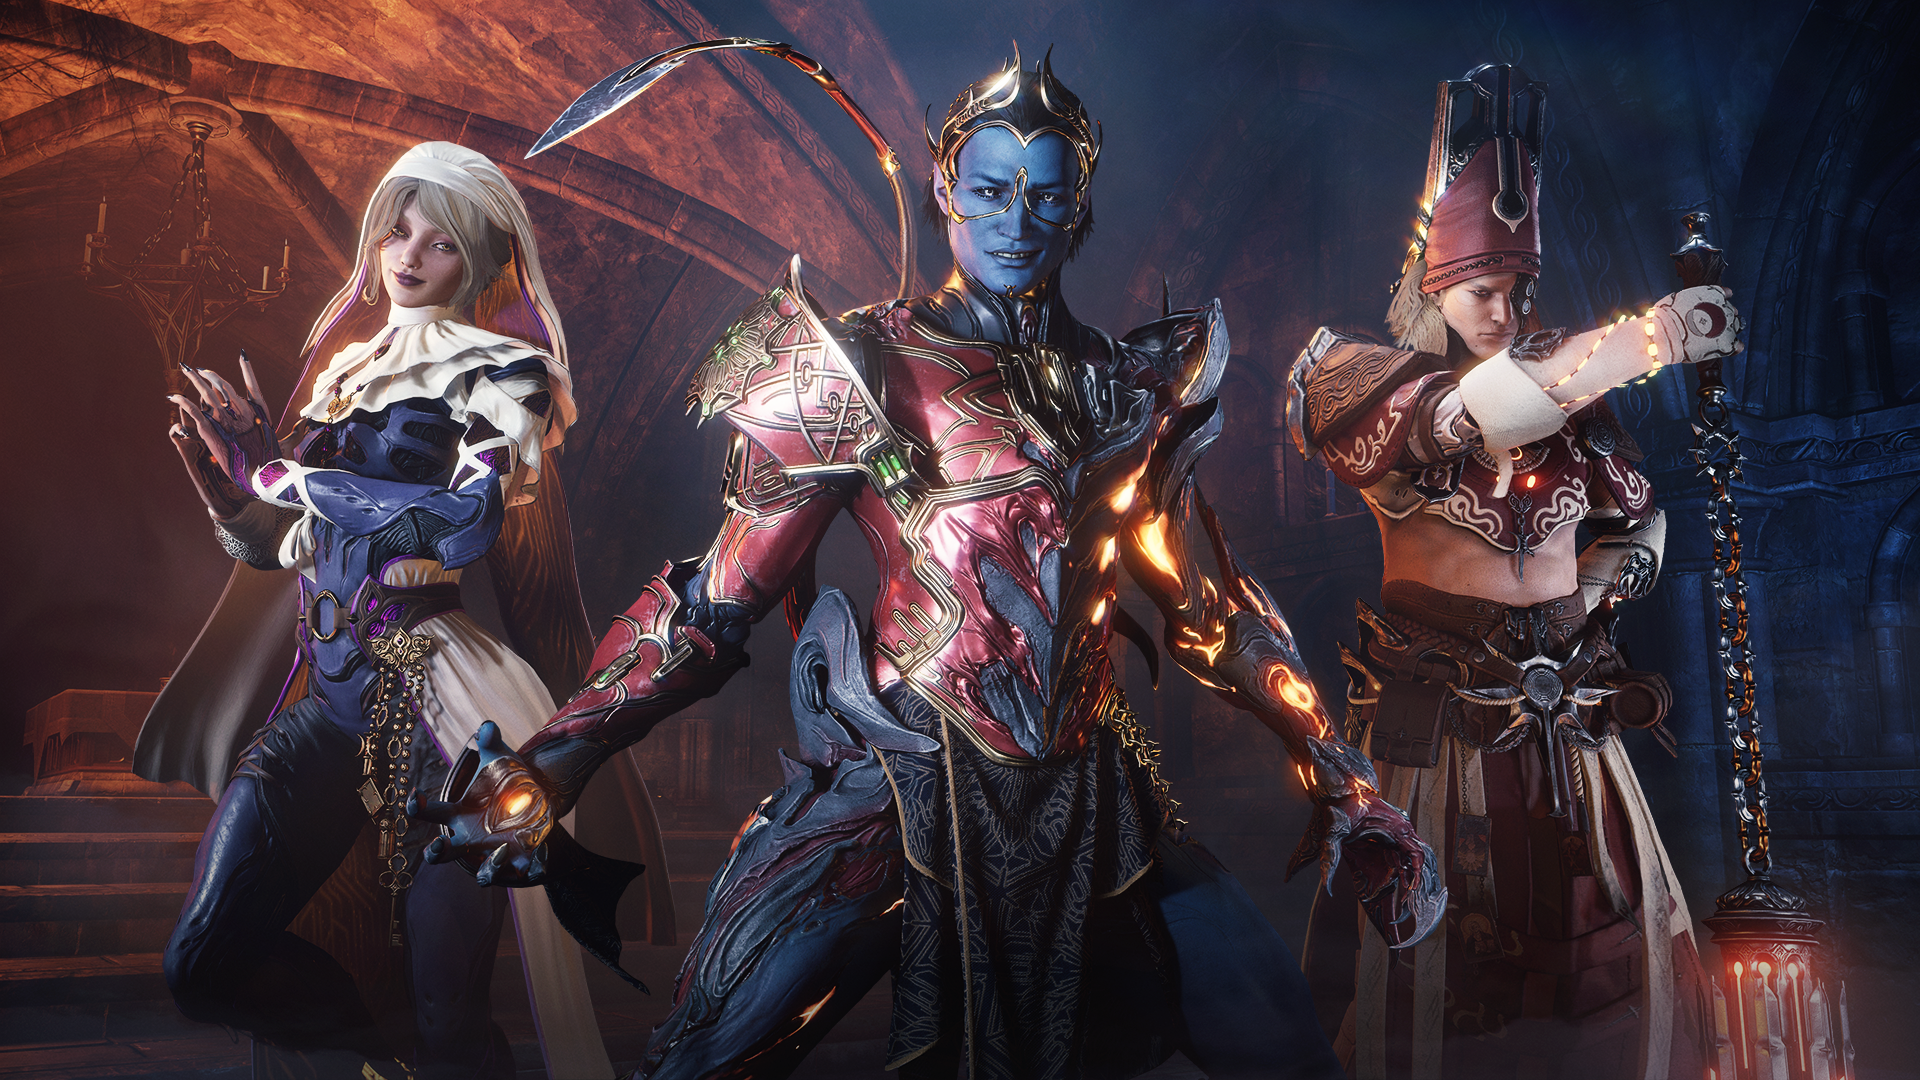
Image Description: From left to right: Marie (Wisp Protoframe) gazing into the camera with her hands held close together , Roathe (Uriel Protoframe) posed menacingly in the center with a smirk and Lyon (Harrow Protoframe) holding his Thurible out in front of him.
The Old Peace Gemini Collection
Deepen the bonds of camaraderie between the three unlikely companions of the Devil’s Triad with this collection of Protoframe Gemini Skins.
Each skin can switch between Warframe and Protoframe appearances by activating the corresponding Gemini Emote.
This collection contains the following items - Gemini Skins can be purchased individually and as part of The Old Peace Complete Collection!
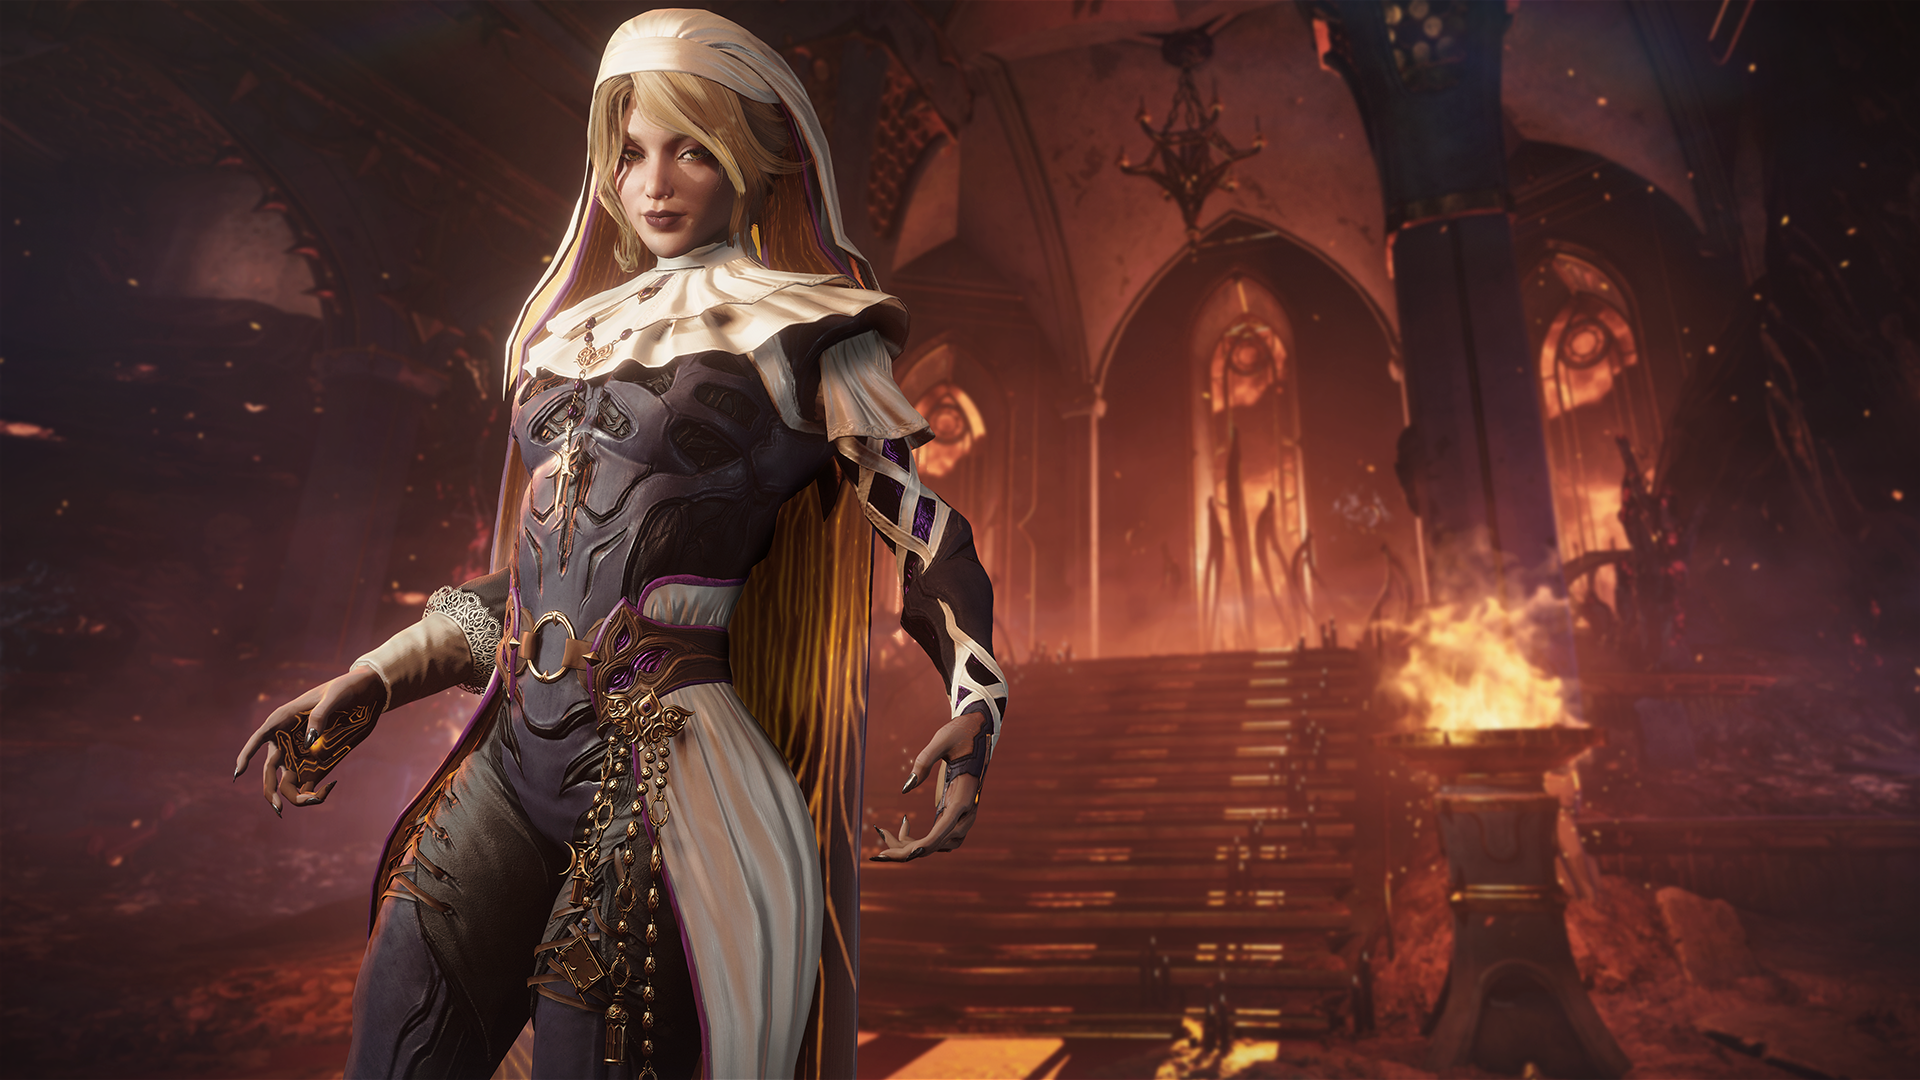
Image description: Marie Leroux, a nun, stands poised with her hands slightly opened at her side in front of a stairway in the fiery Descendia.
Marie Gemini Skin
Sister Marie Leroux, a nun determined to serve Sol by proving that even the most unrepentant devil can be redeemed, brings a human face to the Wisp Warframe.
Marie’s Cowl (signature headgear) can be equipped/removed via Attachments > Auxiliary in the Arsenal.
Marie’s makeup can be adjusted using the Attachments color tints.
Marie Gemini Emote
Switch between Wisp and Marie’s Gemini Skin with the Marie Gemini Emote, even during missions.

Image Description: Lyon Allard, a priest, stands with half his face hidden by his raised arm holding his Thurible.
Lyon Gemini Skin
Father Lyon Allard, a priest of Lua tormented by nightmarish visions, brings a human face to the Harrow Warframe.
Lyon’s Mitre (signature headgear) can be equipped/removed via Attachments > Auxiliary in the Arsenal.
Lyon Gemini Emote
Switch between Harrow and Lyon’s Gemini Skin with the Lyon Gemini Emote, even during missions.
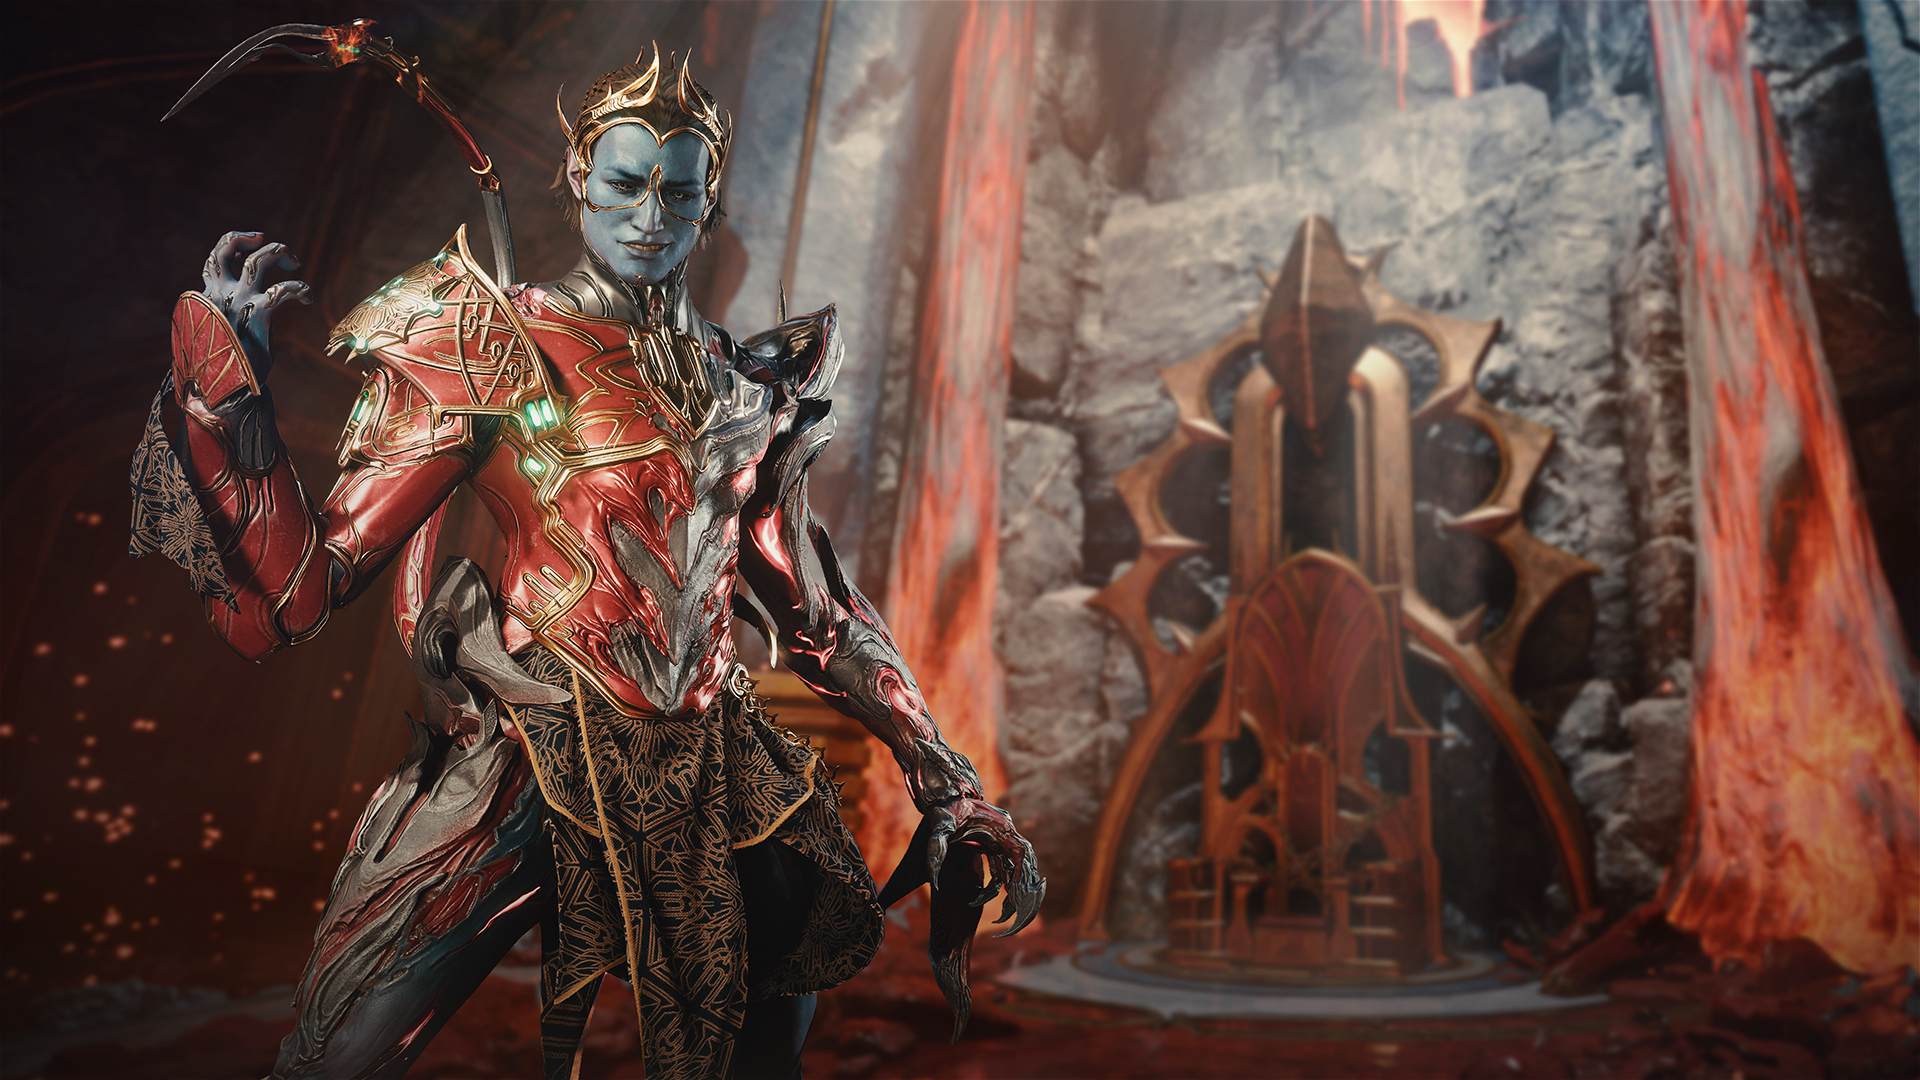
Image Description: Roathe, an Orokin, stands in a pose that exudes strength with a smirk on his face.
Roathe Gemini Skin
Grand Carnus Roathe, the Heretic of Xata, brings a human - though Orokin - face to the Uriel Warframe.
Roathe’s Chyrinth (signature headgear) can be equipped/removed via Attachments > Auxiliary in the Arsenal.
Roathe has a unique tint split between his Warframe body parts (uses base color channels) and Orokin armor (uses attachment color channels).
Roathe Gemini Emote
Switch between Uriel and Roathe’s Gemini Skin with the Roathe Gemini Emote, even during missions.
All of these new Gemini Skins are also included in the The Old Peace Complete Collection.
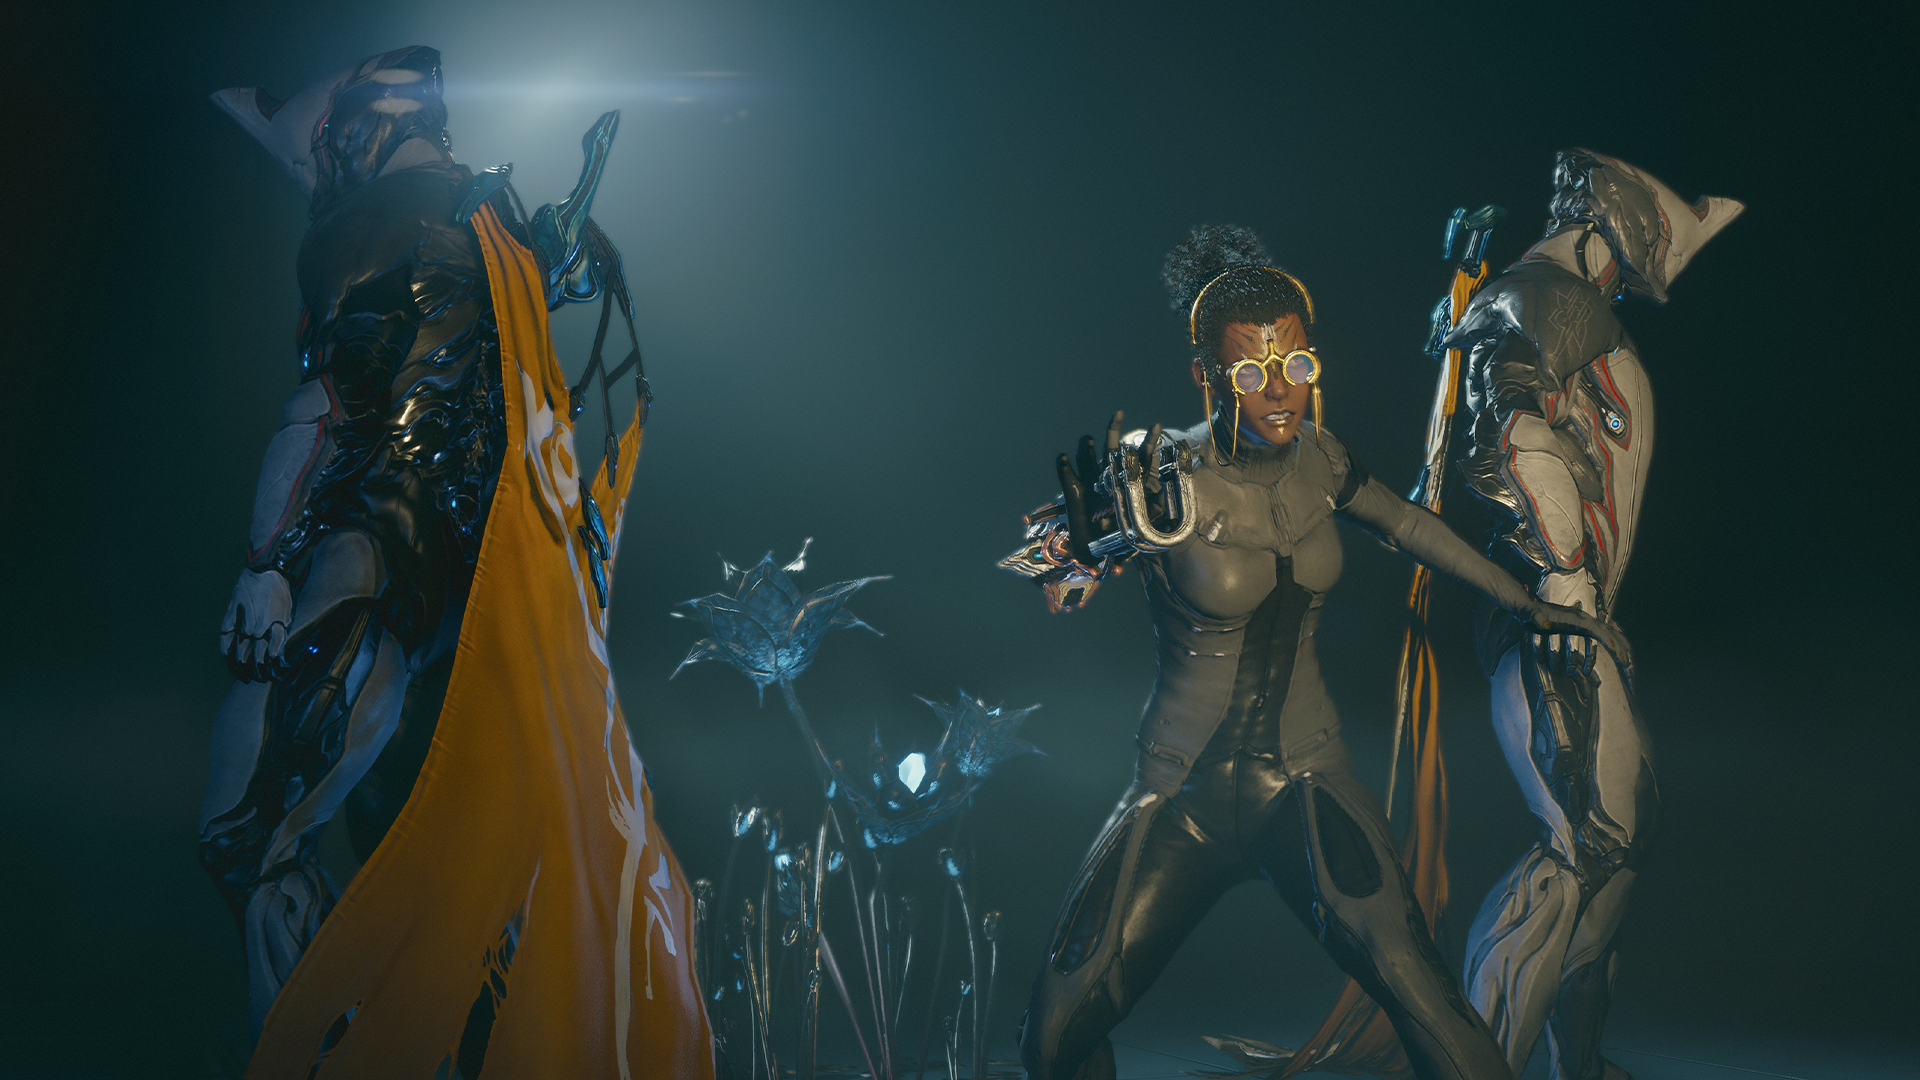
Image Description: An Operator is poised to attack while flanked by two Excaliburs modeling an orange Lustratus Conquest Syandana (left) and Lustratus Warbanner Syandana (right). The Operator wears a golden Itzam’s Oculus while an ethereal flower blooms (the Xenoflora Decorations) in the center.
War Stories Bundle
Recall buried battlefield memories with this collection of ancient mementos. Some things ought never be forgotten.
Note: Since the bundle includes Amp components, it is visible in the Market only to players who have completed The War Within Quest and spoken to Quills Onkko in Cetus.
This bundle contains the following items - the cosmetic items can be purchased individually:
Amp Components
This bundle includes the following Amp components! Bring them to Quill Onkko in Cetus or Little Duck in Fortuna and select the “Amp Assemble" option to build your Operator/Drifter a new Amp.
Upgrading your Amp is an important step in growing your power in Warframe. These have traditionally been available through Syndicates only, but we're experimenting with adding an option to skip the grind, for those who are interested.
We have implemented experimental prorating for the Amp components. If you have any amount of Affinity on the Granmu Prism (as Prisms are the only component from Gilded Amps that counts towards Mastery), the bundle will count all the Amp components as “owned”, apply the prorated price and exclude them from purchase. This is for players who are in the market for the other items but don’t have a need for the Amp.
Granmu Prism
A roughly-tumbled prism held before a heavy-duty triple shutter-gate. Multi-shot grenade burst.
Klebrik Scaffold
Elegant and finely-calibrated proton aggregator latches onto a target and hoses them down.
Lohrin Brace
The armpiece doubles as a throttled overcharger, increasing the likelihood of Critical Hits and Status Chance.
Lustratus Warbanner Syandana
A syandana once worn to distinguish Dax commanders on Tau; wear it now as a mark of pride.
Lustratus Conquest Syandana
Reclaimed from the battlefields of Tau, this battle-worn syandana reflects the cost of war.
Itzam’s Oculus
Honor an Archimedean like no other by donning his signature oculus.
Xenoflora Decorations
Wrought in memory of the Xenoflora of Tau, its beauty can be preserved in your Orbiter. There are three variations of the Xenoflora Decorations included in this bundle:
- Xenoflora Decoration
- Xenoflora Patch (1m)
- Xenoflora Patch (2m)
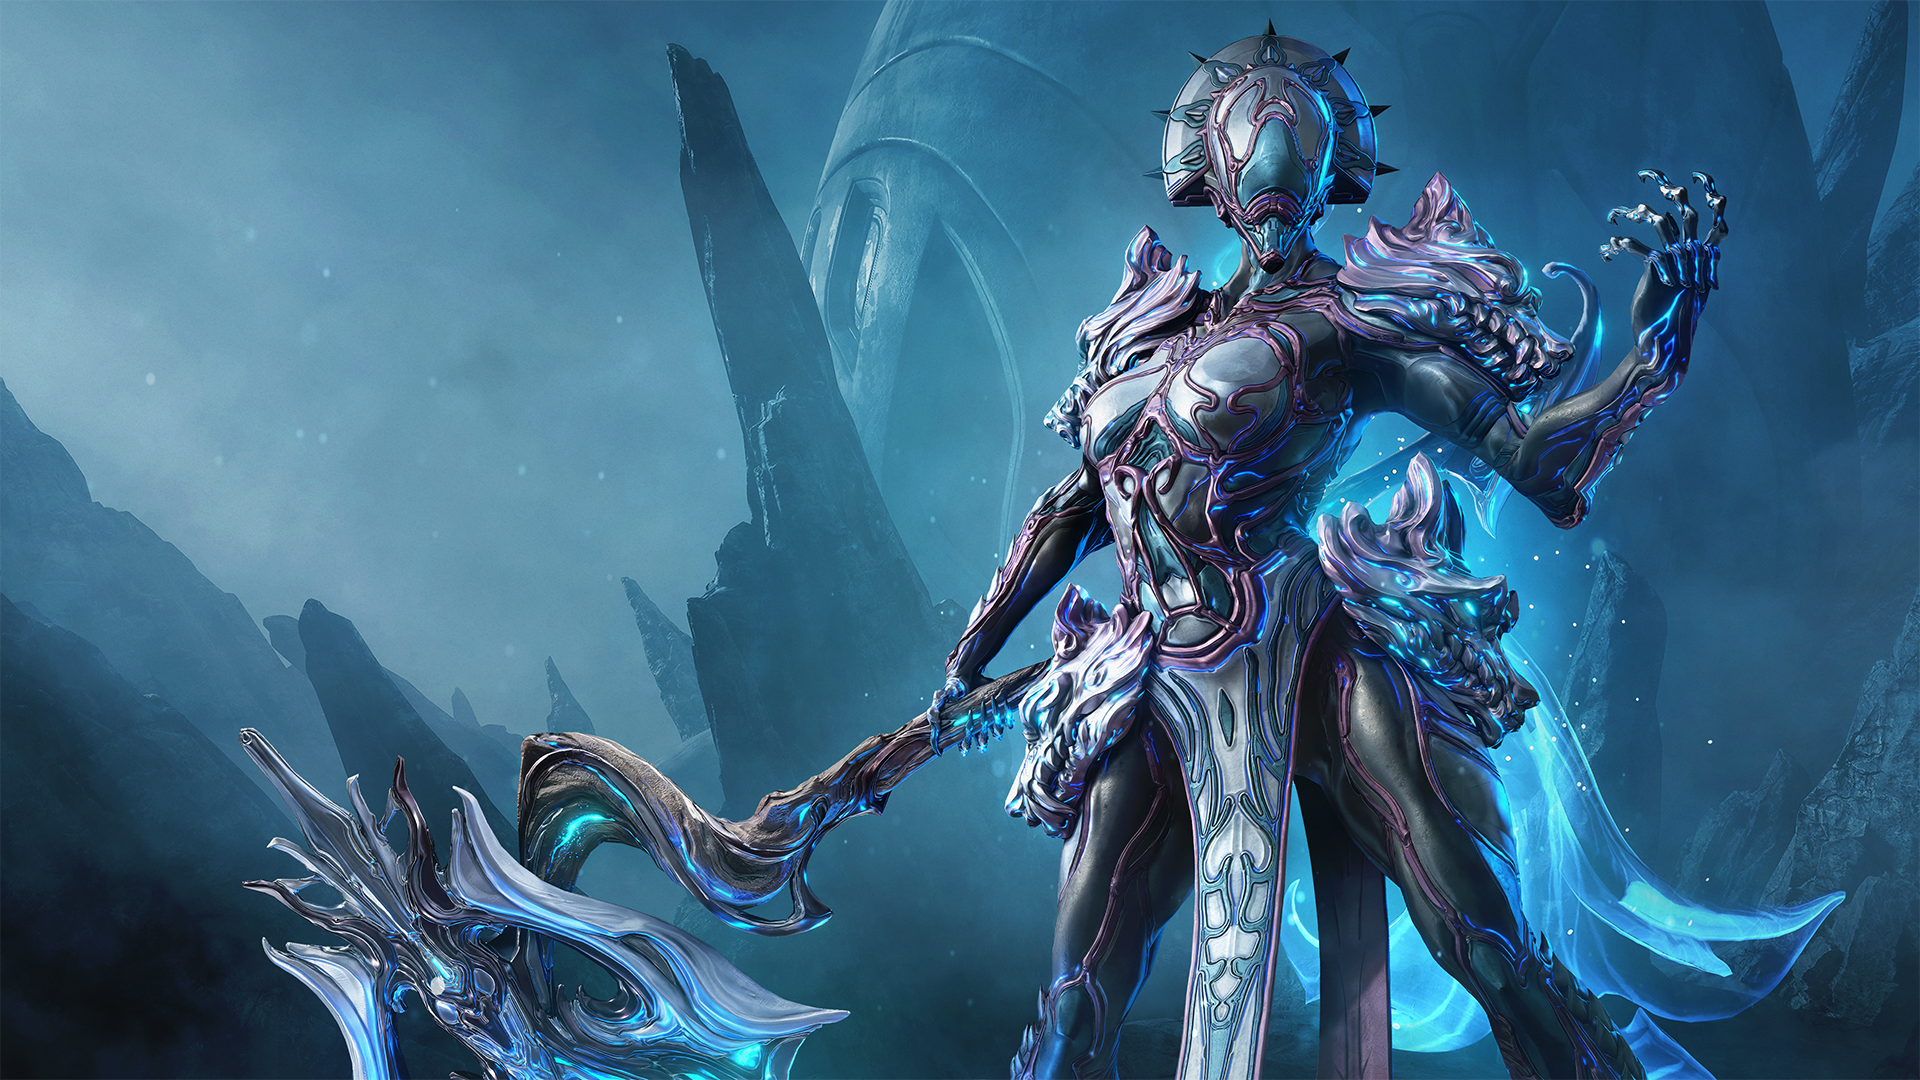
Image Description: Voruna Medeina stands proud in her silver armor with metallic purple and blue accents that extend to the four wolves on her shoulders and hips. In her right hand she wields the Iltis Heavy Blade, an axe whose blue energy mirrors the azure tails of the Manegarmr Ephemera.
Voruna Medeina Collection
Invoke Voruna Medeina, the forest goddess. Her savagery is a blessing to those who hunger for justice.
This bundle contains the following items, which can all be purchased separately:
Voruna Medeina Skin
Voruna appears as a glorious forest goddess, loyal wolves comprising her graceful armor. The savage huntress is also a protector of the innocent, revered by those unjustly hunted.
Iltis Heavy Blade Skin
Those who feel the vicious bite of Voruna Medeina’s signature heavy axe skin know why its wielder has no need for subtlety.
Manegarmr Ephemera
The wolf-tail plume of Voruna Medeina’s signature ephemera displays the refined nature of an inner beast.
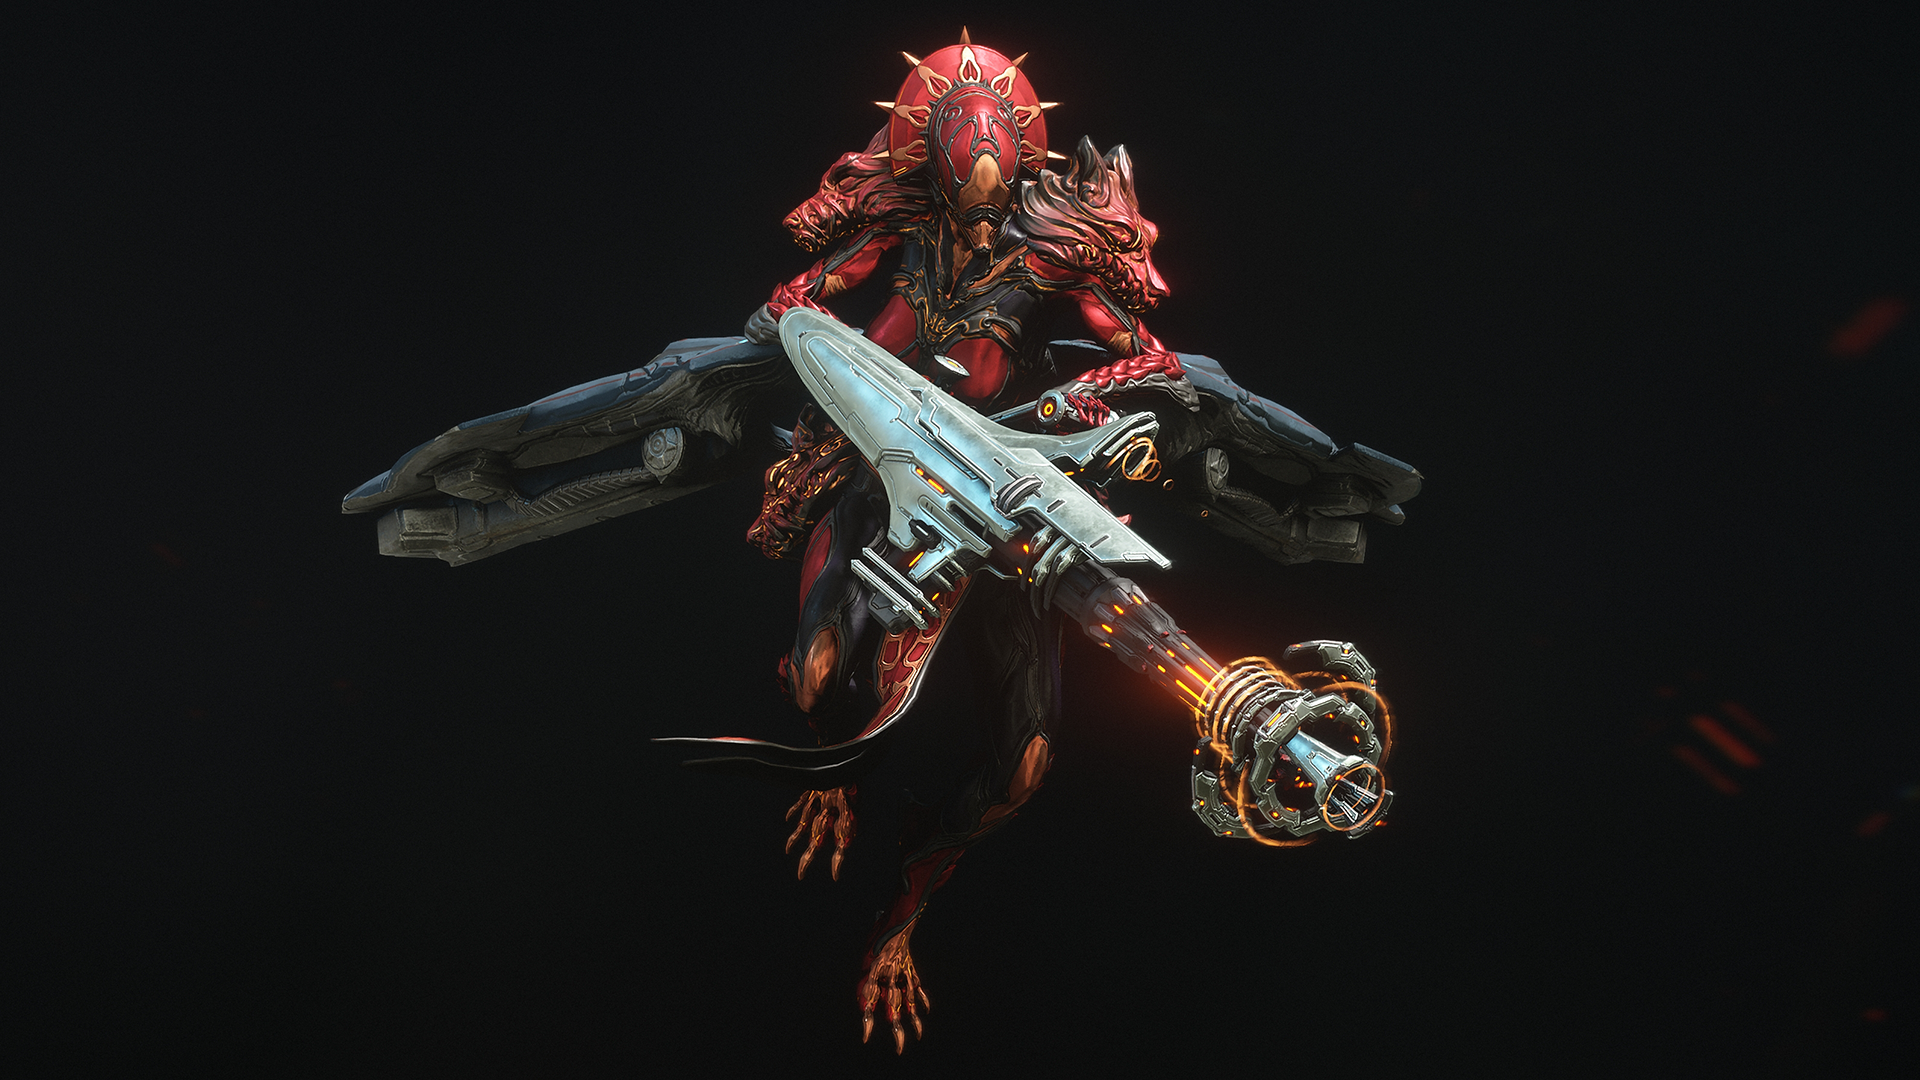
Image Description: Voruna Medeina in Archwing mode, wielding the Tau Dax Archgun Skin.
Tau Dax Armaments Skin Bundle
Take up the distinctive arms of the Dax of Tau with this collection of weapon skins.
This bundle contains the following items, which can all be purchased separately:
Tau Dax Hammer Skin
A skin for hammers modeled after those wielded by the Anarch Libritor Lustratus on Tau.
Tau Dax Bow Skin
This bow skin with the enlarged upper limb of Dax design is based on those used by Dax Arcus.
Tau Dax Polearm Skin
A polearm skin that replicates the weapon carried by Dax Capsarii into battle as a symbol of hope for victory.
Tau Dax Thrown Weapon Skin
This thrown weapon skin bears the heavy, distinctive design of the kunai used by Dax Tenebra.
Tau Dax Nikana Skin
A trusty sword is the soul of a warrior. This nikana skin, decorated by flashes of orange, is carried by each Dax Gladius on Tau.
Tau Dax Rifle Skin
This rifle skin recreates the standard-issue firearm for Dax forces who fight for Tau.
- Note: Not every weapon in the category is compatible with this skin. Compatibility can be verified in the Arsenal > Appearance > Skin list.
Tau Dax Archgun Skin
This archgun skin of Dax design retracts firing rings down its exposed barrel while attached handles keep the wielder’s hands clear.
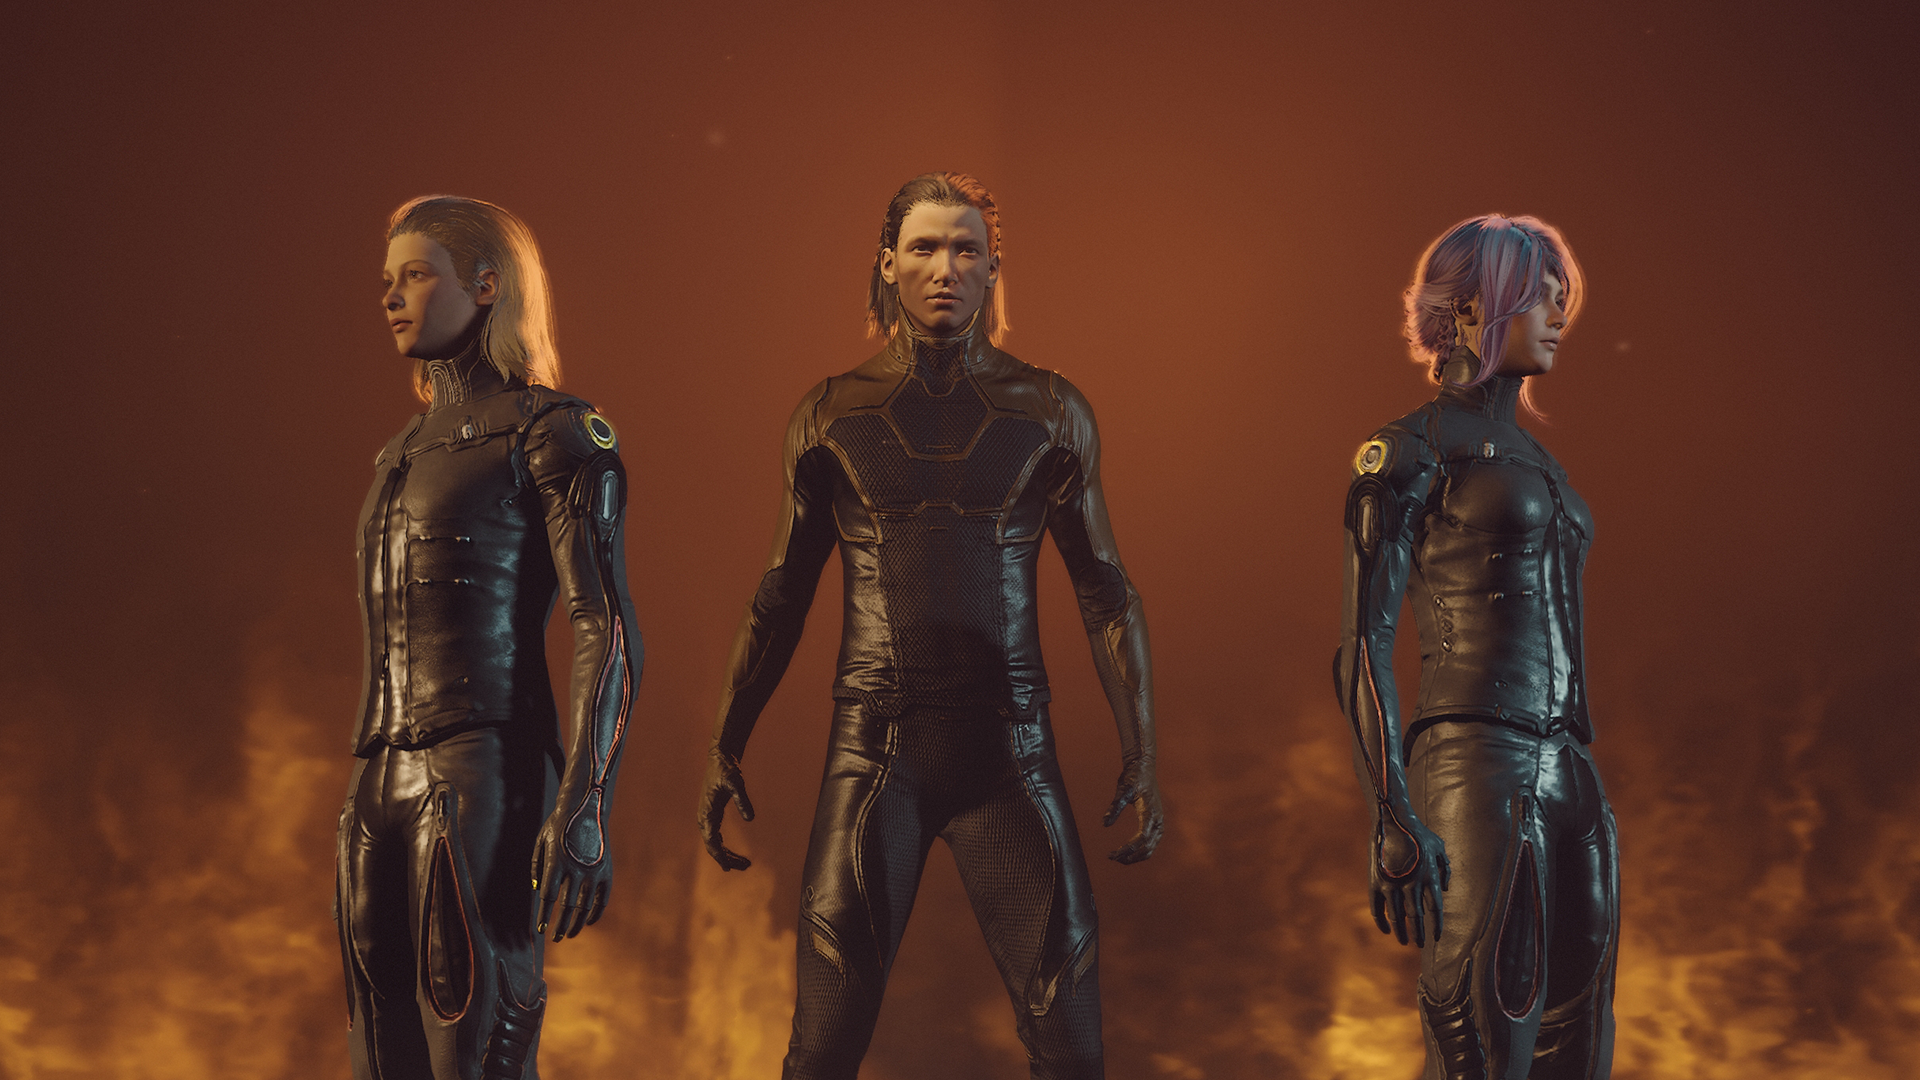
Image Description: Three Drifters stand to model the hairstyles of The Devil’s Triad. From left to right are the styles for Lyon Allard, Roathe, and Marie Leroux.
Crown of Splendor Salon Pack
Adopt the gothic style of the Devil’s Triad with this assortment of hairstyles for the Drifter and Operator.
Includes the following styles from the new Protoframes that can also be purchased separately:
Marie’s Hairstyle
The wispy tresses of Marie’s signature style are rarely seen, but no less intricate for it.
Lyon Hairstyle
Hair is vanity. Lyon’s signature style is the ultimate in low maintenance.
Roathe Hairstyle
Only the most elite of Orokin could afford the time, and expense, of this intricate beaded style.
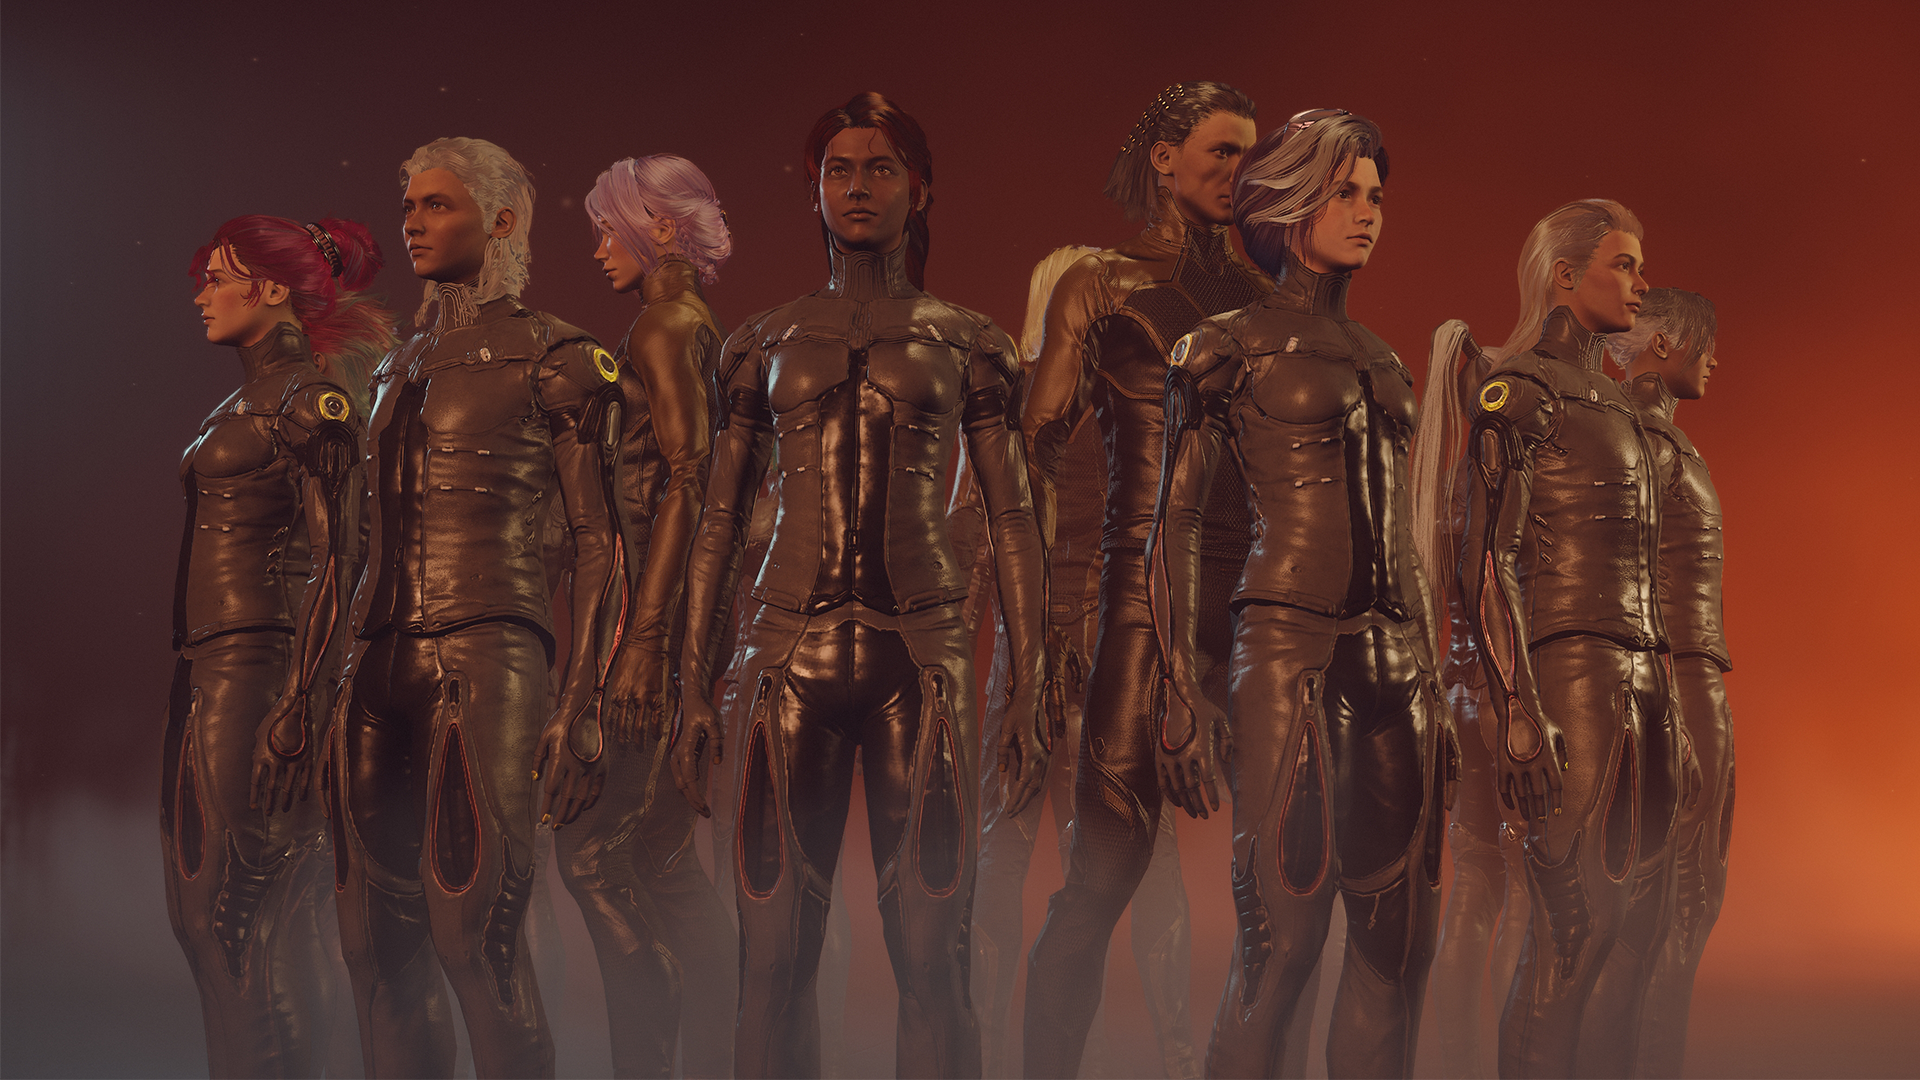
Image Description: Ten Drifters stand to model a sample of the various hairstyles of the Protoframes. On the left and right ends are Kaya’s and Arthur’s respectively, with other members’ hairstyles of the Hex, Roundtable, and Devil’s Triad in the center.
Gemini Salon Pack
Be in style whether the year ends in ‘99 or otherwise, with this collection of looks for the Operator and Drifter featuring the signature hairstyles of the 1999 Hex, Roundtable, and the Devil’s Triad Protoframes.
Includes the following styles from the new Protoframes that can also be purchased separately:
- Amir’s Hairstyle
- Aoi’s Hairstyle
- Arthur’s Hairstyle
- Eleanor’s Hairstyle
- Flare’s Hairstyle
- Kaya’s Hairstyle
- Lettie’s Hairstyle
- Loid’s Hairstyle
- Lyon’s Hairstyle
- Marie’s Hairstyle
- Minerva’s Hairstyle
- Roathe’s Hairstyle
- Rusalka’s Hairstyle
- Velimir’s Hairstyle
Definitive Salon Pack
You’re only as good as your last haircut - make it a great one with this ultimate collection of looks for the Operator and Drifter featuring all standard hairstyles.
Includes the following styles from the new Protoframes that can also be purchased separately (expand spoilers):
- Jillian’s Locks
- Short Front Flip
- Undercut Kaithetail
- Tied Back Dual
- Short Right Flip
- Short Sidecut
- Undercut Front Flip
- Crest Full
- Coiffed Bun
- Bob tendrils
- Bob Short
- Braid Crest
- Braid Kaithetail
- Curls High
- Curls Short
- Curls Full
- Tied Back Short Kaithetail
- Tied Back Long Kaithetail
- Bun Low Curl
- Tied Back High Kaithetail
- Tied Back Full Kaithetail
- Bun High Curl
- Cropped Waves
- Cropped Short
- Lillian’s Locks
- Midlength Bluntcut
- Midlength Feathered
- Tied Back Topknot
- Coiffed Braids
- Coiffed Kaithetail
- Midlength Sidepart
- Braid Forelocks
- Bun Tendrils
- Tied Back Tendrils
- Braid Undercut
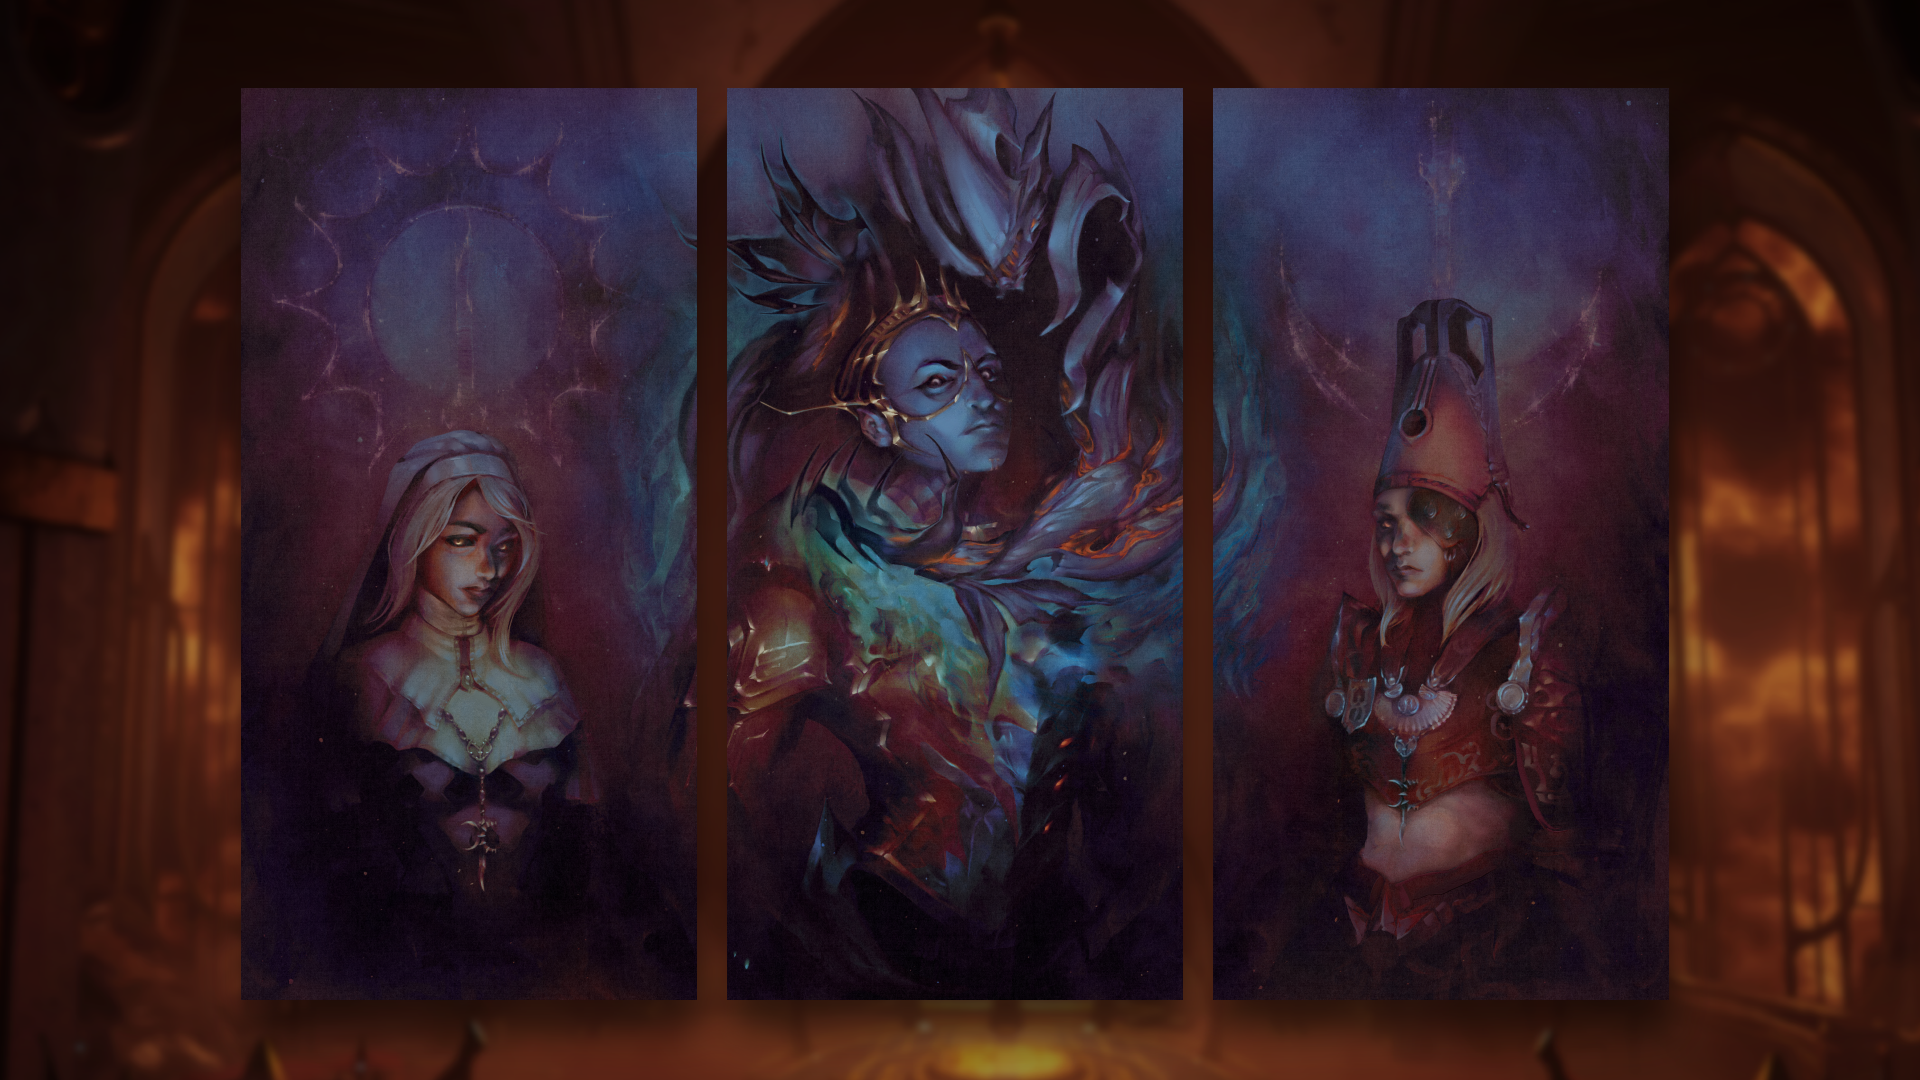
Image Description: A composite image of the three Devil’s Triad Community Displays that together form one larger art piece. From left to right is Marie, Roathe and Uriel, and Lyon all in pensive reflection.
The Devil’s Triad Community Bundle
A bundle containing displays of Marie, Lyon, and Roathe. Together, they form the Devil’s Triad. These displays can be placed individually, or side by side to create a seamless piece. Each can also be purchased separately.
Art by EnergyFalcon (Salt).
Marie Leroux Community Display
A display featuring the nun, Marie.
Roathe and Uriel Community Display
A display featuring the Heretic of Xata, and the demon, Uriel.
Lyon Allard Community Display
A display featuring the priest, Lyon.
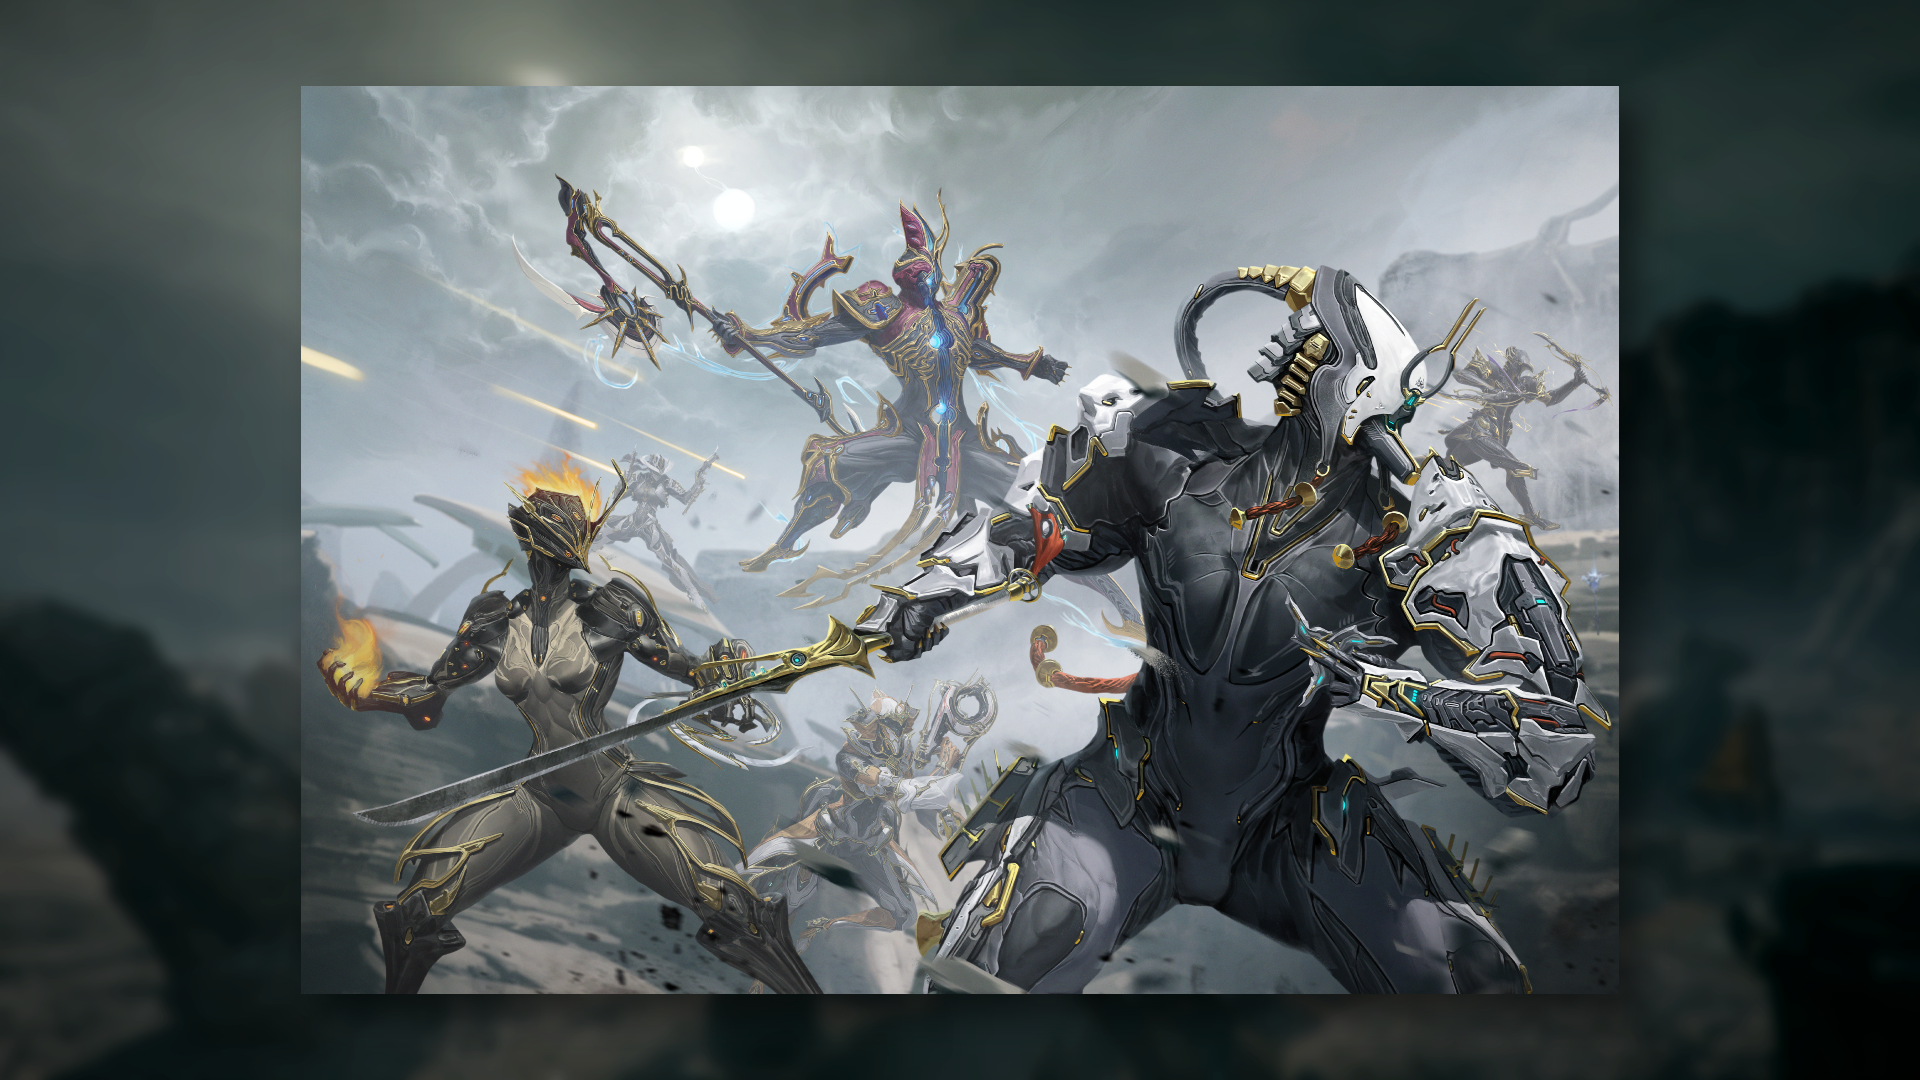
Image Description: Six Prime Warframes are poised for combat on the desolate battlefield of The Perita Rebellion. In the foreground is Ash Prime, Ember Prime, and Caliban Prime, while in the background is Mesa Prime, Protea Prime, and Volt Prime.
Prime Vanguard Display
An ornate display showcasing the Prime Vanguard by Kevin Glint.
General Market Additions
-
Tektolyst Artifact Acquisition Pack (one-time purchase)
- Unlock the secrets of ancient Focus Schools and unleash their ultimate power, the Tauron Strike. Contains all the resources you need to acquire a Tektolyst Artifact weapon from Marie Leroux, in La Cathédrale.
-
Contains:
- 150 Lyroic Bridge
- 150 Ren Hypercore
- 150 Ascaris Prime
-
Each Focus School’s Lua Lens has been added to the Market!
- Lua Lenses have the most converting power of all the lens types, converting 5.5% of excess Affinity into Focus. With the Focus expansion, they (like all other Focus Lenses) grant +10% bonus Tauron Strike Charge Rate.
- These are available in the market to players who have completed The Second Dream Quest.
PRIME VANGUARD VARZIA OFFERINGS (BEGINS DECEMBER 18)
As part of the upcoming Prime Resurgence End of Year Event, the Prime Vanguard Warframes will be part of Varzia’s Wares for the first rotation from December 18, 2025 - January 15, 2026.
This is a special time-limited event through Varzia to celebrate the release of The Old Peace and give players an opportunity to own the Warframes that make up the Prime Vanguard:
- Mesa Prime
- Ash Prime
- Volt Prime
- Ember Prime
- Caliban Prime
- Protea Prime
Vanguard Relics will be available for Aya containing the Blueprints for the Warframes listed. These new Relics were created specifically for this event to offer players a chance to earn all six Prime Warframes. Given the unique nature of these Relics with their premium vaulted offerings, there will be a purchase limit of 100 per Vanguard Relic (400 total for all Relics) per player in order to maintain Prime economy balance.
Each Warframe’s Pack (with the exception of Caliban and Protea Prime*) will be available to purchase for Regal Aya that also includes their weapons and accessories. Pack contents will also be available for individual purchase.
*Caliban Prime and Protea Prime were both recently available via Prime Access and have not yet been vaulted. To maintain the order of operations with Prime Resurgence and respect those who had purchased these packs through Prime Access, they are excluded from the Regal Aya packs.
More details will be shared closer to launch on December 18th!
ADDITIONS
-
We have added the option to select Mandarin as an Audio Language from the launcher! This will change character voice lines (specifics below) upon launching the game.
-
How to change: Click on the gear wheel in the launcher, navigate to the “Audio Language” drop down menu and select “Simplified Chinese”* from the list.
-
*We will be updating this to correctly state “Mandarin” in a future cert update.

-
*We will be updating this to correctly state “Mandarin” in a future cert update.
-
What to expect:
- We have ported over the existing Mandarin VO (voice overs in missions, Quests, etc.) from our WeGame build into the Global build. Providing voice lines for a game as big as ours is no easy task! So there may be areas where no Mandarin VO lines are available and in those cases, it will default to the English version with Simplified Chinese subtitles.
- Subtitles have been updated to more closely follow the new Mandarin VO, while intentionally keeping the existing global terminology instead of the China-build terms. In a few cases we add the English name in brackets (for example, 莲 (Lotus))
- We look forward to receiving your feedback on the addition of Mandarin VO to the game. Thank you to our friends at WeGame for their tremendous work in providing Warframe with the Mandarin Voice Overs!
-
How to change: Click on the gear wheel in the launcher, navigate to the “Audio Language” drop down menu and select “Simplified Chinese”* from the list.
-
The Legendary 6 Mastery Rank Test is now available to those eligible!
- Succeeding will reward you with the Aurichalc Legendary Mastery Slate.
-
Added 54 new Höllvania-themed Dojo Decorations! Ranging from stairs, tarp tunnels, chimneys, railings, scaffolding and so much more. You’ll be ready to start your own construction company!
- The remaining Hollandia -themed Dojo Decorations we showed earlier this year will be released in the future.
- Added “The Teacher” Somachord Tone to Teshin’s Steel Path Honor Store for Steel Essence.
CHANGES
Entrati Syndicate Changes
With the introduction of The Devil’s Triad to the KIM system, your rank with the Entrati Syndicate influences one of the story paths available to you. With this in mind, we revisited the Entrati Syndicate to make it easier for folks to reach the rank of Family.
Rank-Up Sacrifice Changes:
The Rank-Up sacrifices for the Entrati Syndicate are tied to the family’s story, but we have replaced various items where we could to reduce rarity and difficulty of acquisition.
-
Rank 1: 6 Benign Infested Tumor and 6 Ferment Bladder
- Was: 3 Spinal Core Section (available from fish found exclusively via Cave Fishing)
-
Rank 2: Keratinos Blueprint, 1 Daughter Token, and 1 Father Token
- Was: 1 Keratinos Blades Blueprint, 1 Keratinos Gauntlet Blueprint, 1 Daughter Token, and 1 Father Token
- The Standing Cost to acquire the Blueprint has remained the same, but it’s one less item to purchase.
-
Rank 3: 3 Sly Vulpaphyla Tag, 3 Vizier Predasite Tag, 1 Son Token, and 1 Mother Token
- Was: 5 Common Avichaea Tag, 1 Medjay Predasite Tag, 1 Son Token, and 1 Mother Token
- The Tags required are now from common subspecies and feature easier species to find on the Cambion Drift.
-
Rank 4: Zarim Mutagen Blueprint, Arioli Mutagen Blueprint, 1 Son Token, and 1 Father Token
- Was: Zarim Mutagen, Arioli Mutagen, 1 Son Token, and 1 Father Token
- Players no longer need to build the Mutagens.
-
Rank 5: Seriglass Shard, 1 Mother Token, and 1 Father Token (Unchanged)
- While the rewards are unchanged, we have made changes to Tokens and to the Seriglass Shard’s price which will make it easier to acquire.
Token Standing Changes:
- Daughter Token: increased from 100 to 500 Standing
- Father Token: increased from 100 to 500 Standing
- Otak Token: increased from 100 to 500 Standing
- Son Token: increased from 500 to 1,000 Standing
- Grandmother Token: increased from 1,500 to 3,000 Standing
Other Changes:
- Reduced Seriglass Shard price from 20 to 10 Grandmother Tokens
-
Adjusted Exchange Family Token conversion ratios to maintain Standing Ratio as follows:
- Reduced required Father, Daughter, and Otak Tokens from 10 to 4
- Increased required Mother Tokens from 10 to 20
- Note: Exchanging Tokens gives players 1.5x extra Standing in Grandmother Tokens. With the changes to Token Standing Values, the number of Tokens required to exchange for a Grandmother Token have been adjusted to maintain that ratio.
General Changes
-
We’ve improved damage number visuals so that you see damage numbers from NPCs you are authoritative over when they deal damage, instead of just your own. Basically, if the player caused the damage (whether they are controlling the avatar or not), the player can see the damage number!
- This was something we added to Nokko so that you could see the damage numbers of his Sporepring even when he was in Sprodling mode. Now, we’ve made this game-wide so that you can see any latent damage dealt by Warframe abilities. This is especially useful with the new Tauron Strikes to see the damage dealt after you have used Transference to switch to Operator.
-
Changed Elemental Ammo (e.g. Cyte-09’s Resupply) to apply its elemental damage instance twice On Headshot/Weakpoint hit upgrades/buffs.
- Previously, it was applying this additional instance to the target’s “torso” on headshot. This could result in some issues where hitting a boss’s weak point would prevent elemental ammo from doing any damage because it would be trying to hit their “torso” and not the weak point. This has the added benefit of triggering benefits from weak point hits multiple times (eg. Incarnon charging)!
- Added tips while Modding to better assist players in matching polarity and reaching capacity.
- Added Archwing (i.e., Archgun, Archmelee) indicators in tooltips and the in-game Market.
-
Changed Valkyr’s Passive SFX.
- Reduced the SFX indicator volume after fully charging her Passive.
- Removed the “sword-sheathing” SFX when the Passive is charged.
-
Improved the Gore System to be more, well, gory!
- Should you not wish to see the bloodier splatters from your attacks, you can toggle off Gore in your settings.
- Added a “Sort By:” header when expanding a drop-down to better explain what the drop-down does.
- Improved the UI VFX radial rays for slide out popups (notably when scraping wreckage).
- Updated the Detron’s texture and material.
- Improved tileset logic in the “Protect the Moon” stage of The Second Dream Quest.
PERFORMANCE & OPTIMIZATIONS
- Optimized memory usage in all levels.
- Improved system resource usage when optimizing your cache.
- Improved cache optimization speed on higher-end PCs.
- Optimized memory footprint during a segment of The New War quest.
- Optimized Mutalist Cernos particle usage on GPUs.
- Made small optimizations to download size.
- Optimized capturing screenshots to make it faster in some situations.
- Optimized memory footprint for all platforms.
- Made streaming system optimizations.
- Made a small optimization to level loading.
- Made systemic micro-optimizations to the upgrade system.
- Made optimizations to Duviri, Koumei and hack sound samples.
- Optimized engine startup time and memory footprint in-game.
- Fixed performance issues after leaving Duviri while using Saryn’s Minerva Gemini Skin.
- Fixed performance issues caused by The Hex Protoframes loading into Höllvania missions.
- Fixed Oraxia’s ability clips causing performance issues.
- Made systemic micro-optimizations to network replication.
FIXES
Top Fixes
- Fixed the Gladiator, Vigilante, Carnis, Mecha, Nira, Saxum, Synth and Tek Mod Set bonuses not applying.
- Fixed Host being unable to rejoin the Deepmines Bounty they migrated from.
- Fixed the Captura “Reposition Text to Camera View” option no longer moving text to camera position.
- Fixed explosive projectiles being blocked by bullet passable surfaces (eg: Ogris).
-
Fixed an issue where the Phahd Scaffold (Operator amp component) triggered the effects of other weapon upgrades.
- Since the Phahd secondary fire is derived from a "glaive" type weapon, the weapon was uniquely treated as a projectile, and lingered long enough to erroneously count as whatever weapon you had equipped on your Warframe.
- Phahd attacks will now solely count as an Operator weapon, and will receive buffs from Operator mods and abilities accordingly.
- Fixed the “Exit Game” option in the pause menu missing while in Teshin’s Dojo in The Teacher Quest.
- Fixed Quest progress not being updated properly if losing network connection at the stage completion.
- Fixed being able to start another quest from the Codex while The Teacher is the active quest, resulting in being unable to progress.
-
Fixed being able to trigger an unfinished version of wall running with melee weapon equipped.
- Wall running will be complete in its feature complete state in a future update. A partial version accidentally leaked in The Vallis Undermind.
- Fixed Oxylus’s Scan Matter not working on Cambion Drift Ore veins.
- Fixed Warframe being sent back to a previous respawn location after falling off-map as Operator elsewhere.
- Fixed Nokko’s Passive unintentionally working for Hosts in Arbitrations.
- Fixed Oberon’s Passive not working after loading into a 1999 Mission from the Höllvania Central Mall.
- Fixed instances of Oraxia’s Mercy’s Kiss not properly executing enemies below 50% health.
- Fixed Deepmines Bounties being a requirement to unlocking Steel Path.
-
Fixed Clients on low-spec machines potentially losing connection when attempting to load into a Höllvania mission.
Warframe and Weapon Fixes
- Fixed Punch Through causing projectiles from certain weapons to bounce off of dead foes instead of punching through them.
- Fixed the Cortege locking players in the alt-fire mode after pressing the input while it’s uncharged.
- Fixed client Nokkos being unable to cast Reroot in the Simulacrum after the Host invites while using the Arsenal.
- Fixed Oraxia being unable to latch onto the Ascension elevator with Silken Stride.
- Fixed players losing their Mod configurations until death following a Host Migration in Duviri’s Circuit.
- Fixed The Profit Taker’s legs having unusual hitboxes, which made it appear that hitscan Archgun damage was dealing no damage (was causing 0s to appear when dealing damage).
- Fixed being downed right after exiting Nokko’s Reroot causing the player to float uncontrollably in the Sprodling revive state.
- Fixed Nokko’s Brightbonnet replenishing Operator Energy.
UI Fixes
- Fixed Undermind Bounties appearing as Saturn, Phoebe when viewing friends' activity.
- Fixed Ordis’ vendor menu in the Drifter Camp not displaying the number of Vestigial Motes owned.
- Fixed UI prompts during The Sacrifice being ineligible due to the small size of the interactable text.
- Fixed generic notification popups not appearing in the correct location immediately after changing Menu Scale.
- Fixed mod slot UI backer scaling up and getting stuck in larger size after equipping a Mod.
- Fixed Friends and Nightwave screen overlapping upon Trade initiation.
- Fixed binding callout in Duviri Selection popup not appearing after completing Paragrimm’s Tomes objective in Duviri.
VFX & SFX Fixes
- Fixed cases where the Deepmines Mushroom buff VFX would not scale properly on Warframes, notably with Titania when she shrank into her Razorwing state.
- Fixed the heavy melee attack VFX not working with Gemini Skins.
- Fixed universal shotgun skins disabling firing sound FX on certain shotguns.
- Fixed the Spore Ephemera growth VFX appearing on Warframe instead of on the ground as intended.
- Fixed Vitoplast being barely visible in Void Flood missions if the Visual Effect slider is set to 10.
- Adjusted audio mix for the Gruzzling as they were a bit louder than other Murmur enemies.
- Fixed issue with Bonewidow’s VFX.
- Fixed Valkyr’s jump spin SFX stacking while Hysteria is active.
Cosmetic Fixes
- Fixed the Hildryn Sarcostema Helmet not being platform locked.
- Fixed various offset issues on the Brazontik armor set.
- Fixed the Eos Prime, Prisma Edo and Prisma Daedalus attachments only being equipped on one side while the “Customize Left/Right separately” toggle is disabled.
- Fixed an issue where Gemini Emote voice lines didn't work in all Base of Operations.
- Fixed cloth issues on the Stormfall gloves and jacket. This fix also addressed cloth issues with a Duviri NPC.
- Fixed Gauss Prime’s thigh pads clipping through his legs with his Default, Agito, Graxx and Nitrolyst skins.
-
Fixed the glittering effect of the gold on the Commodore Prime being broken and appearing distorted.
- In order to fix this issue, the gold tint was adjusted slightly so you may need to update your color scheme slightly to compensate.
- Fixed changing to Nokko and defaulting his colors in hubs causing him to inherit the previously equipped Warframe’s colors instead.
- Fixed Look Links using the free colors from the Classic palette not applying if you do not own the full palette.
- Fixed broken hand textures on the Zephyr Conquera skin.
-
More fixes towards Kullervo Apostate’s tint channels.
-
This is a follow up to the original fix we made in The Vallis Undermind update to address the skin’s tint channels making colors appear too dull. We’ve further balanced the color and roughness, which has also been applied to his Culpa Syandana.
-
This is a follow up to the original fix we made in The Vallis Undermind update to address the skin’s tint channels making colors appear too dull. We’ve further balanced the color and roughness, which has also been applied to his Culpa Syandana.
Environment/Tileset Fixes
- Fixed an unclear extraction waypoint in the Desdemona, Uranus tileset.
- Fixed a floating plant in the Five Fates Captura scene.
- Fixed trees not properly connecting to the ground in Duviri.
- Fixed texture issues in the Courtier’s Bliss Dojo Room.
- Fixed missing textures in a Grineer Outpost in the Plains of Eidolon.
- Fixed a floating rock near Gara Toht Lake in the Plains of Eidolon.
- Fixed a map hole in the Grineer Sealabs tileset.
- Fixed being able to see through the map in a certain section of the Space Port in the Orb Vallis.
- Fixed flickering floor textures while playing in the Corpus Ship tileset.
- Fixed broken geometry in the Grineer Asteroid tileset.
- Fixed a map hole in the Corpus Outpost tileset.
- Fixed a floating green square above Fortuna’s entrance in the Orb Vallis. Avakot?
- Fixed Duviri Captura scenes lacking vertical or horizontal barriers to teleport the player back to the intended play area.
- Fixed texture flickering in a tile in the Höllvania tileset.
- Fixed doors in Teshin’s Dojo doubling up its entry in The Teacher quest.
- Fixed a door in the Deepmines tileset having poor trigger detection to open.
- Fixed rendering issues for cables in the Höllvania tileset - this was causing them to have incorrect thickness and texturing.
- Fixed hole in map in one of the tiles in The Teacher quest.
- Fixed detached foliage on one of the rock walls in the Deepmines tileset.
- Fixed the camera clipping through geometry when the player stands at the end of one of the tunnel paths in the Deepmines tileset.
- Fixed being able to see outside of the tile when standing on top of the mod bench in The Teacher Quest.
- Fixed floating fences on a catwalk in a Gas City tile.
- Fixed a texture issue in a Höllvania tile.
- Fixed the orbital bombs in the Kela de Thaym fight not reaching the ground before they explode.
- Fixed issues with reflections in the Orbiter that was causing lighting to pop.
- Fixed invisible geometry at entrance of Inaros’ tomb in the Sands of Inaros Quest if the Skaut Landing Craft skin is equipped.
Misc. Fixes
- Fixes towards enemies that are affected by Radiation Status Effects surviving against each other and then turning to team up against you. The uno reverse radiation effect
- Fixed the Loadout Menu opening when stepping into a certain spot near Necraloid in the Sanctum Anatomica.
- Fixed parts of the Skaut’s model missing in extraction tiles with the Day of the Dead skin equipped.
- Fixed Infested Mobility’s ending SFX playing prematurely if it was modded for over 300% Duration.
- Fixed Corpus Ospreys getting stuck in doorways.
- Fixed missing bottom textures on various 1999 Dojo Decorations.
- Fixed Grineer Scorpions swinging indefinitely in place.
- Fixed missing Drifter voicelines after petting a Kubrie, Kexat or Kaithe in Duviri.
- Fixed The Teacher’s “Exit the Arsenal and Return To Teshin” notification persisting on screen until the player installs Cryo Rounds.
- Fixed Grineer Butchers and Scorpions remaining passive during The Awakening Quest.
- Fixed Noctua’s Paragrimm decoration appearing inverted.
- Fixed instances of graphical artifacts occurring while using dynamic resolution.
- Fixed Corpus enemies that use jet packs (such as Terra Provisor) using walking animations while jetpacking.
- Fixed being unable to rotate Adversary in the diorama while using a controller.
- Fixed Drifter being off screen in the Focus Menu in the Orbiter and Drifter’s Camp when using the Agile animation set.
- Fixed Warframe kneeling animation in the menus breaking after hitting a respawn volume while they are open.
- Fixed images lingering on screen in the Kela De Thaym fight after she and her audience have completed speaking.
- Fixed Operator model clipping through floor during the chair spin jump scare cutscene in “Get to Entrati” stage of The Hex quest.
- Fixed being able to see Sevagoth’s Shadow’s arms through the coffin during the end cinematic of the Call of the Tempestarii quest.
- Fixed loss of function when loading into Railjack mission as Operator.
- Fixed The Awakening Quest missing subtitles during the intro cinematic.
- Fixed the K-Drive behaving erratically in Captura and Simulacrum when disarmed via Warframe abilities (for example Loki’s Radial Disarm) and friendly-fire is active.
- Fixed one of the Yareli Community Customizations missing from Prime Time 447.
- Fixed the Operators in the Erra cutscene having some odd clipping in their chest.
- Fixed Captain Vor’s Janus Key using the wrong material (it didn’t look gold as intended).
- Fixed Larkspur Prime’s listing in Prime Resurgence not stating that it includes an uninstalled Gravimag (original PSA).
- Fixed three street lights in 1999 having health when they should not.
- Fixed Operator transmissions in the Jade Shadows quest that created odd interactions with Stalker.
- Fixed a missing sentence in a Nightcap subtitle.
- Fixed Corpus enemies that use jet packs (such as Terra Provisor) to be able to fly in the Vallis Undermind.
- Fixed edge case where you could be forced logged out if you tried to remove a pending friend request who has a space in their alias.
- Fixed Vadarya Prime missing pickup mesh when disarmed.
- Fixed the symbols required to access control panels in the Gas City puzzle missing.
- Fixed infinite ammo in The Teacher quest not appearing correctly in the HUD.
- Fixed Warframe lingering in the Nightwave screen.
- Fixed rare case of being unable to purchase the Winter Accessories Bundle.
Script Errors & Crash Fixes
- Fixed a script error caused by Nokko’s Reroot.
- Fixed a script error caused by Mag’s Magnetize.
- Fixed a crash after using speed-increasing Abilities.
- Fixed a script error caused by the Sprodling Ephemera.
- Fixed a script error in the Sands of Inaros quest when fighting Inaros.
- Fixed a script error in the Railjack section of The New War quest.
- Fixed script error caused by custom cooldown HUD colors while using Archwing Blink.
- Fixed rare script error with The Unseeing Herald.
For list of known issues that are on our radar, visit our dedicated thread: https://forums.warframe.com/topic/1478410-known-issues-the-old-peace/