 Exporting your Files using TennoGen Blender Plugin
We’ve created a Blender Plugin that best approximates how TennoGen Creations will look within our engine. Since artists will need to preview their submissions using this plugin, it’s also used to export your final submission!
Download the Blender Plugin: Click Here
Download Blender: https://www.blender.org/
Installation
After downloading the Plugin and Blender, simply drop the WarframeTennoGen folder in here:
C:\Program Files\Blender Foundation\Blender 4.4\4.4\scripts\addons_core
or inside your custom script directory folder.
You should be able to find the add-on now in the Preferences window (Edit > Preferences).
Once enabled, WarframeTennoGen add-on can be found on the right side of the 3D viewport, on the side bar accessible with the ‘N’ hotkey.
Material Tools
To avoid having to set up your materials by hand and to ensure the materials can be easily imported into the game engine, the Materials panel exists to speed up and simplify the process of creating and tweaking Warframe-compatible materials.
To create a new material, specify a desired name, type, and hit New.
Currently active material is highlighted in the material list. You may select multiple objects with multiple different materials in the Viewport to edit their properties at once (as long as they use the same material type).
For the PBR material, you have the option of using Quick-Load PBR Textures to select a single texture file and let the script populate the rest of the material’s texture inputs as long as there are other image files in that same directory that follow the same naming scheme:
Texture_x.png where Texture is the name of your texture set and x is the
type suffix.
Example of a correct naming scheme:
    Excalibur_d.png    Base color map (Diffuse / Albedo)
    Excalibur_s.png    Reflectance map (Specular / Metalness)
    Excalibur_r.png    Microfacet roughness
    Excalibur_n.png    Tangent normals
    Excalibur_e.png    Emissive mask (Green channel may optionally contain a UV-animated seamless texture)
    Excalibur_t.png    RGBA tint map
Example of an incorrect naming scheme:
    Excalibur_diffuse.png    We only expect one character after the underscore (_)
    Excal_s.png              The 'texture set' before the underscore must be the same
    Excalibur_r.png          The 'texture set' before the underscore must be the same
    Excal_bake_n.png         Too many underscores
    emissives.png            Name is not descriptive / type is not declared
    ExcaliburTintMap_d.png   Incorrect type suffix
Textures can also be loaded one by one below the Quick-Load Textures button.
TennoGen materials support texture animation — simply press Play (Space bar by default) in your Blender Scene and you should see it. For the PBR material, Use Emissive Mask needs to be enabled, and Emissive Pan coordinates need to be specified.
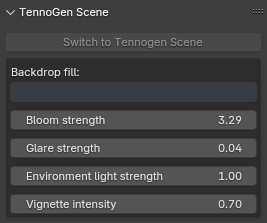
TennoGen Scene
We require the use of the built-in Tennogen Scene for submission screenshots to supply the basic lighting. The controls here are pretty self explanatory. Use tastefully! For more information on screenshot requirements, check out the dedicated guide.
Zip Exporter
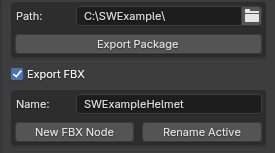
The Exporter will export Blender objects and data in a Warframe-friendly format. By default,
it’s set up to export materials only (i.e. texture reskins).
To allow export of custom geometry (such as character helmets or attachments), first tick Export
FBX in the Exporter panel.
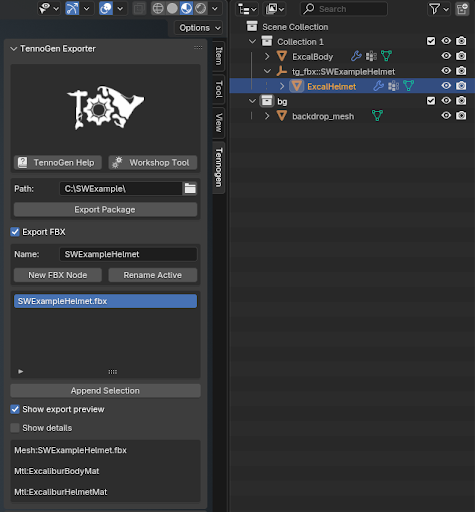
Since some submissions may contain a mix of texture reskins and custom geometry, the Exporter needs to know which objects should have their geometry included in the package. This is done through nesting mesh objects within “FBX Nodes” (Essentially Empties with a name prefix that the plugin recognizes).
The “New FBX Node” button will create one such node, and automatically parent your current selection to it.
Important: One node will export one FBX file. For things like armor sets, each armor piece needs to sit within its own FBX file, so for a full set of 5 pieces we expect 5 FBX meshes.
Append Selection can be used to parent additional selected objects to the node that’s currently active in the list.
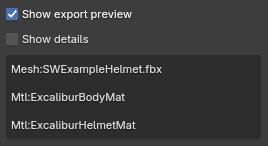
Show export preview will list a text-only view of the package’s contents.
Show details will list individual mesh objects and images associated with FBX and materials that
will be exported.
Make sure the export preview looks correct before exporting!
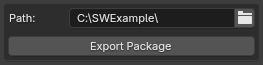
Lastly, Export Package will package your scene and export it as a .zip archive,
ready for upload with the Steam Workshop tool.