




 Sauvegarde Cross Platform
 Twitch
– Lié
Twitch
– Lié

Update 44.1.0: Iceblade of Narin: The Icebind
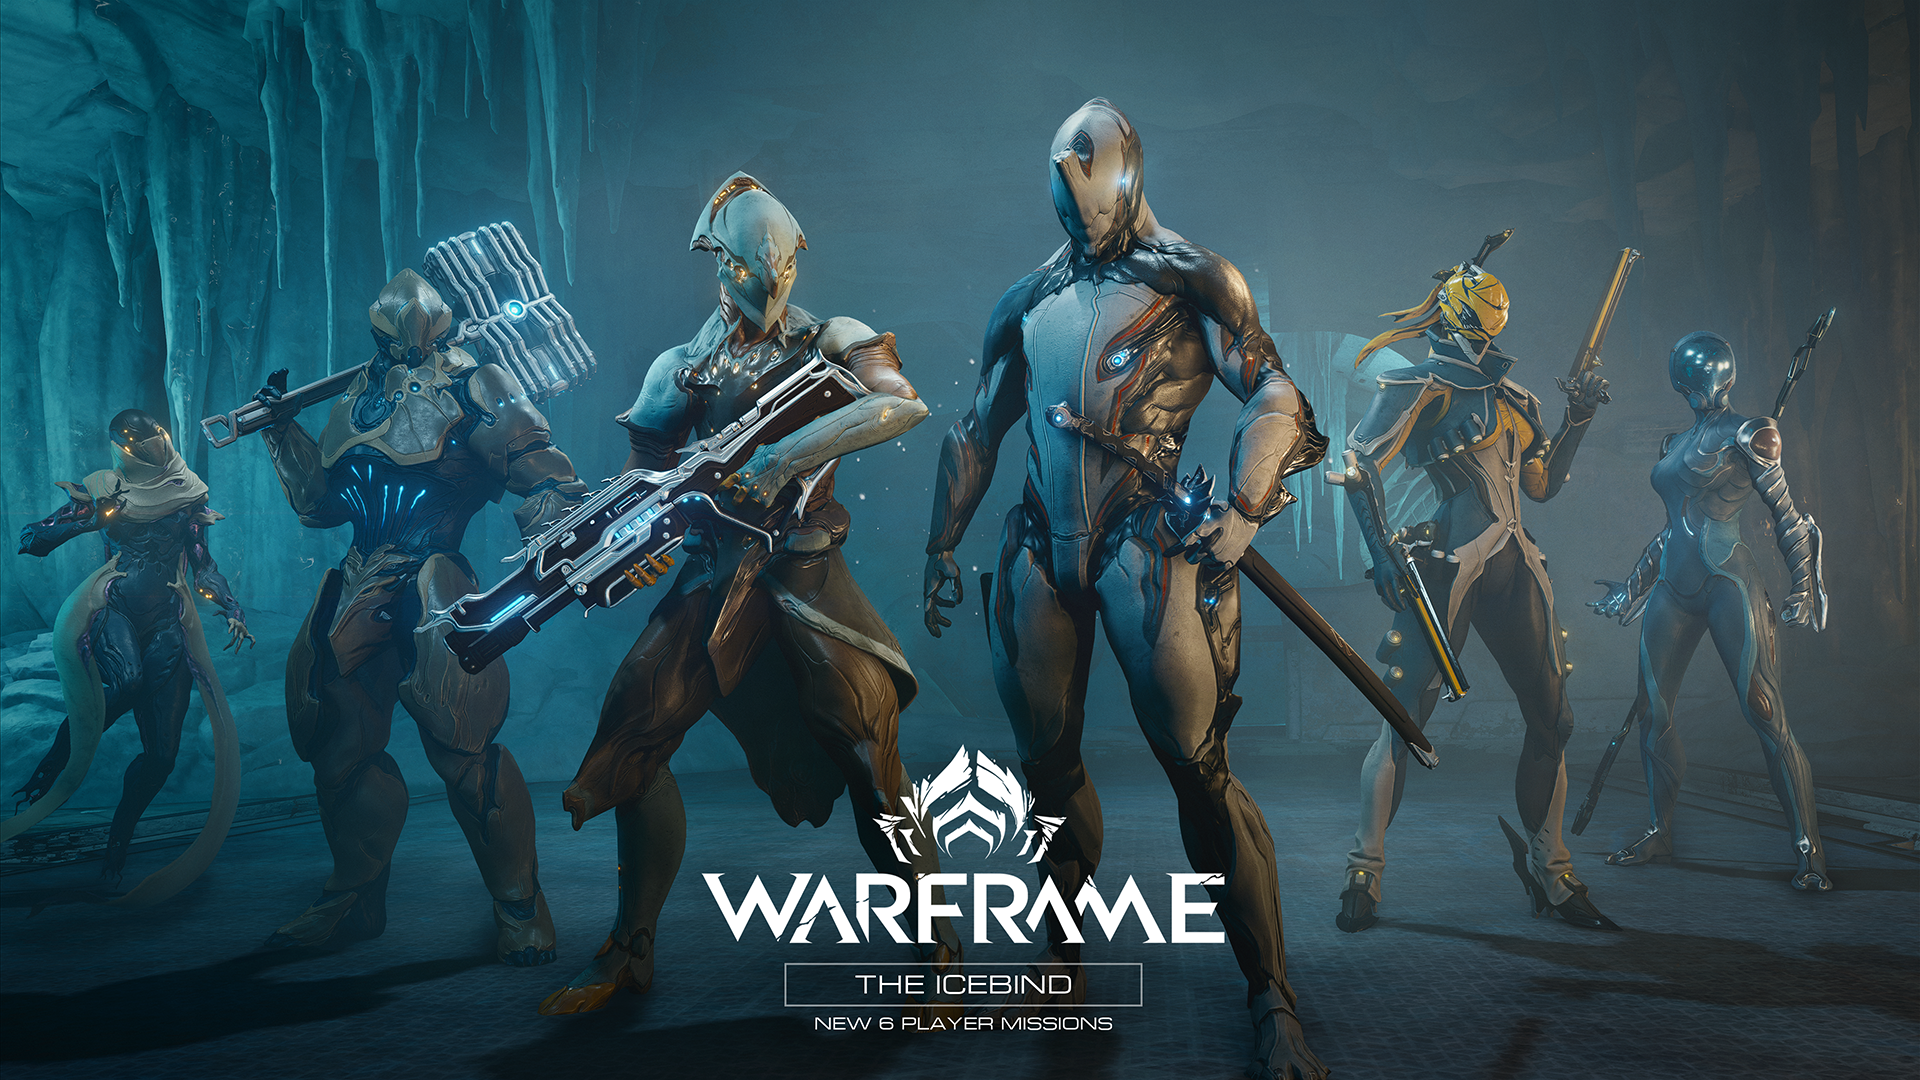 Image Description: Six Warframes stand poised for battle within a frosty cave with the Warframe logo and The Icebind: New 6 Player Missions in the foreground. From left to right we can see: Wisp, Rhino, Volt, Excalibur, Mesa, and Mag.
UPDATE 44.1: ICEBLADE OF NARIN: THE ICEBIND
Time for an experiment, students! What happens if you ring that bell?
Our newest gamemode has arrived! The Icebind is an experiment for both us making Warframe, and for those playing it. This new mode aims to give players space to push their loadout and tackle cooperative objectives — as the community rings their Cryobells, we’ll be watching for feedback as we continue to iterate on this project in phases.
NEW GAMEMODE: THE ICEBIND
The Icebind is manifested through the Cryobell ceremony. High upon Yuvan Peak, Cryobells have formed, drawn out by Narin’s influence. Each bell's tone leads to a time and place where a dark influence has taken hold. Six warriors must gather to ring the bell. Together they must overcome the Binds of a force not of this plane.
General Overview for The Icebind:
Players can ring a Cryobell to take them to The Icebind, a new mission type with these key characteristics:
-
Six player squads, where there can be no more than one of each Warframe.
- (i.e. no six man Pink Rhino Squads this time, sorry!)
- Approximately 10-15 minute long missions.
- Level 999+ Enemies.
- Each Cryobell (mission key) comes with a randomized mission type, enemy, location, and modifiers — the squad votes on which one to play!
- Various mission restrictions, including No Self Revives, Gear Cooldown Increase, Empowered Enemies, and more.
- Guaranteed Riven Splicer upon completion, plus an additional reward from the reward pool.
- Bonus rewards for each Squad Side Objective completed (up to 3 per mission).
-
Players can complete these missions three times a week.*
- * players can stockpile up to six mission keys if they do not use them all each week.
To access The Icebind, players must have completed the following:
- Completed both the Angels of the Zariman and Whispers in the Walls quests
- Unlocked (but not necessarily completed) either Elite Temporal Archimedea or Elite Deep Archimedea
The Core Icebind Loop
The Icebind is different each time a player steps into it, beholden to the randomized traits of the Cryobell. Before we explain the various Binds (i.e. modifiers) introduced by the Cryobells, it’s important to understand the core gameplay loop. This section explains the overarching structure of playing The Icebind, and the section following will outline the various Binds that can affect it.
Starting The Icebind
This new mission can be started from Yuvan Peak, where players need to perform two important steps:
-
First, claim their Cryobells from the ice pillar atop Yuvan Peak.
- Three Cryobells form each week, following weekly reset at Midnight UTC on Sundays.
- Players can stockpile up to six Cryobells if they did not use them all in one week.
- Second, with Cryobells in-hand, speak to Cephalon Melica and select “Ring a Cyrobell”
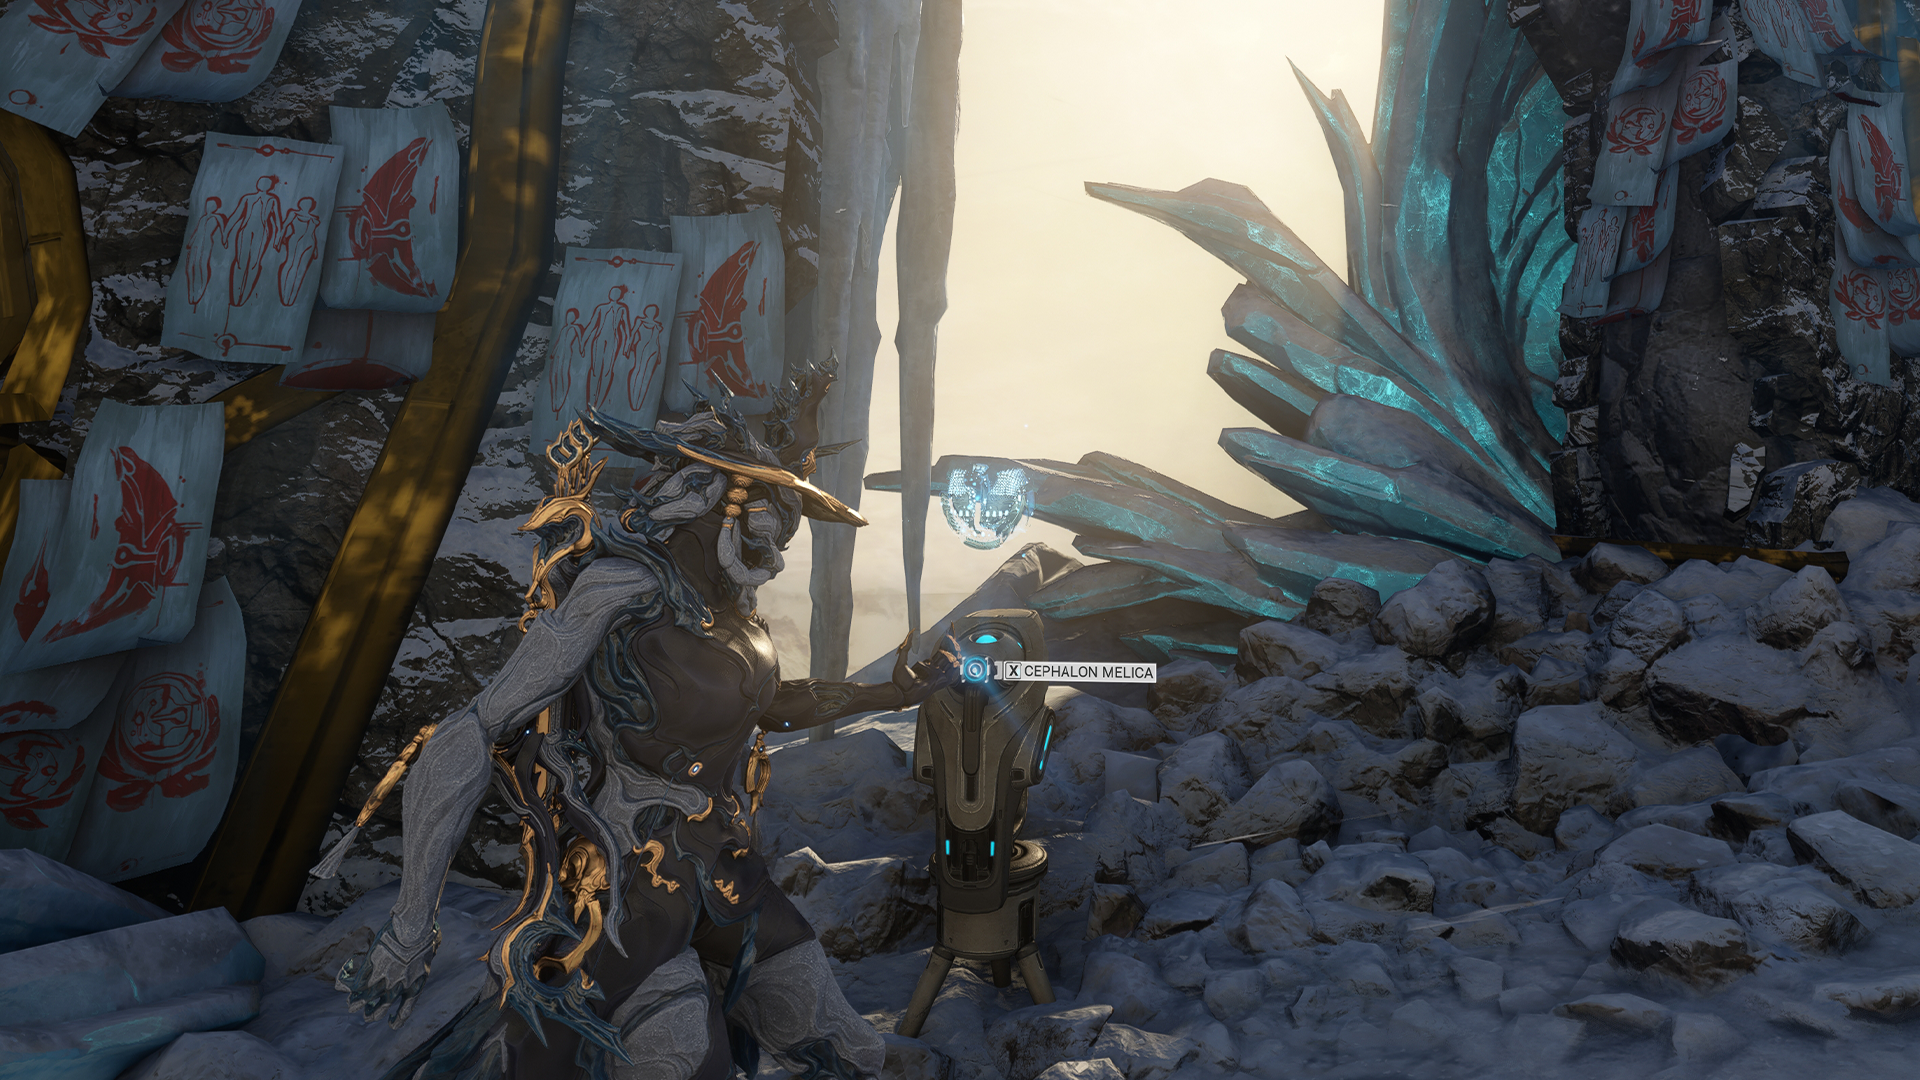 Image Description: Screenshot of Narin standing in front of Cephalon Melica at the Yuvan Peak. The context action UI for Cephalon Melica can be seen, with large ice pillars covered in talismans on either side behind the Cephalon.
Doing so will open The Icebind party creation screen, where you can invite players to form your squad. The host can only form a six player squad using the “Ring the Cryobell” screen. With its launch, The Icebind does not have public matchmaking as these missions require more cooperation than traditional Warframe missions (which we’ll cover a little more in the Squad Side Objective section).
SELECTING A CRYOBELL
Players who are invited to a Squad will be summoned to Yuvan Peak, where they can then gather their Cryobells and proceed to Cephalon Melica. All players must speak to Cephalon Melica and select “Ring a Cryobell” to start the mission.
In this screen, players can edit their loadout and select which Cryobell they wish to ring. Your choice of Cryobell matters, because it determines your Personal Bind (which is a guaranteed personal modifier for the mission, regardless of which Cryobell is chosen by the squad) and which version of The Icebind players will vote on (including the mission type, enemy type, and modifiers).
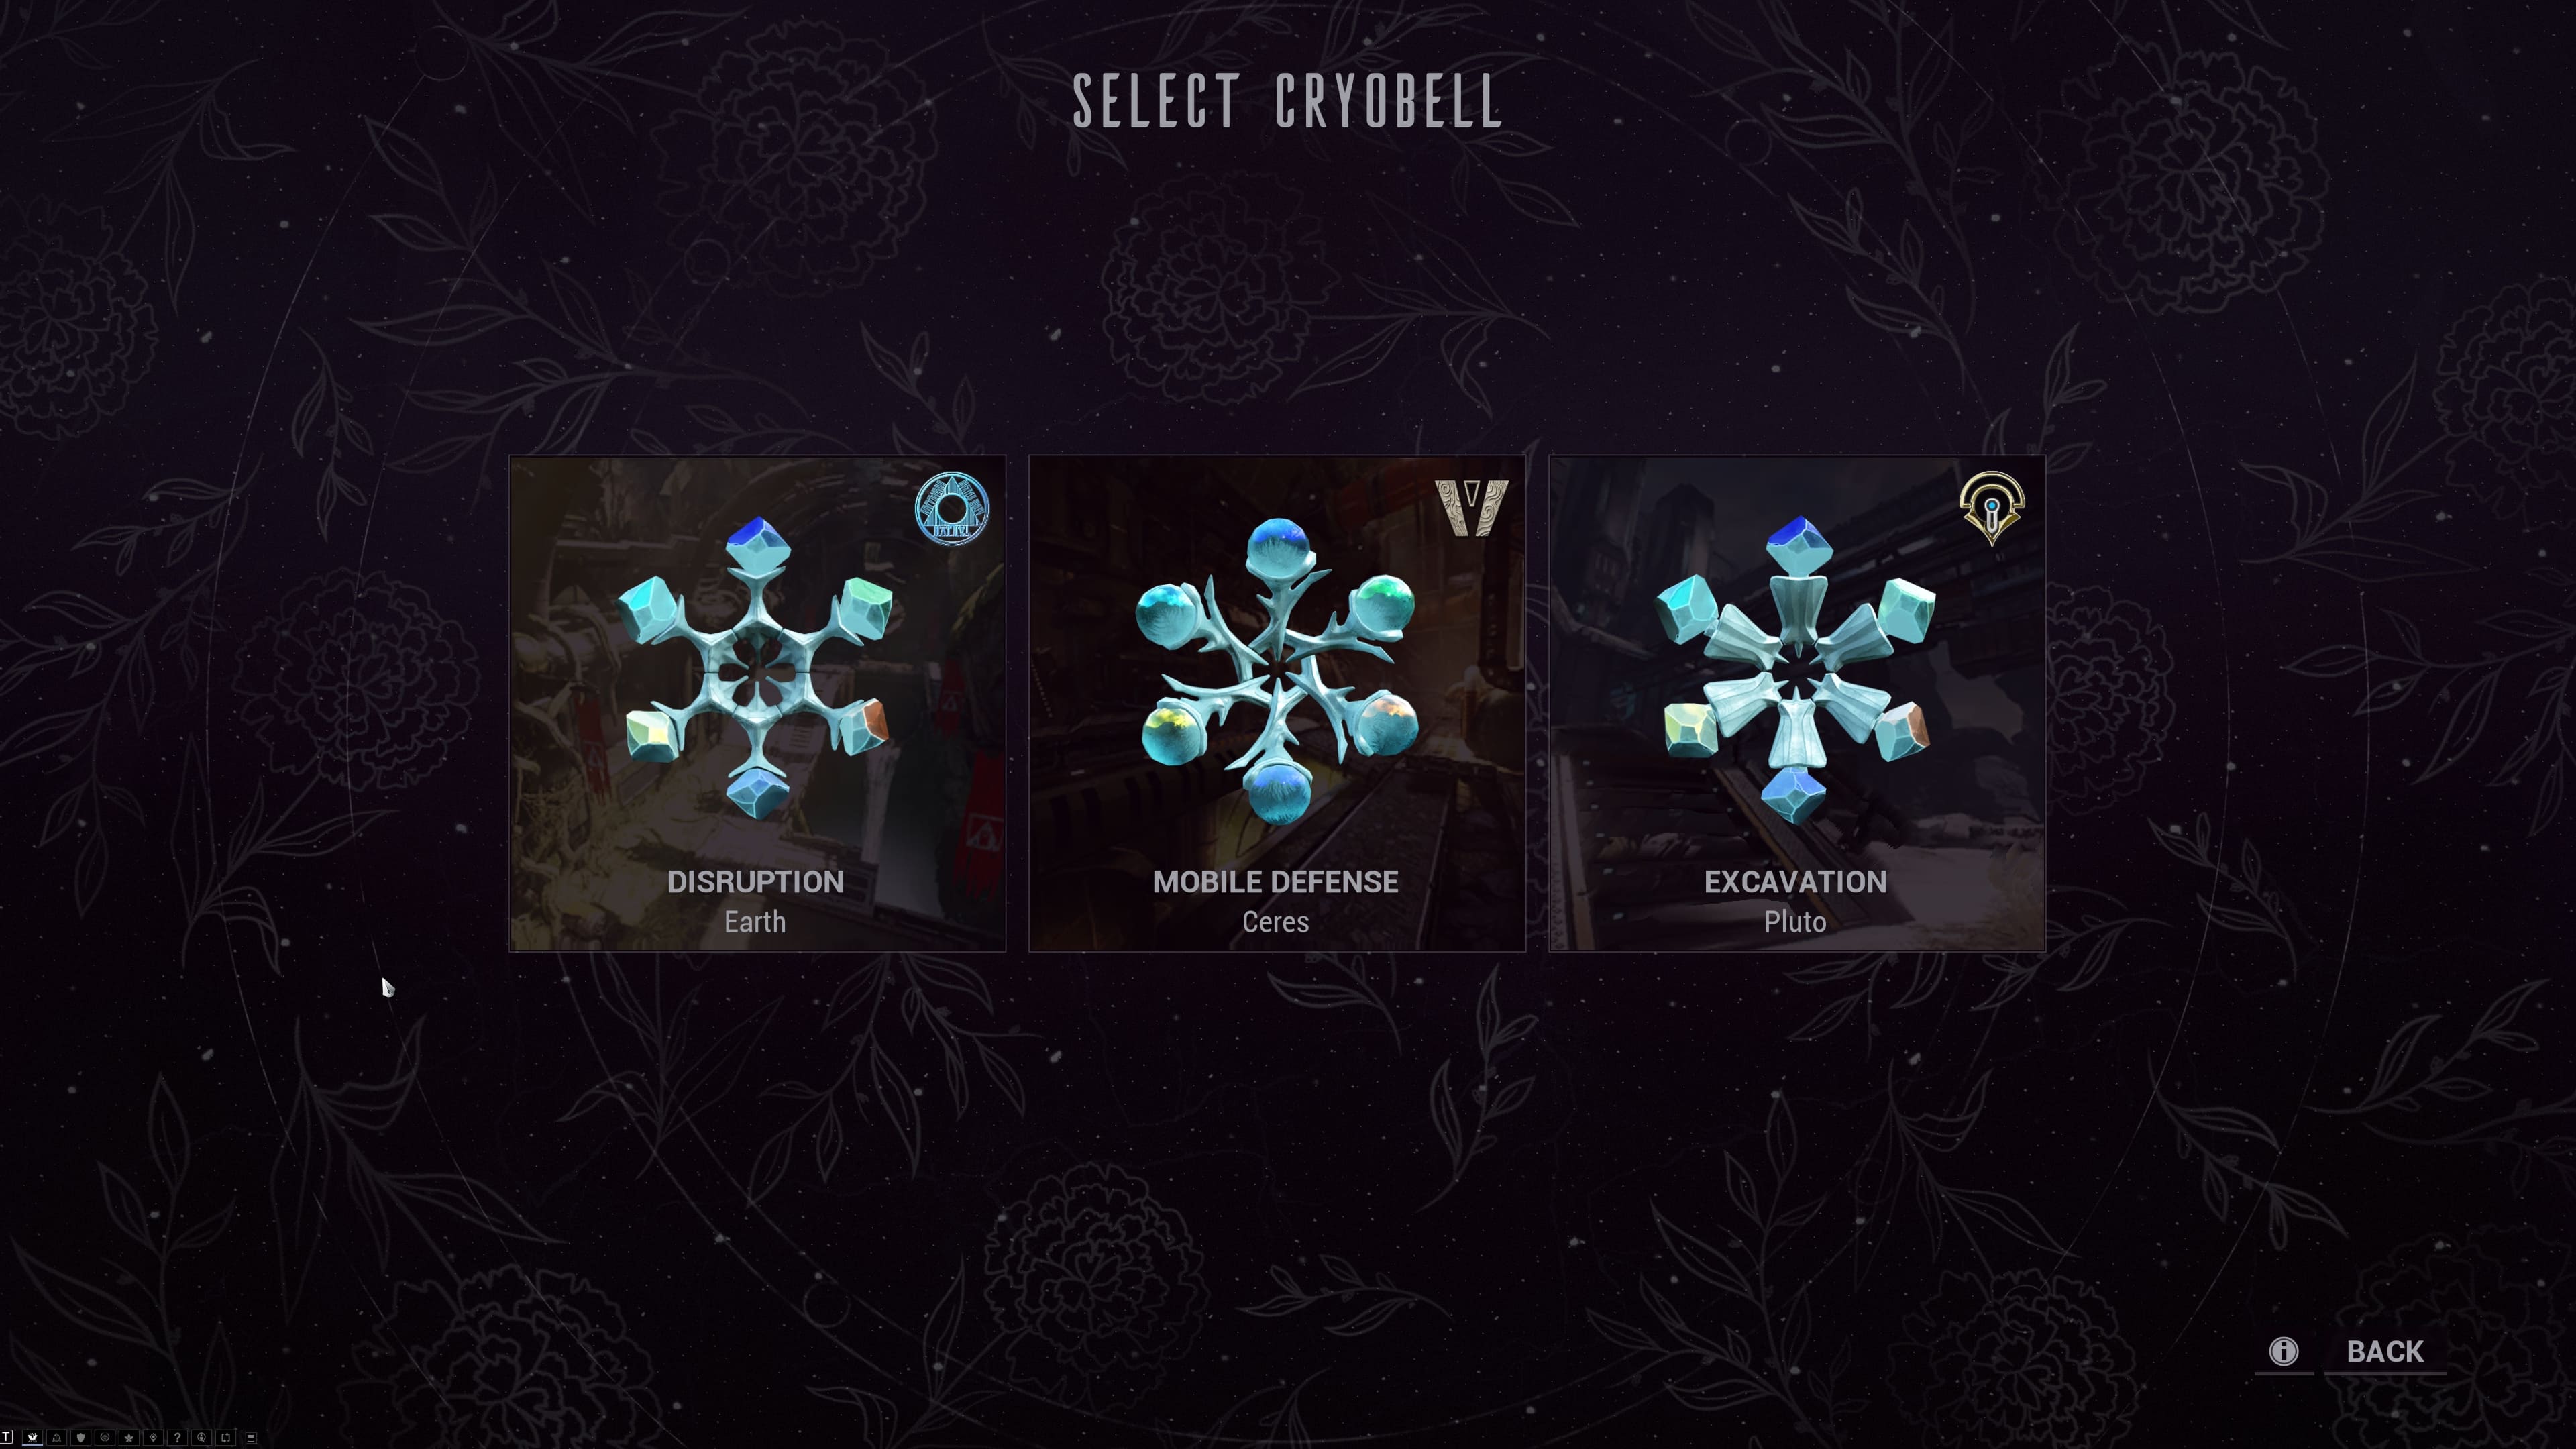
Image Description: Screenshot of the Select Cryobell UI showing three Cryobells and some of their traits. From left to right we see: a Disruption on Earth against the Corpus, a Mobile Defense on Ceres against The Murmur, and an Excavation on Pluto against the Orokin.
When selecting a Cryobell, you’ll be able to see each of the traits it will give to your mission:
- Mission Type
- Planet
- Enemy Type
- Mission Bind
- Tactical Bind
- Personal Bind
We’ll go over all of these randomized traits in the “Cryobells and their Binds” section of this Dev Workshop.
After all players have selected a Cryobell, the entire squad can vote on which one to play!
VOTING ON A CRYOBELL
Once all players have selected a Cryobell, a 60 second voting countdown begins. Players can review all of the available mission options available to them, and vote on which one to play! If no votes are cast, a random Cryobell is chosen; in the case of a tie, the Host’s vote is the deciding choice.
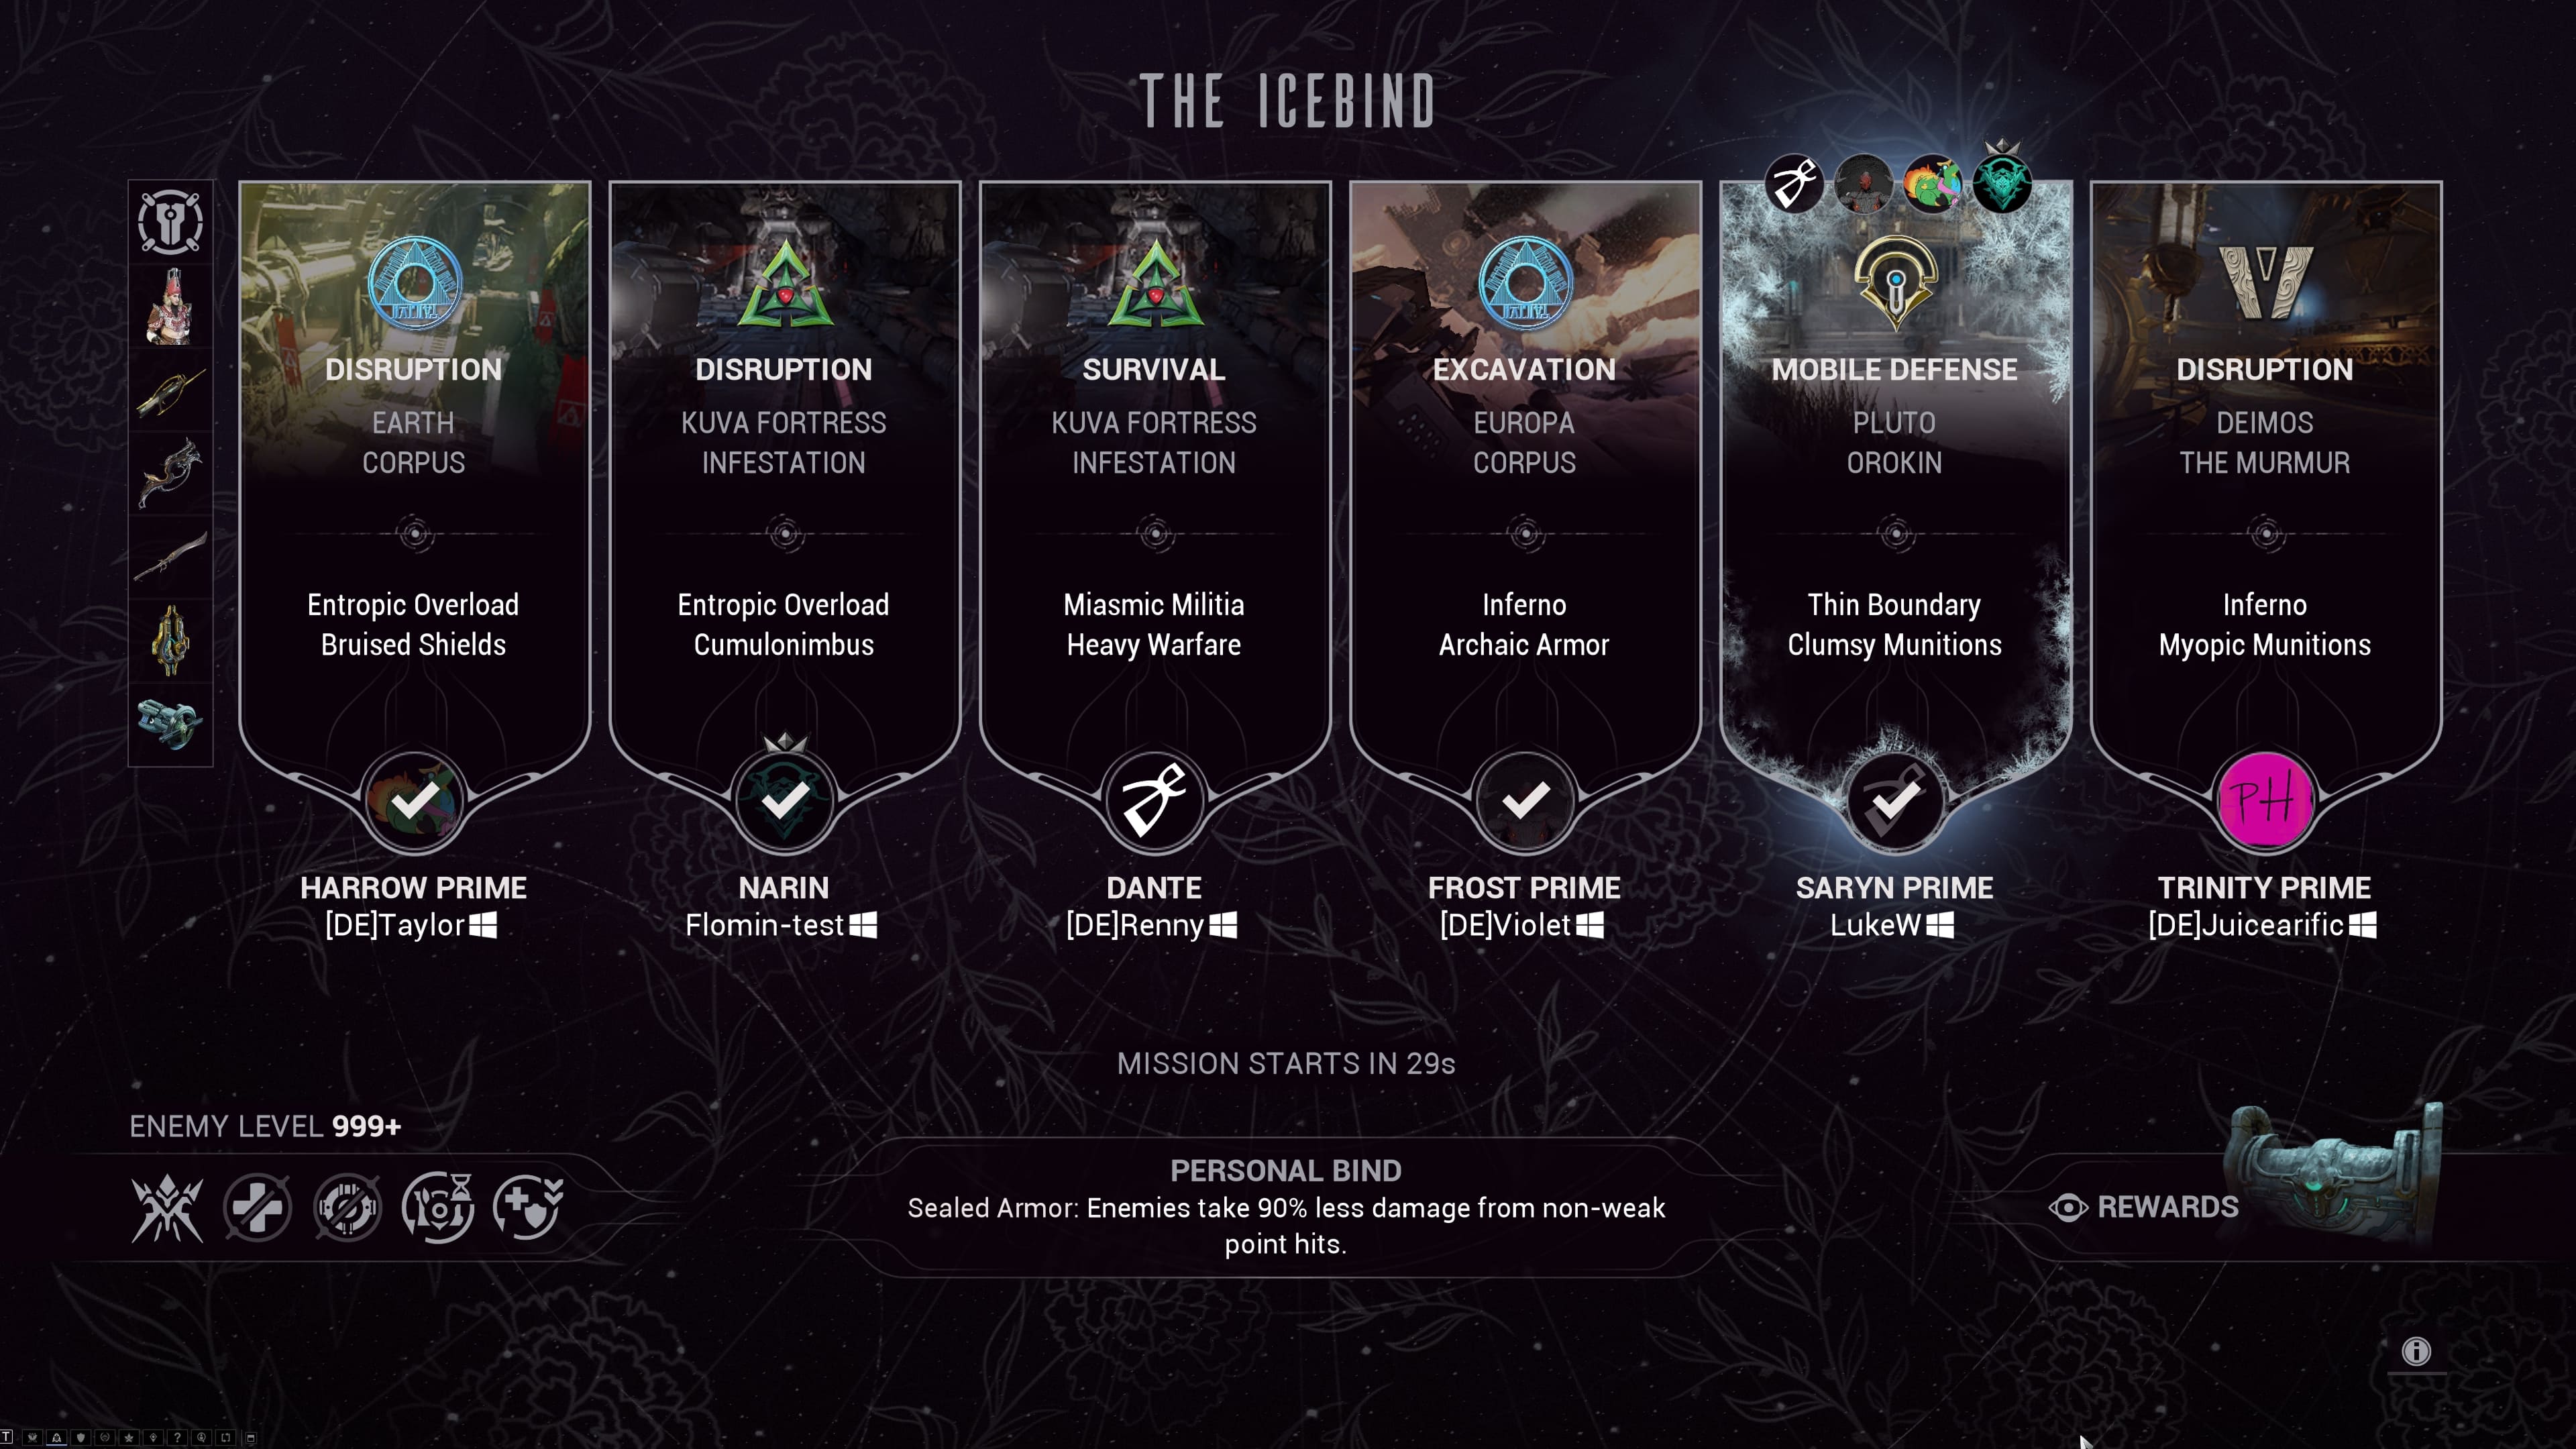 Image Description: Screenshot of The Icebind UI after each player has selected their Cryobell and are voting on the mission. From left to right we can see your current loadout and each players’ Cryobell traits. Underneath we see icons for Standard Mission Traits, the mission start timer, your Personal Bind, and the option to view Rewards.
Once voting concludes, players have an additional 10 second countdown to review the selected Cryobell before the mission begins.
While Cryobells are consumable mission keys, rest assured Cryobells are not spent until players have successfully extracted from The Icebind.
Playing The Icebind
Entering the Icebind, you’ll be starting a mission as you normally would — as normal as it can be, considering randomized Binds of a Cryobell. Players will be presented with either a Survival, Mobile Defense, Excavation, or Disruption mission depending on the chosen Cryobell. At the beginning, you’ll be prompted to start your objective and aim to complete it successfully, with bonus Squad Side Objectives spawning in at regular intervals to keep things interesting. We’ll get to those in a bit!
While many elements of The Icebind are random, there are guaranteed elements you can expect each time you play.
STANDARD MISSION TRAITS
- Enemy Level: 999+
- Guaranteed Reward: Riven Splicer (plus Kuva and an additional reward from the Reward Pool after opening a Crested Frozen Chest)
- No Duplicate Warframes: Only one of each Warframe can enter the mission.
-
Mission Restrictions:
- Empowered Enemies: Enemy Health and Shields and Armor increased by 200% and an additional 100% for each squad member, stacking to a maximum of 800%. Increased chance of Eximus.
- No Self Revive: After a Tenno has bled-out, a Tombstone will appear where they fell. At least 3 surviving Tenno must sacrifice part of their health temporarily to bring the Tenno back into the action. If fewer than 3 Tenno are still standing then all of them must make the sacrifice to revive others.
- Last Gasp Penalty: Activating the Last Gasp focus ability reduces the timer by 2 seconds.
- Bleedout Shortens: The bleedout timer shortens after each revive, to a minimum of 5 seconds.
- Frozen Keys: After being dead for 3 minutes you will not obtain any Frozen Keys that the squad acquires from completing objectives while you are dead.
- Cooldown Increase: Each type of Restore has a 3 minute cooldown timer applied.
- Fatigued Companions: Companion Recovery timer increased by 100%.
- Stunted Shields: Full Shield Gate immunity duration reduced by 50%.
As the mission progresses, Squad Side Objectives begin to spawn for a total of 3 per mission.
Look for the purple waypoint on your minimap indicating a Squad Side Objective is available. These side objectives are optional, but completing them gives the squad extra rewards!
HOW TO START AN OPTIONAL SQUAD SIDE OBJECTIVE
Depending on the objective, a certain number of Squad members are required to be nearby before it can be even started. This is important, because failing a Squad Side Objective will fail your mission and require you to start again. Choosing to do Side Squad Objectives is a matter of risk vs reward — do you trust your squad to succeed, and in return earn a Frozen Key to unlock more rewards? Or will you decide to not start the Squad Side Objectives and just earn the guaranteed Riven Splicer and completion reward upon mission success?
To ensure these are not started until players are ready, the Side Objective must be activated via a “Start” prompt, which then updates the objective description to indicate how many players need to be nearby. Once enough players are in the area, the objective will begin! Through teamwork, you all must work together to complete your task within the allotted time.
With The Icebind’s launch, there are 5 Squad Side Objectives to master:
- Lockbox: collect Cyphers from fallen enemies and bring them to the Lockbox to unlock it.
- Cryothermia: neutralize a Cryo Core by holding it while it deals escalating damage to player health.
- Indomitable Ice: charge ice crystals with concentrated fire.
- Entropy Orb: gather around the orb and avoid its damaging pulses.
- Signal Chain: connect a beam of energy between one point to another using your Warframes.
Successfully completing a Squad Side Objective rewards all squad members with a Frozen Key, which can be used to unlock rewards in a special treasure room upon mission completion.
Since players can try to tackle 3 of these objectives in one mission, time management is another factor to master! Rest assured, if you are rushing to complete your final Squad Side Objective before the mission ends, the mission will not extract players if there is an active Squad Side Objective*. Once that is complete, you’ll be whisked away to the end of mission screen (whether that’s a mission fail or mission success is up to your performance).
* Specifically, if the Squad Side Objective has had the "Start" input pressed — not just the waypoint appearing on the map.
MELICA’S GLACIAL LABORATORY
The Icebind doesn’t end with the usual race towards extraction. Instead, once the mission is complete, players will be immediately transported to Melica’s Glacial Laboratory. Here, they can use their earned Keys to unlock chests and collect what was earned. Players are also rewarded a guaranteed Riven Splicer upon mission completion! Learn more about Riven Splicing in our dedicated section below.
There are two different Keys that are earned in The Icebind:
- Crested Frozen Key — guaranteed reward for completing the mission
- Frozen Key — earned by completing Squad Side Objectives, up to 3 can be obtained per mission
Crested Frozen Keys open Crested Frozen Chests, which appear at the center of the map. Full drop rates can be found on our official Droptable Site.
Crested Frozen Key Rewards:
-
Guaranteed Kuva:
- 7,500 Kuva
- 17,500 Kuva
- 100,000 Kuva
-
Additional Reward Table:
- Riven Transmuter
- Veiled Riven Cipher
- Omni Forma
- Forma Bundle
- Melee Riven Mod
- Pistol Riven Mod
- Rifle Riven Mod
- Shotgun Riven
- Archgun Riven Mod
- Companion Weapon Riven Mod
- Azure Archon Shard
- Crimson Archon Shard
- Amber Archon Shard
Frozen Keys open Frozen Chests, which can be found on the outside edges of the map. Full drop rates can be found on our official Droptable Site.
Frozen Key Rewards:
-
Guaranteed Kuva:
- 1,750 Kuva
- 3,500 Kuva
- 7,500 Kuva
-
Additional Reward Table:
- Forma
- 200 Vosfor
- 3 Day Affinity Booster
- 3 Day Resource Drop Chance Booster
- 3 Day Resource Booster
- 3 Day Credit Booster
- Melee Riven Mod
- Pistol Riven Mod
- Rifle Riven Mod
- Shotgun Riven
- Azure Archon Shard
- Crimson Archon Shard
- Amber Archon Shard
Once you’ve unlocked your Chests, you can proceed to the marked extraction point. That said, there are more than just rewards to be found in Melica’s Glacial Laboratory — curious Tenno may wish to search the room for fragments from the distant past.
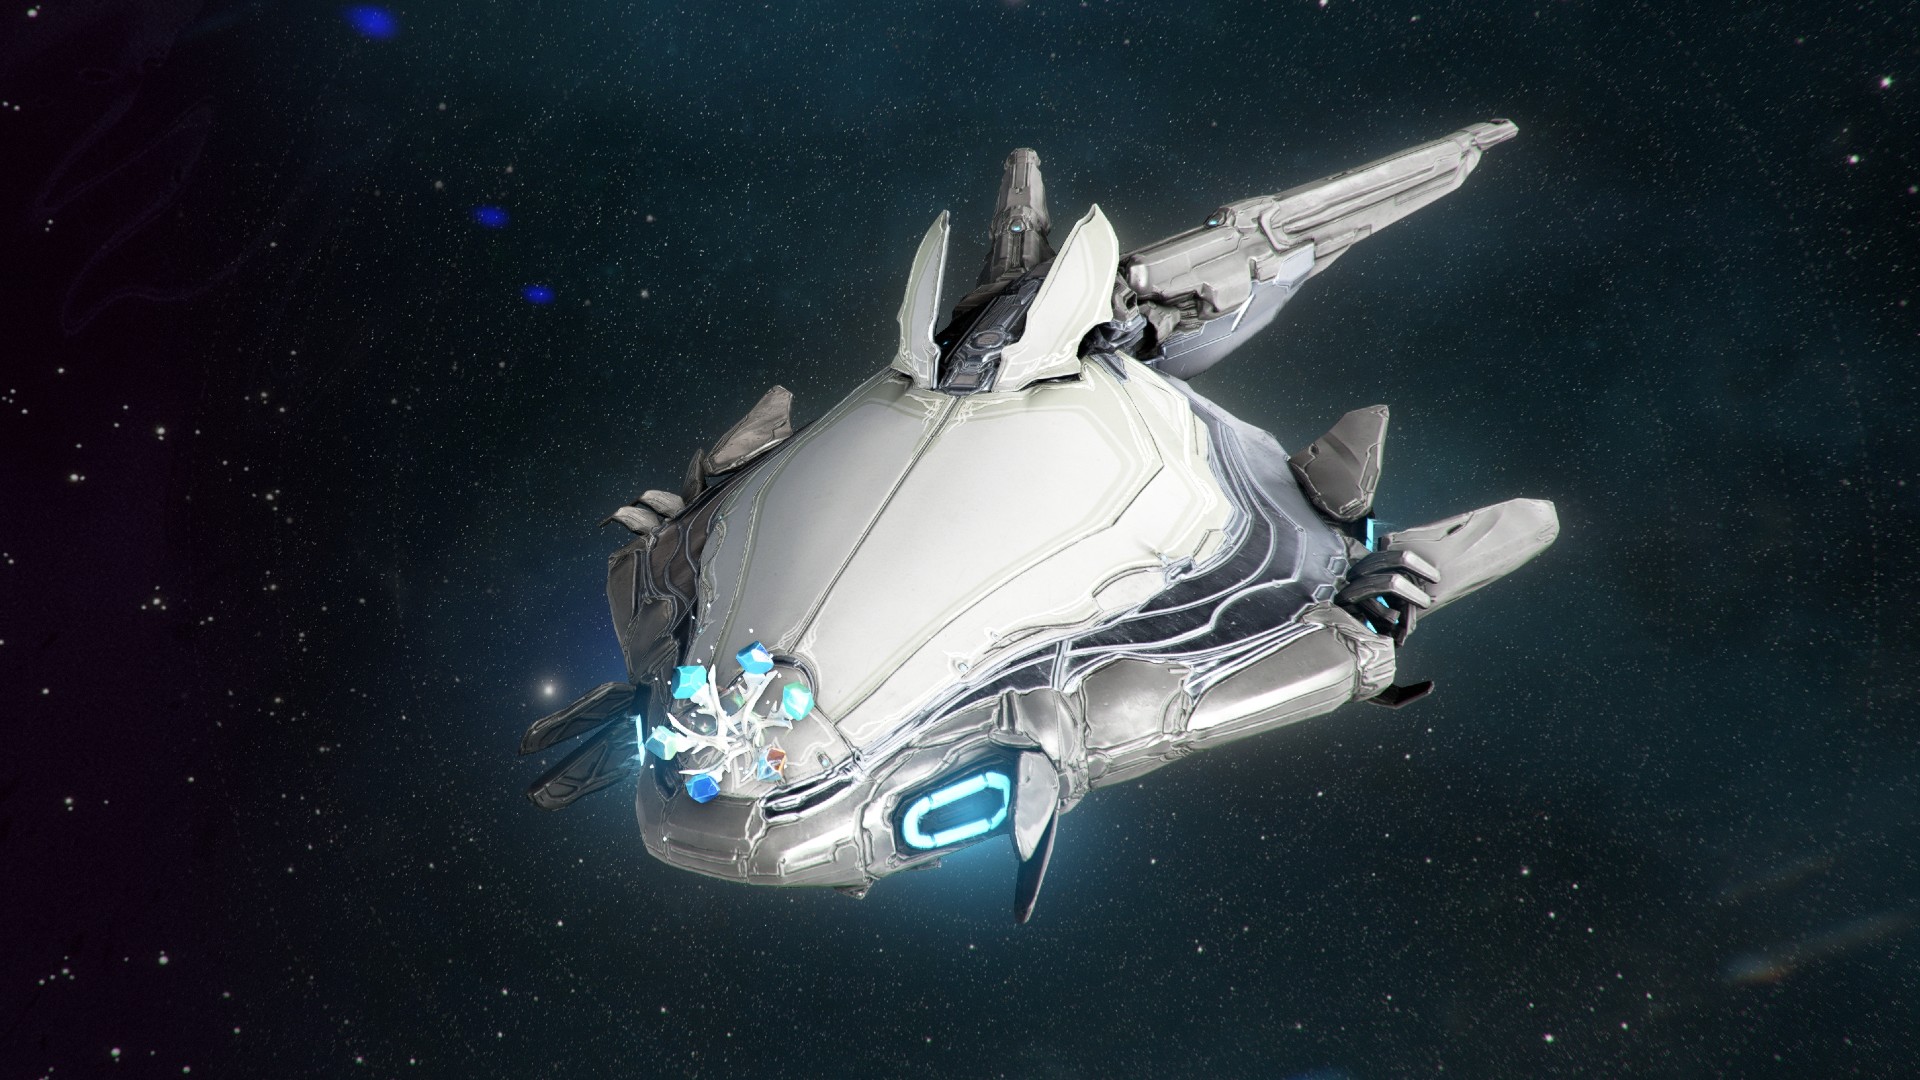 Image Description: An image of a default Liset Landing Craft, with a Cryobell placed on the nose of the ship where Sumdalis are equipped. The Cryobell appears as a glowing core with six crystallized offshoots all around it.
First-Time Completion Reward
Completing The Icebind for the first time also rewards players with a Cryobell Sumdali, as proof that they have overcome the Binds of a force not of this plane.
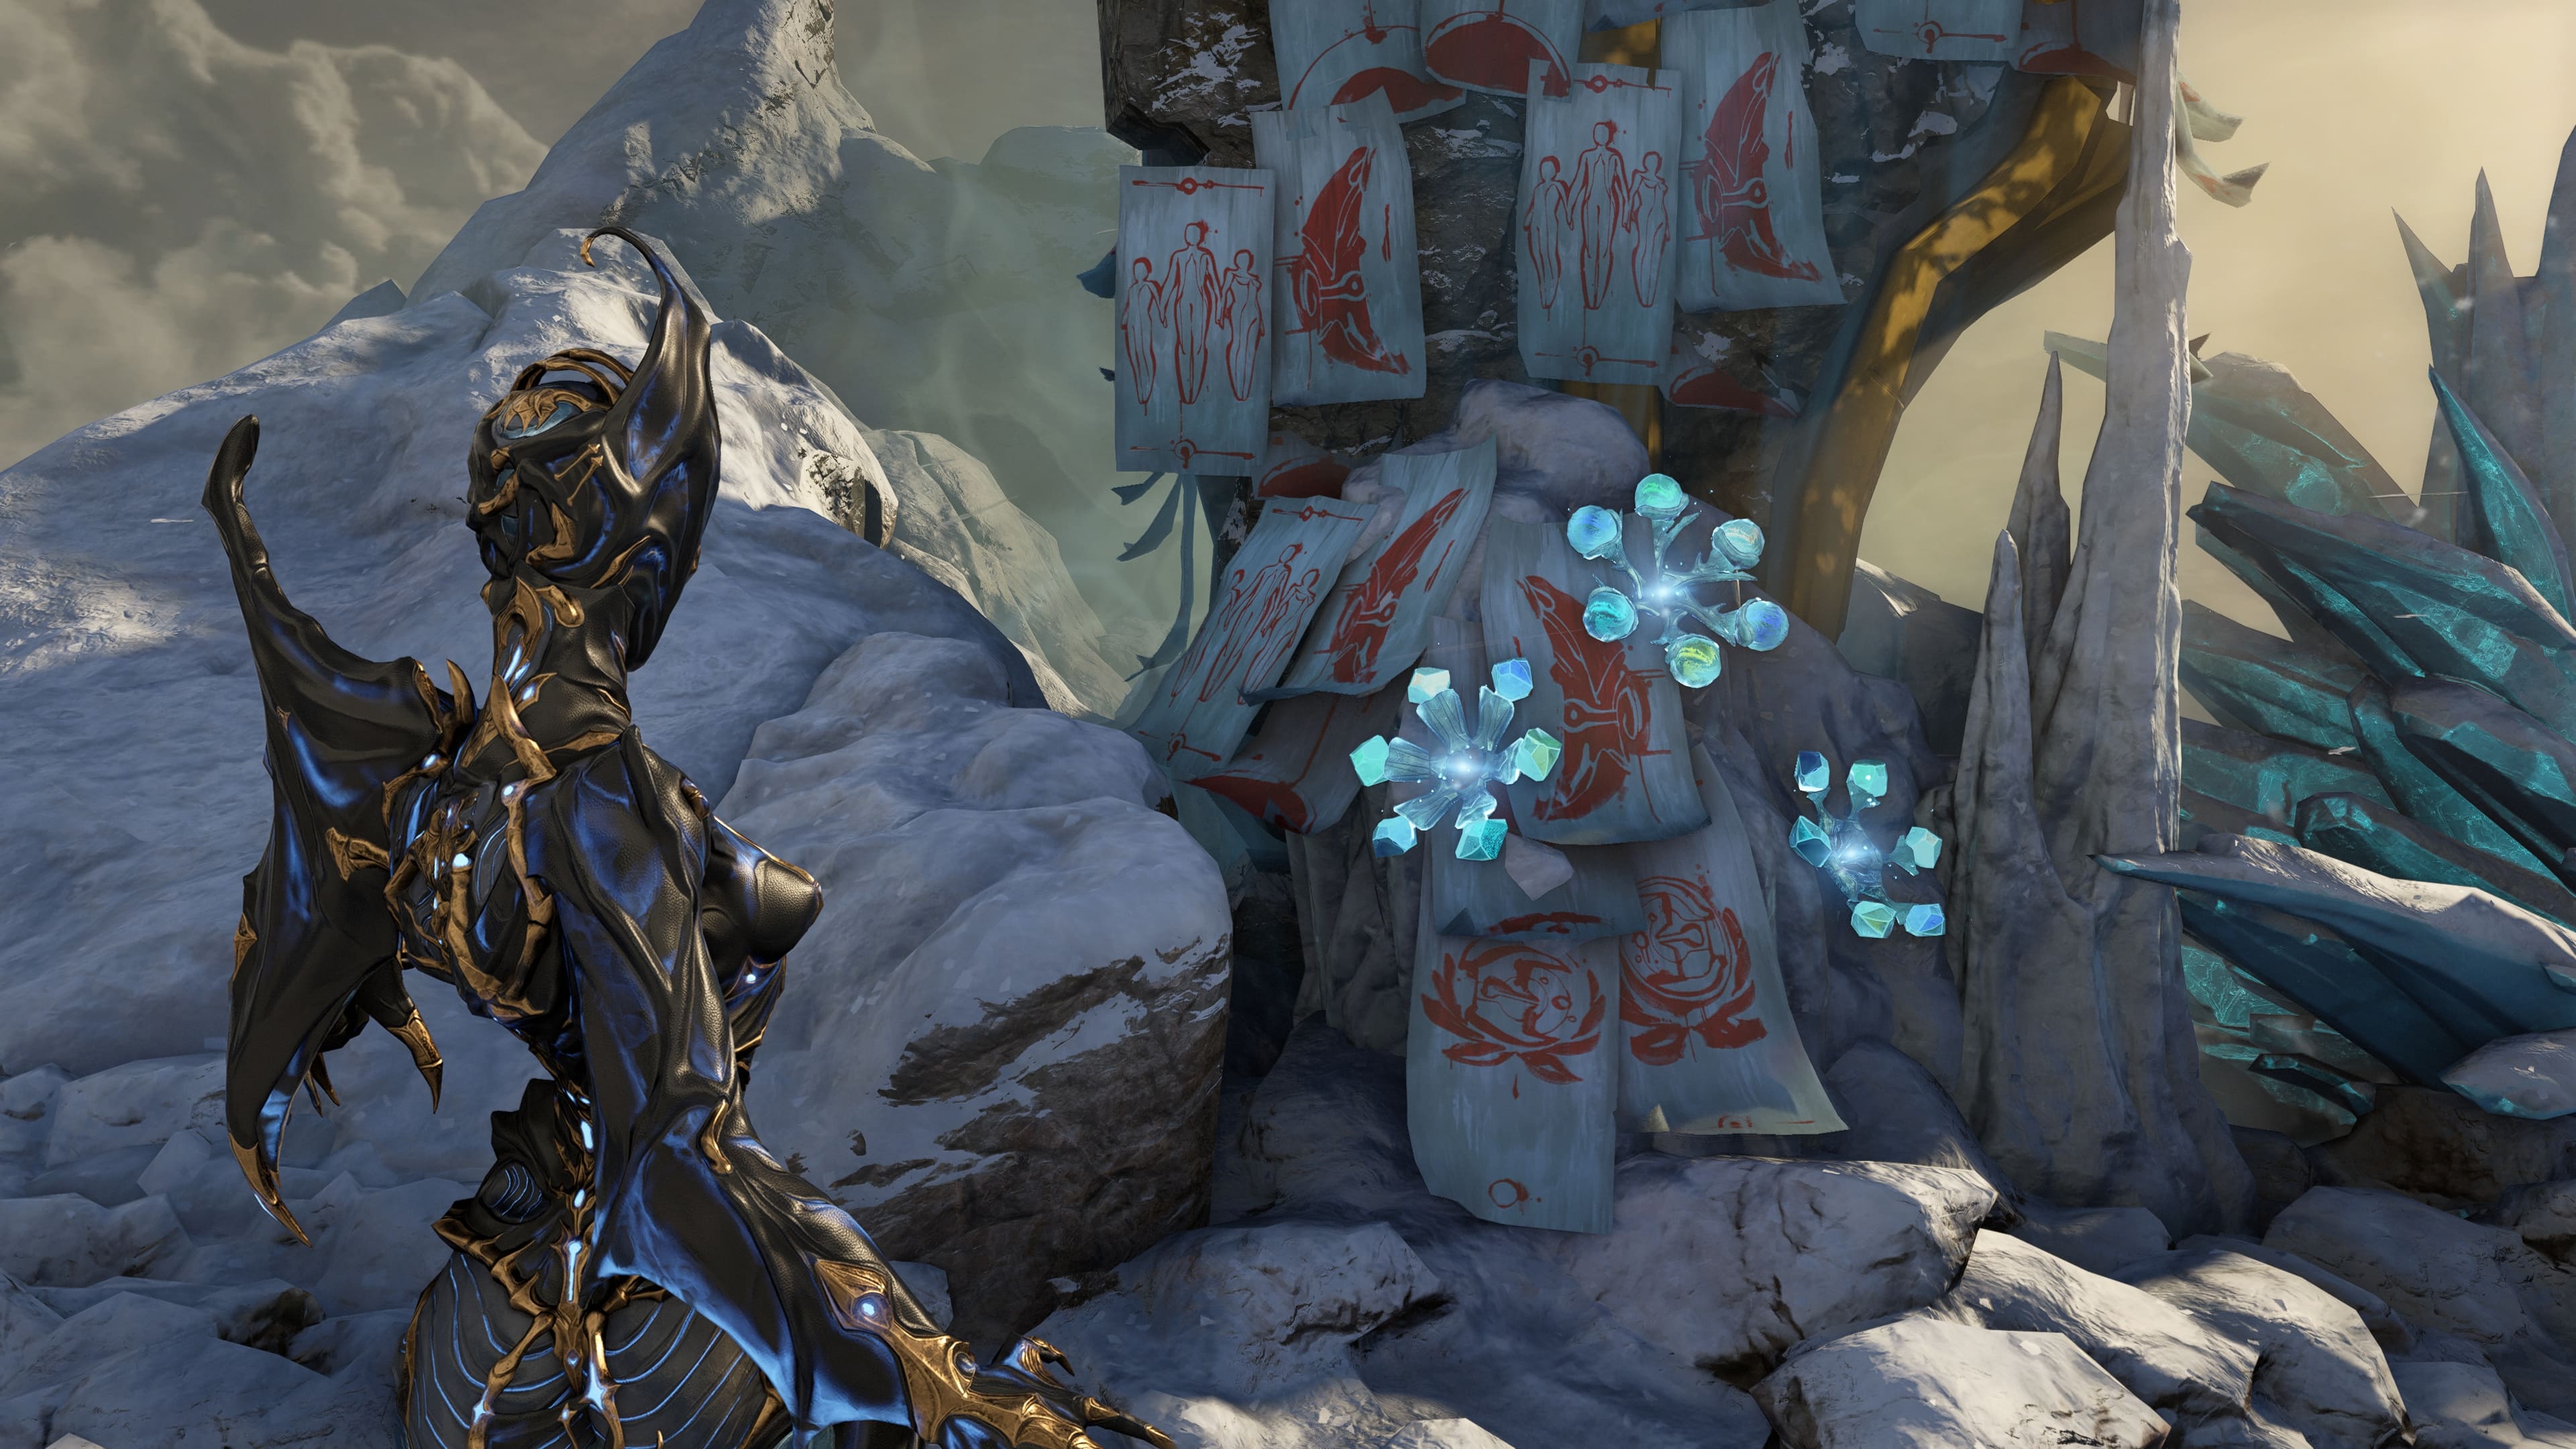 Image Description: Banshee Threnodia looks at three Cryobells that have emerged from an ice pillar covered in talismans in the Yuvan Peak. Each Cryobell appears as a glowing core with six crystallized offshoots all around it.
Cryobells and their Binds
Now that you should have a basic understanding of the core loop when playing The Icebind, it’s time to talk about the Cryobells. Formed through Narin’s influence on Yuvan Peak, each bell’s tone leads to a time and place where a dark influence has taken hold, manifesting as different Binds that alter the player’s experience.
Bound to each Cryobell is a randomized set of traits, which determines the mission it will take you to:
- Mission Type
- Mission Location
- Enemy Type
- Personal Bind
- Mission Bind
- Tactical Bind
Let’s go over what each of these can be!
Mission Type
- Survival (10 Minutes)
- Mobile Defense (3 Terminals of 3 minutes each)
- Excavation (600 Cryotic)
- Disruption (8 Conduits)
Mission Location
- Any Planet in the Origin System, excluding Duviri, The Dark Refractory, and Höllvania.
Enemy Type
- Grineer
- Corpus
- Infested
- The Murmur
- Orokin
Personal Bind
Your Cryobell’s Personal Bind applies to you in-mission, regardless of what Cryobell was chosen by the Squad.
- Abbreviated Abilities: Ability durations reduced by 50%.
- Ability Overload: Using an ability opens a void rift nearby.
- Ammo Deficit: Ammo restored by drops and gear is reduced by 75%
- Constricted: Max energy reduced by 75%.
- Dark Antimatter: Enemies slain by ability damage create a hostile antimatter drop that is attracted to you.
-
Dropped Guard: Warframe and ally Overguard* gain reduced by 75%.
- *Overguard gained from Allies, this Bind does not affect your squadmates’ Overguard.
- Dull Blades: -50% melee combo chance.
- Energy Exhaustion: Lose 2 Energy per second for each enemy within 10 meters of you.
- Firewalker: For each meter travelled on foot, take increasing heat damage over time. Jumping or being airborne reduces it.
- Flankable: Max shield capacity is reduced by 75%, but an impenetrable Volt shield is permanently in front of you.
- Fractured Armor: Casting an ability reduces armor by 10% for 10s.
- Framecurse Syndrome: Activating an Ability inflicts 50 health and 150 shield damage upon you.
- Hypersensitive: Duration of negative Status Effects is tripled
- Knifestep Syndrome: Lose 2 Health when moving. Jumping pauses the effect.
- Lethargic Shields: Shield recharge delay increased 500%.
- Performance Anxiety: A spotlight chases you. Killing enemies while illuminated inflicts damage on you that increases with each kill.
- Permanent Injury: Max health reduced each time health damage is taken
- Secondary Wounds: Gain 1 Puncture Status Effect every time you take damage.
- Shocking Leaps: Jumping or Bullet Jumping generates a Shock Eximus orb that chases you.
- Slam Spikes: Melee Slam Attacks cause damaging spikes to erupt from the ground for 2s after the slam.
- Static Siphon: Casting abilities causes all enemies within 15m to emit damaging electrical chains back to the caster.
- Undersupplied: Max ammo on all weapons reduced by 75%
- Untreatable: Pickups do not heal, and Health Orbs cannot be picked up.
Mission Bind
A Mission Bind is a complication that alters the entire theme of the mission. These introduce gameplay elements to work around, and can affect what type of units spawn.
- Entropic Overload: Using abilities spawns Entropic Crystals on you and triggers Entropic Overload, causing enemies to self-revive as Leech Eximus and hostile Entropic Wisps appear. Getting hit by a Wisp causes stacked crystals to explode. Destroying Entropic Crystals and Wisps will decrease saturation.
- Stone Soldiers: Enemies are hard as stone and hit even harder. Taking them by surprise is the best way to exploit weak points in their stony flesh. In addition, you will face hostile Tomb Guardians.
- Miasmic Militia: Enemies slowly take damage, but are immune to Toxin, Gas, Viral, and Corrosive status effects. On death, a Gas cloud is released.
- Thin Boundary: Void Tears rip into reality, growing with nearby ability use. Tears inflict Void Shackles, reducing ability stats and weapon combo durations, while draining energy, health, and Incarnon weapon energy.
- Inferno: Heat Status present on players or enemies will feed the Inferno, drawing in Arson Eximus, Heat empowered enemies, and damaging anyone near active sources of Heat. Avoid inflicting Heat Status and killing hostile Heat sources to starve the Inferno.
Tactical Bind
A Tactical Bind is an additional complication that may affect your loadout or gameplay decisions.
- Antimatter Foes: Enemies killed by abilities spawn a hostile Antimatter Drop that tracks you.
- Archaic Armor: Enemy armor is greatly increased and cannot be stripped normally. Each hit they take reduces their maximum armor by 1%.
- Bruised Shields: Shields can only be restored via melee attacks.
- Bolstered Belligerents: All enemies have Overguard equal to 50% of their max health.
- Clumsy Munitions: When taking damage, a grenade may be dropped at your feet that explodes after a few seconds.
- Cumulonimbus: Being airborne triggers cumulative electrical damage, which dissipates over time once on the ground.
- Entanglement: Allies within 4m of slain enemies endure reduced Movement Speed and Parkour Velocity.
- Heavy Warfare: Enemies take -90% less damage from non-heavy weapons. Enemies will drop heavy ammo packs and heavy weapon recall time reduced to 5 sec.
- Jade Spirits: Jade Wisps haunt the region. If approached, they chase down the player responsible and transform into Jade Light beams.
- Kela's Revenge: Missiles strike from above periodically.
- Myopic Munitions: Enemies will only take damage if a player is within 15m of them.
- Parasitic Light: The squad is given two parasitic lanterns which drain energy of those that carry them. Enemies outside the lanterns’ light have massive damage reduction.
- Postmortal Surges: Slain enemies explode with Void energy.
- Toasty Toes: Grounded movement inflicts Heat damage over time. Airborne movement reduces it.
How you choose to counteract these Binds is up to you, as The Icebind does not come with specific loadout restrictions.
For feedback on The Icebind game mode, please use the dedicated The Icebind subforum.
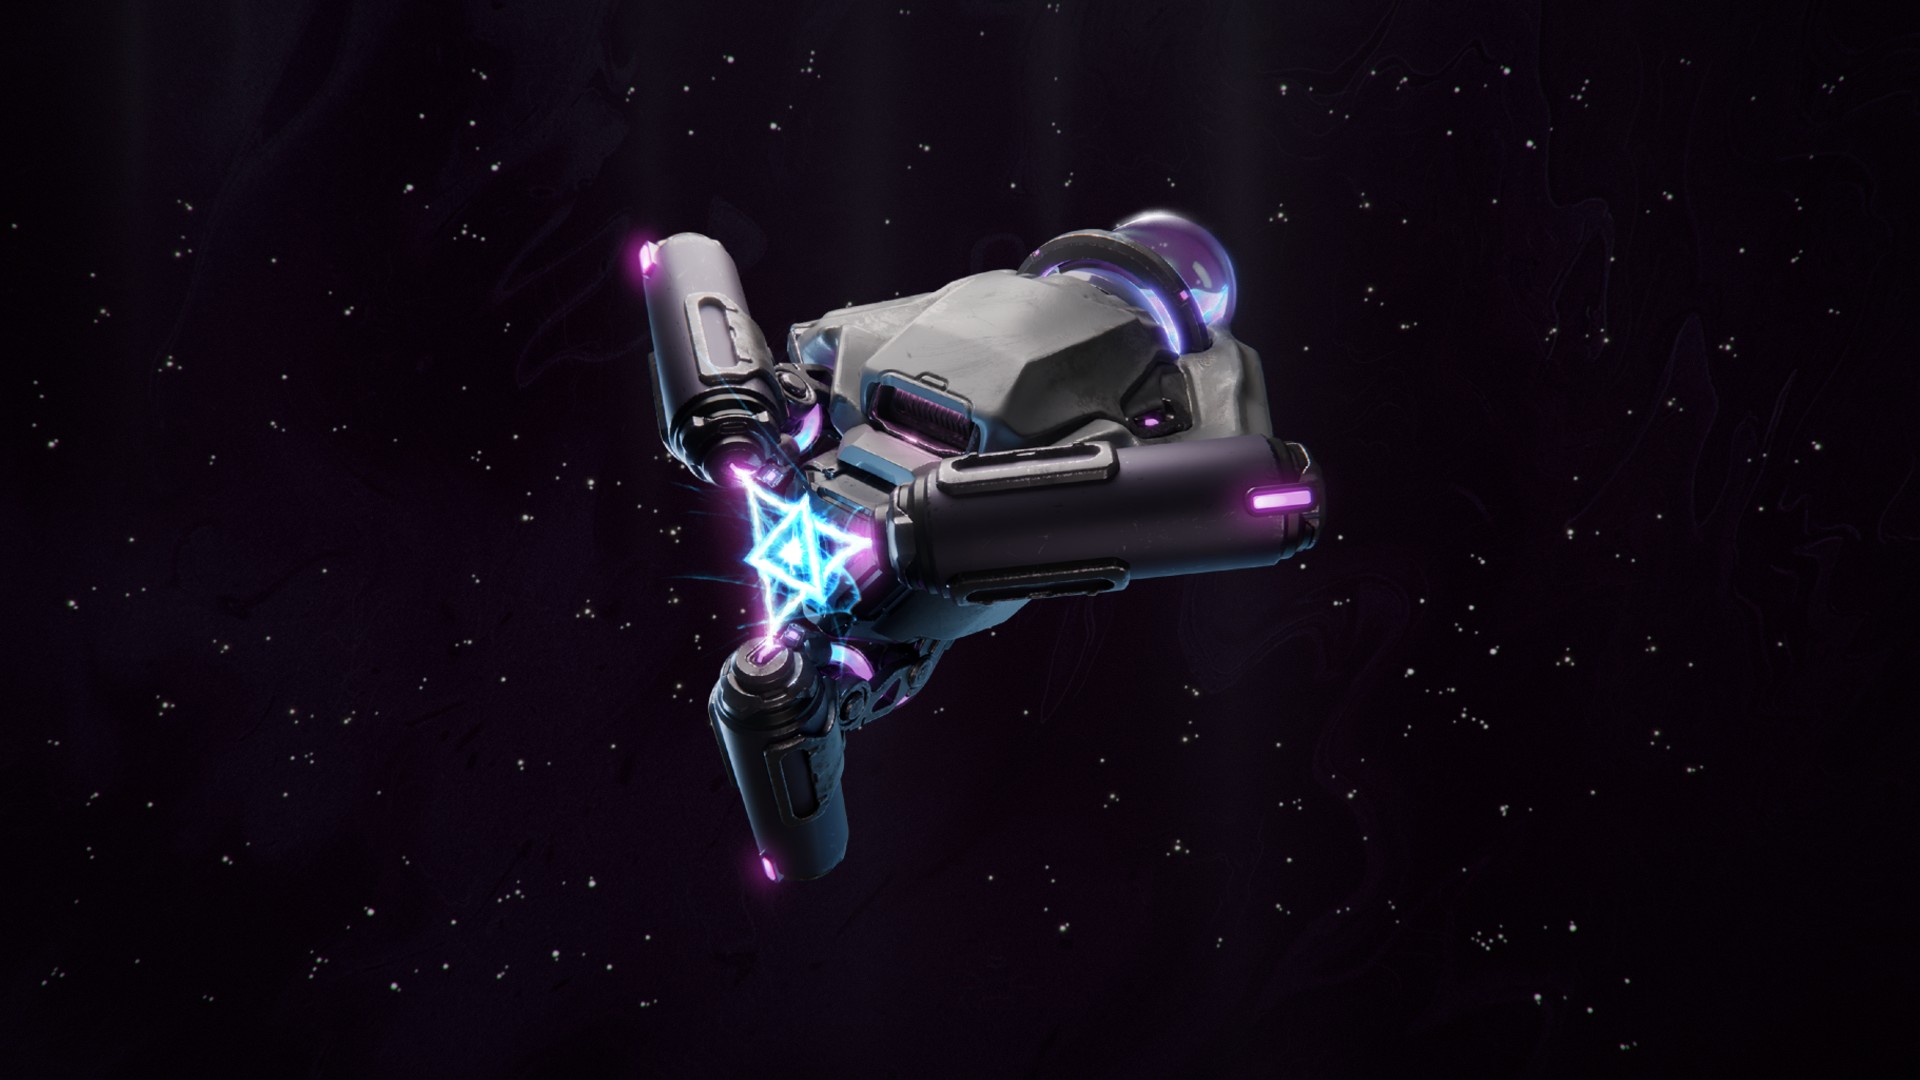 Image Description: An image of a Riven Splicer, which is a technological device. It is a trapezoidal shape, with three arms jutting off, which point to the center in the shape of a triangle. Each arm appears to be emitting a laser effect, which results in the shape of the Riven icon in between the three arms.
RIVEN EXPANSION: RIVEN SPLICING
The second half of our Riven Expansion arrives: Riven Splicing!
With the use of Riven Splicers, obtained exclusively from The Icebind gamemode, specific traits can be combined to create all-new spliced traits! When selecting a Riven Mod, a new Riven Splicing menu will appear. Opening this menu will display all owned Rivens, detailing which Rivens have valid trait combinations.
Select any lit up Riven Mod to see which traits can be spliced!
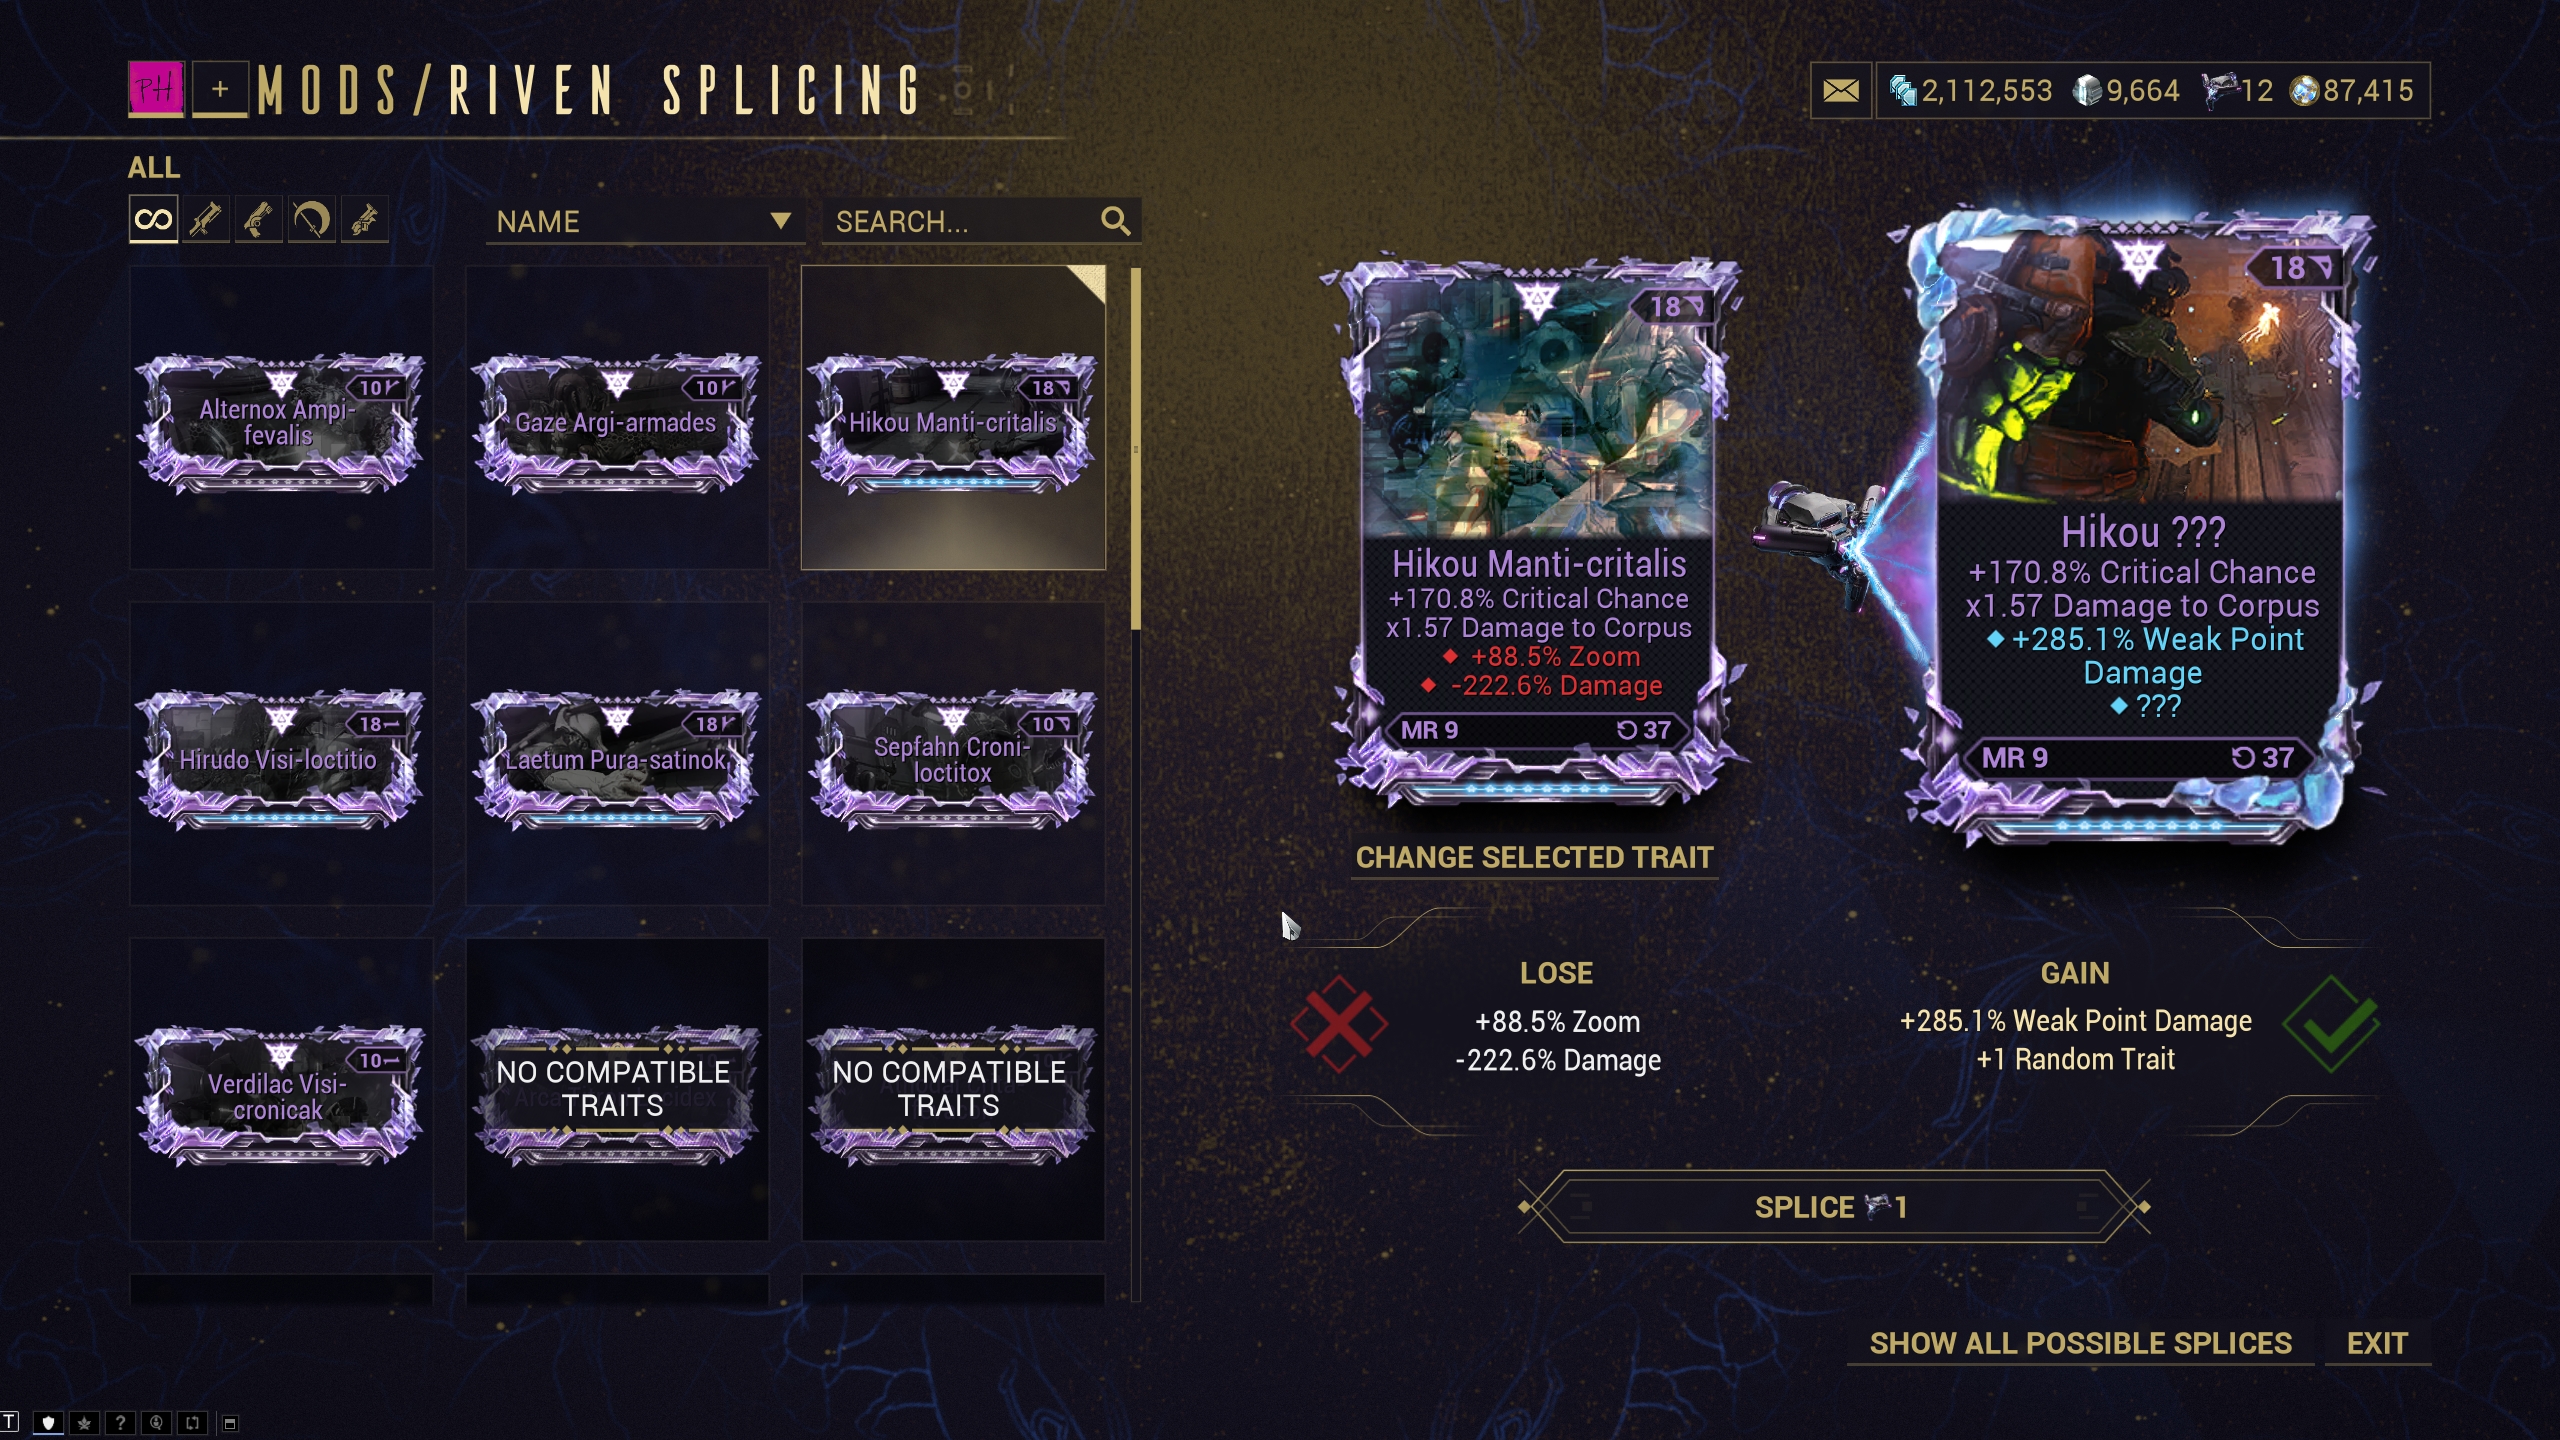 Image Description: A view of the new Riven Splicing menu. On the left side of the screen is a list of Rivens, with incompatible Rivens grayed out with a “No Compatible Traits” label on top of them. The right side of the screen shows the possible Splicing options for the Selected Riven, in this case a Hikou Riven. The screen offers the choice to merge +88.5% room and -222.6% Damage traits into a +285.1% Weakpoint Trait and a ??? Trait.
Spliced traits require a combination of two specific traits to splice together, with different combinations creating different outcomes! Combinations are pre-selected and confirmation is required before applying a spliced trait to your Riven. We have listed all combinations at the bottom of this section, and you can view the combinations possible on a specific Riven with the “Show All Possible Splices” option in the Riven Splicing menu. This means you’ll always know what spliced trait you’re about to receive before you make a decision.
If multiple spliced traits are available from a single Riven Mod, a “Change Selected Trait” option appears, allowing you to choose which spliced trait you want!
As an example: A Riven Mod with +Heat Damage, +Cold Damage, and +Toxin damage will have 3 spliced traits to choose from: +Blast Damage, +Gas Damage, and +Viral Damage. Which spliced trait goes on the Riven Mod is your choice!
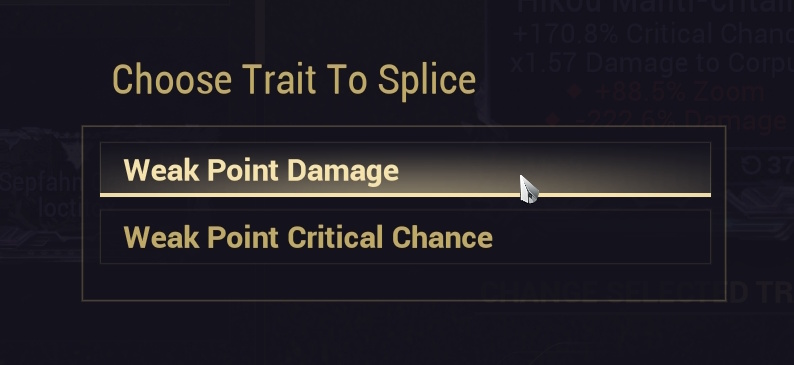
Image Description: A pop-up for deciding which Trait to Splice. The options provided are “Weak Point Damage” or “Weak Point Critical Chance”
When traits are spliced, the two required traits are consumed, with the spliced trait AND a second random trait taking their place. The random trait is one you may receive from cycling normally, including one just used in making the spliced trait, with one change. If one of the consumed traits was a negative bonus, the random trait will also be a negative; if both consumed traits were positive, it will be a positive. This ensures your Riven keeps the same layout of positive and negative traits it has before combining!
After splicing, the total number of positive and negative traits will no longer change on the Riven Mod, no matter how many times it is cycled after the fact. This can be undone by removing the spliced trait from the Riven.
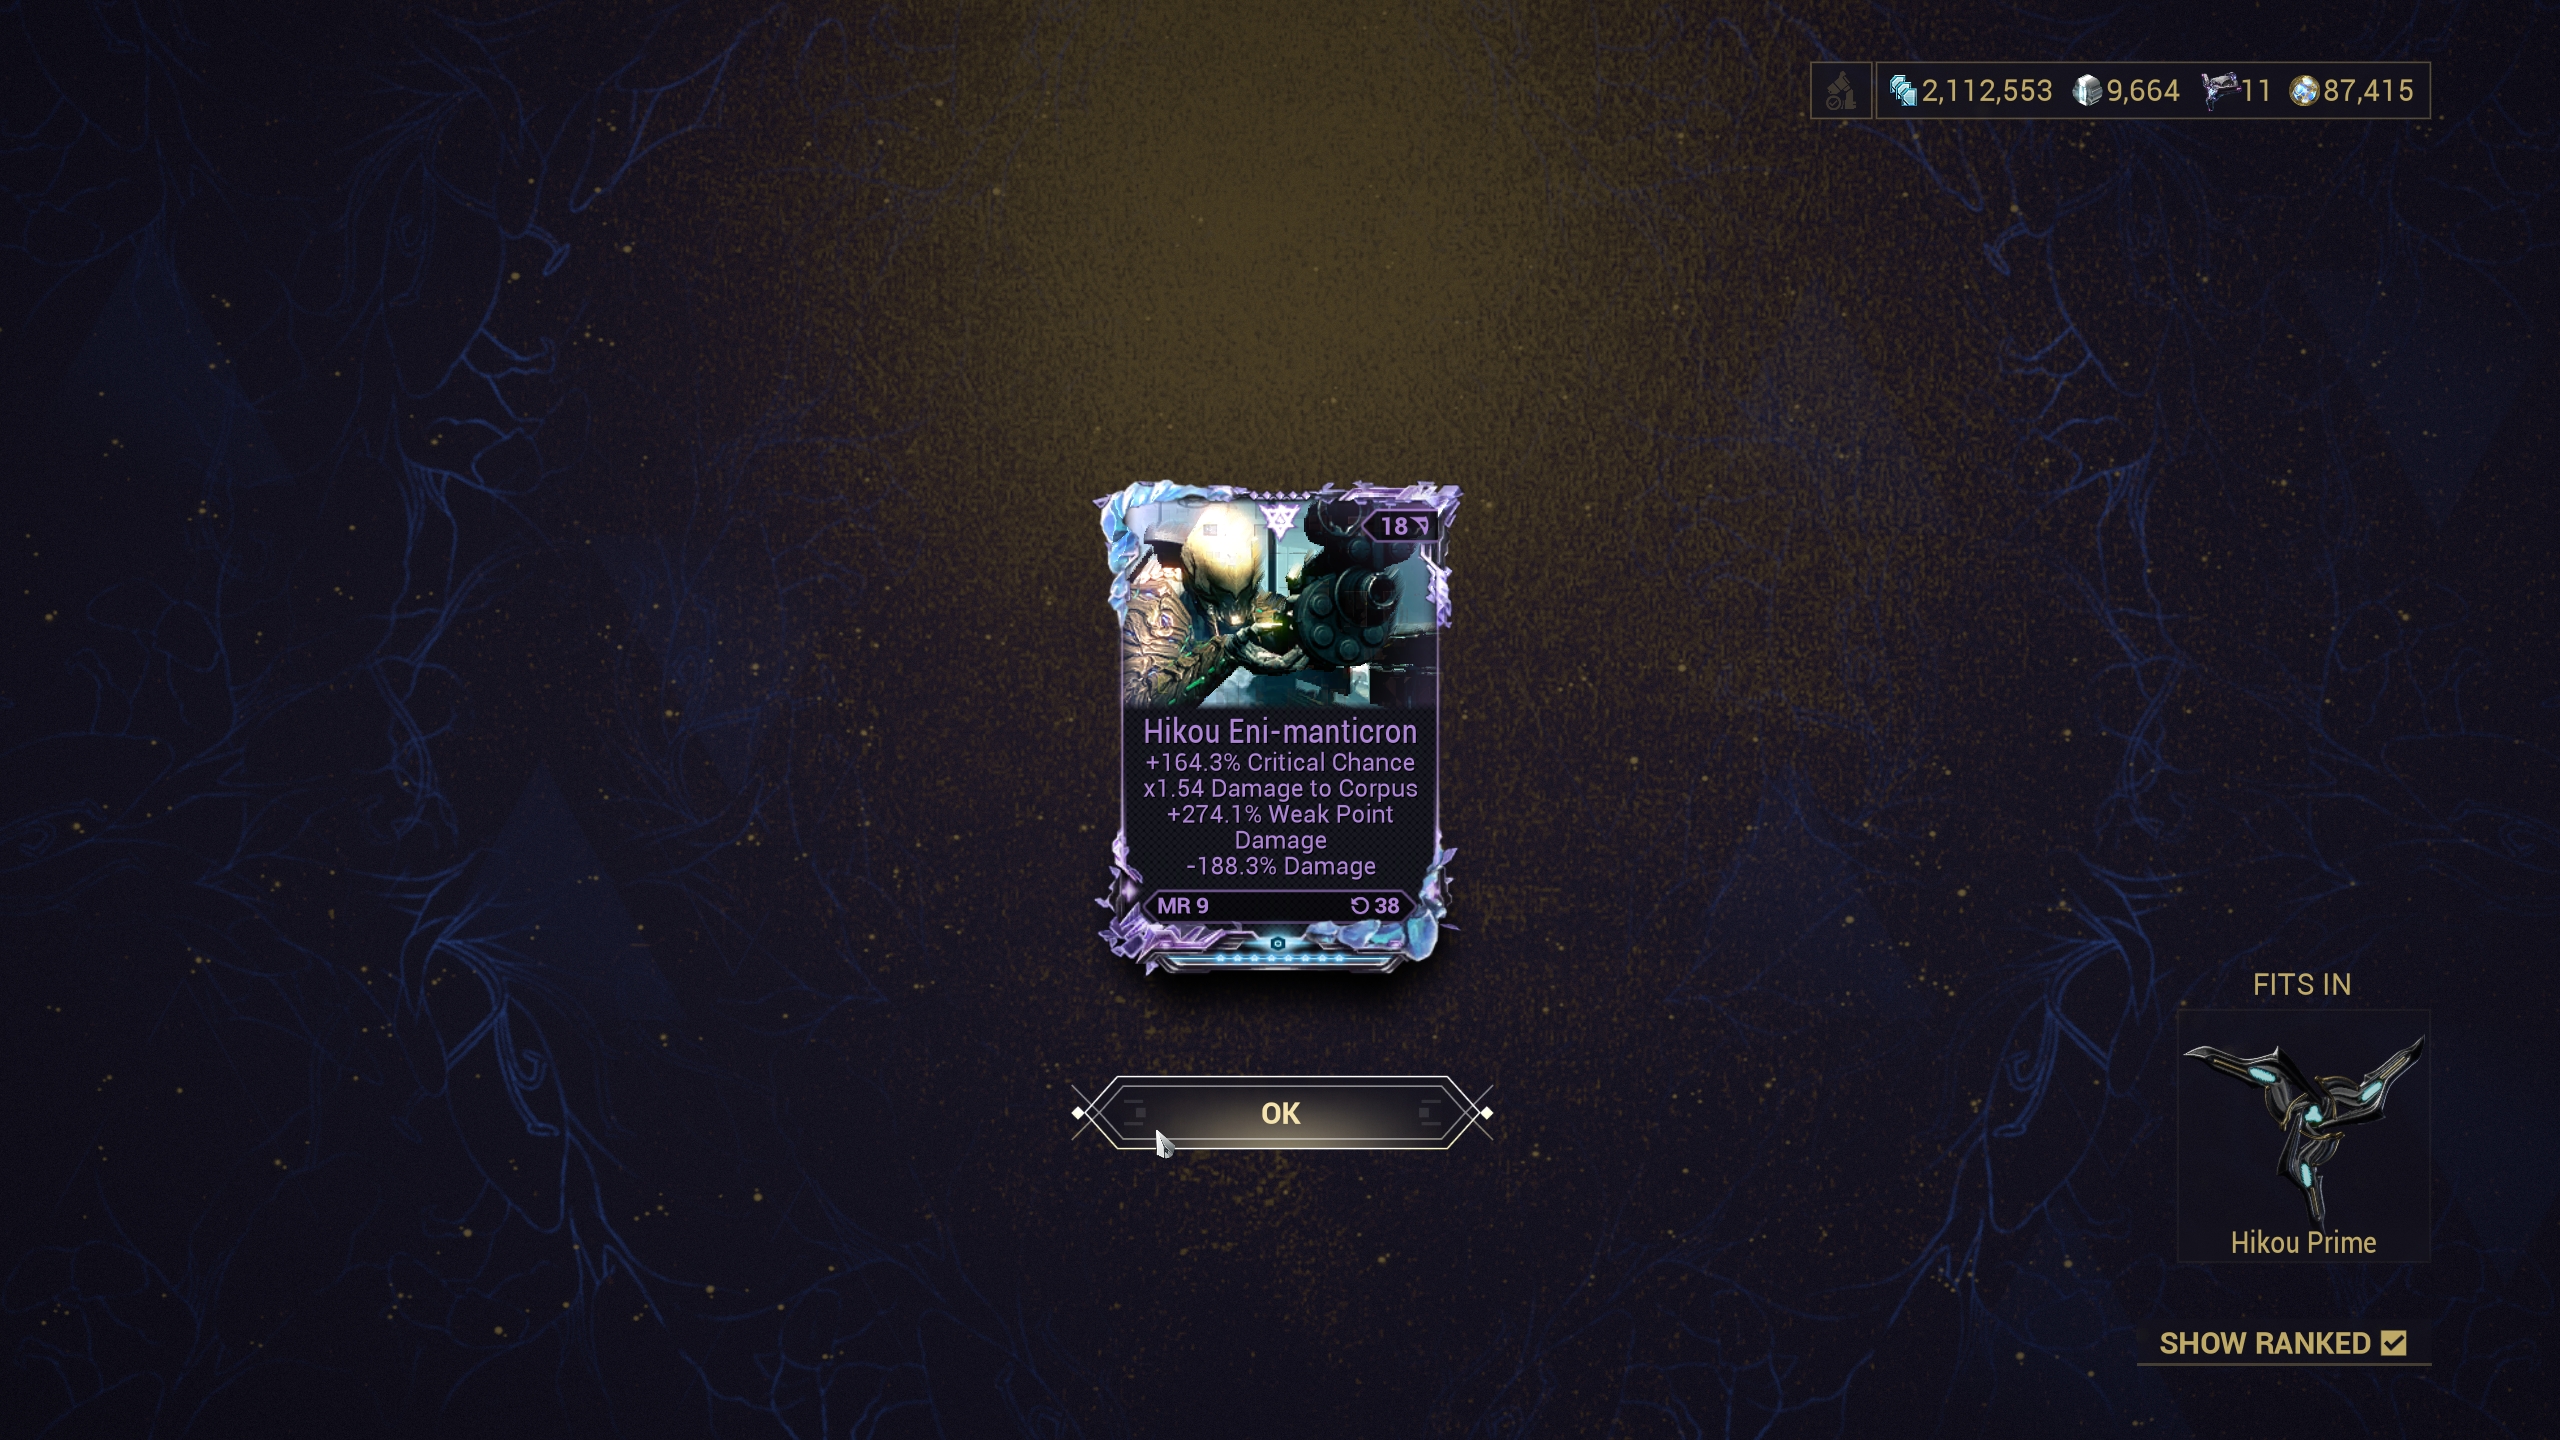
Image: The end-result of a successful Riven Splicing. A Hikou Riven Mod is in the center of the screen, featuring the new +274.1% Weak Point Damage trait, as well as the random -188.3% Damage trait.
Once a spliced trait is on your Riven, it’s there to stay! It is locked, but is not considered a locked trait — meaning it will not double your Kuva cost. Should you ever decide to remove the trait, the lock can be removed and the spliced trait can be cycled off, allowing a new trait to be spliced on! Utilize both a spliced trait and trait locking to lock two traits at once, making cycling for the last trait or two you want even easier.
As an example: Let’s say you had a Riven Mod with 3 Positive Traits and 0 Negative traits, and chose a + Viral spliced trait. No matter how many times the Riven is cycled, it retains +Viral Damage and 2 other positive traits, with 0 negative traits. You could even lock one of the other traits, guaranteeing two traits and cycling for the perfect final trait!
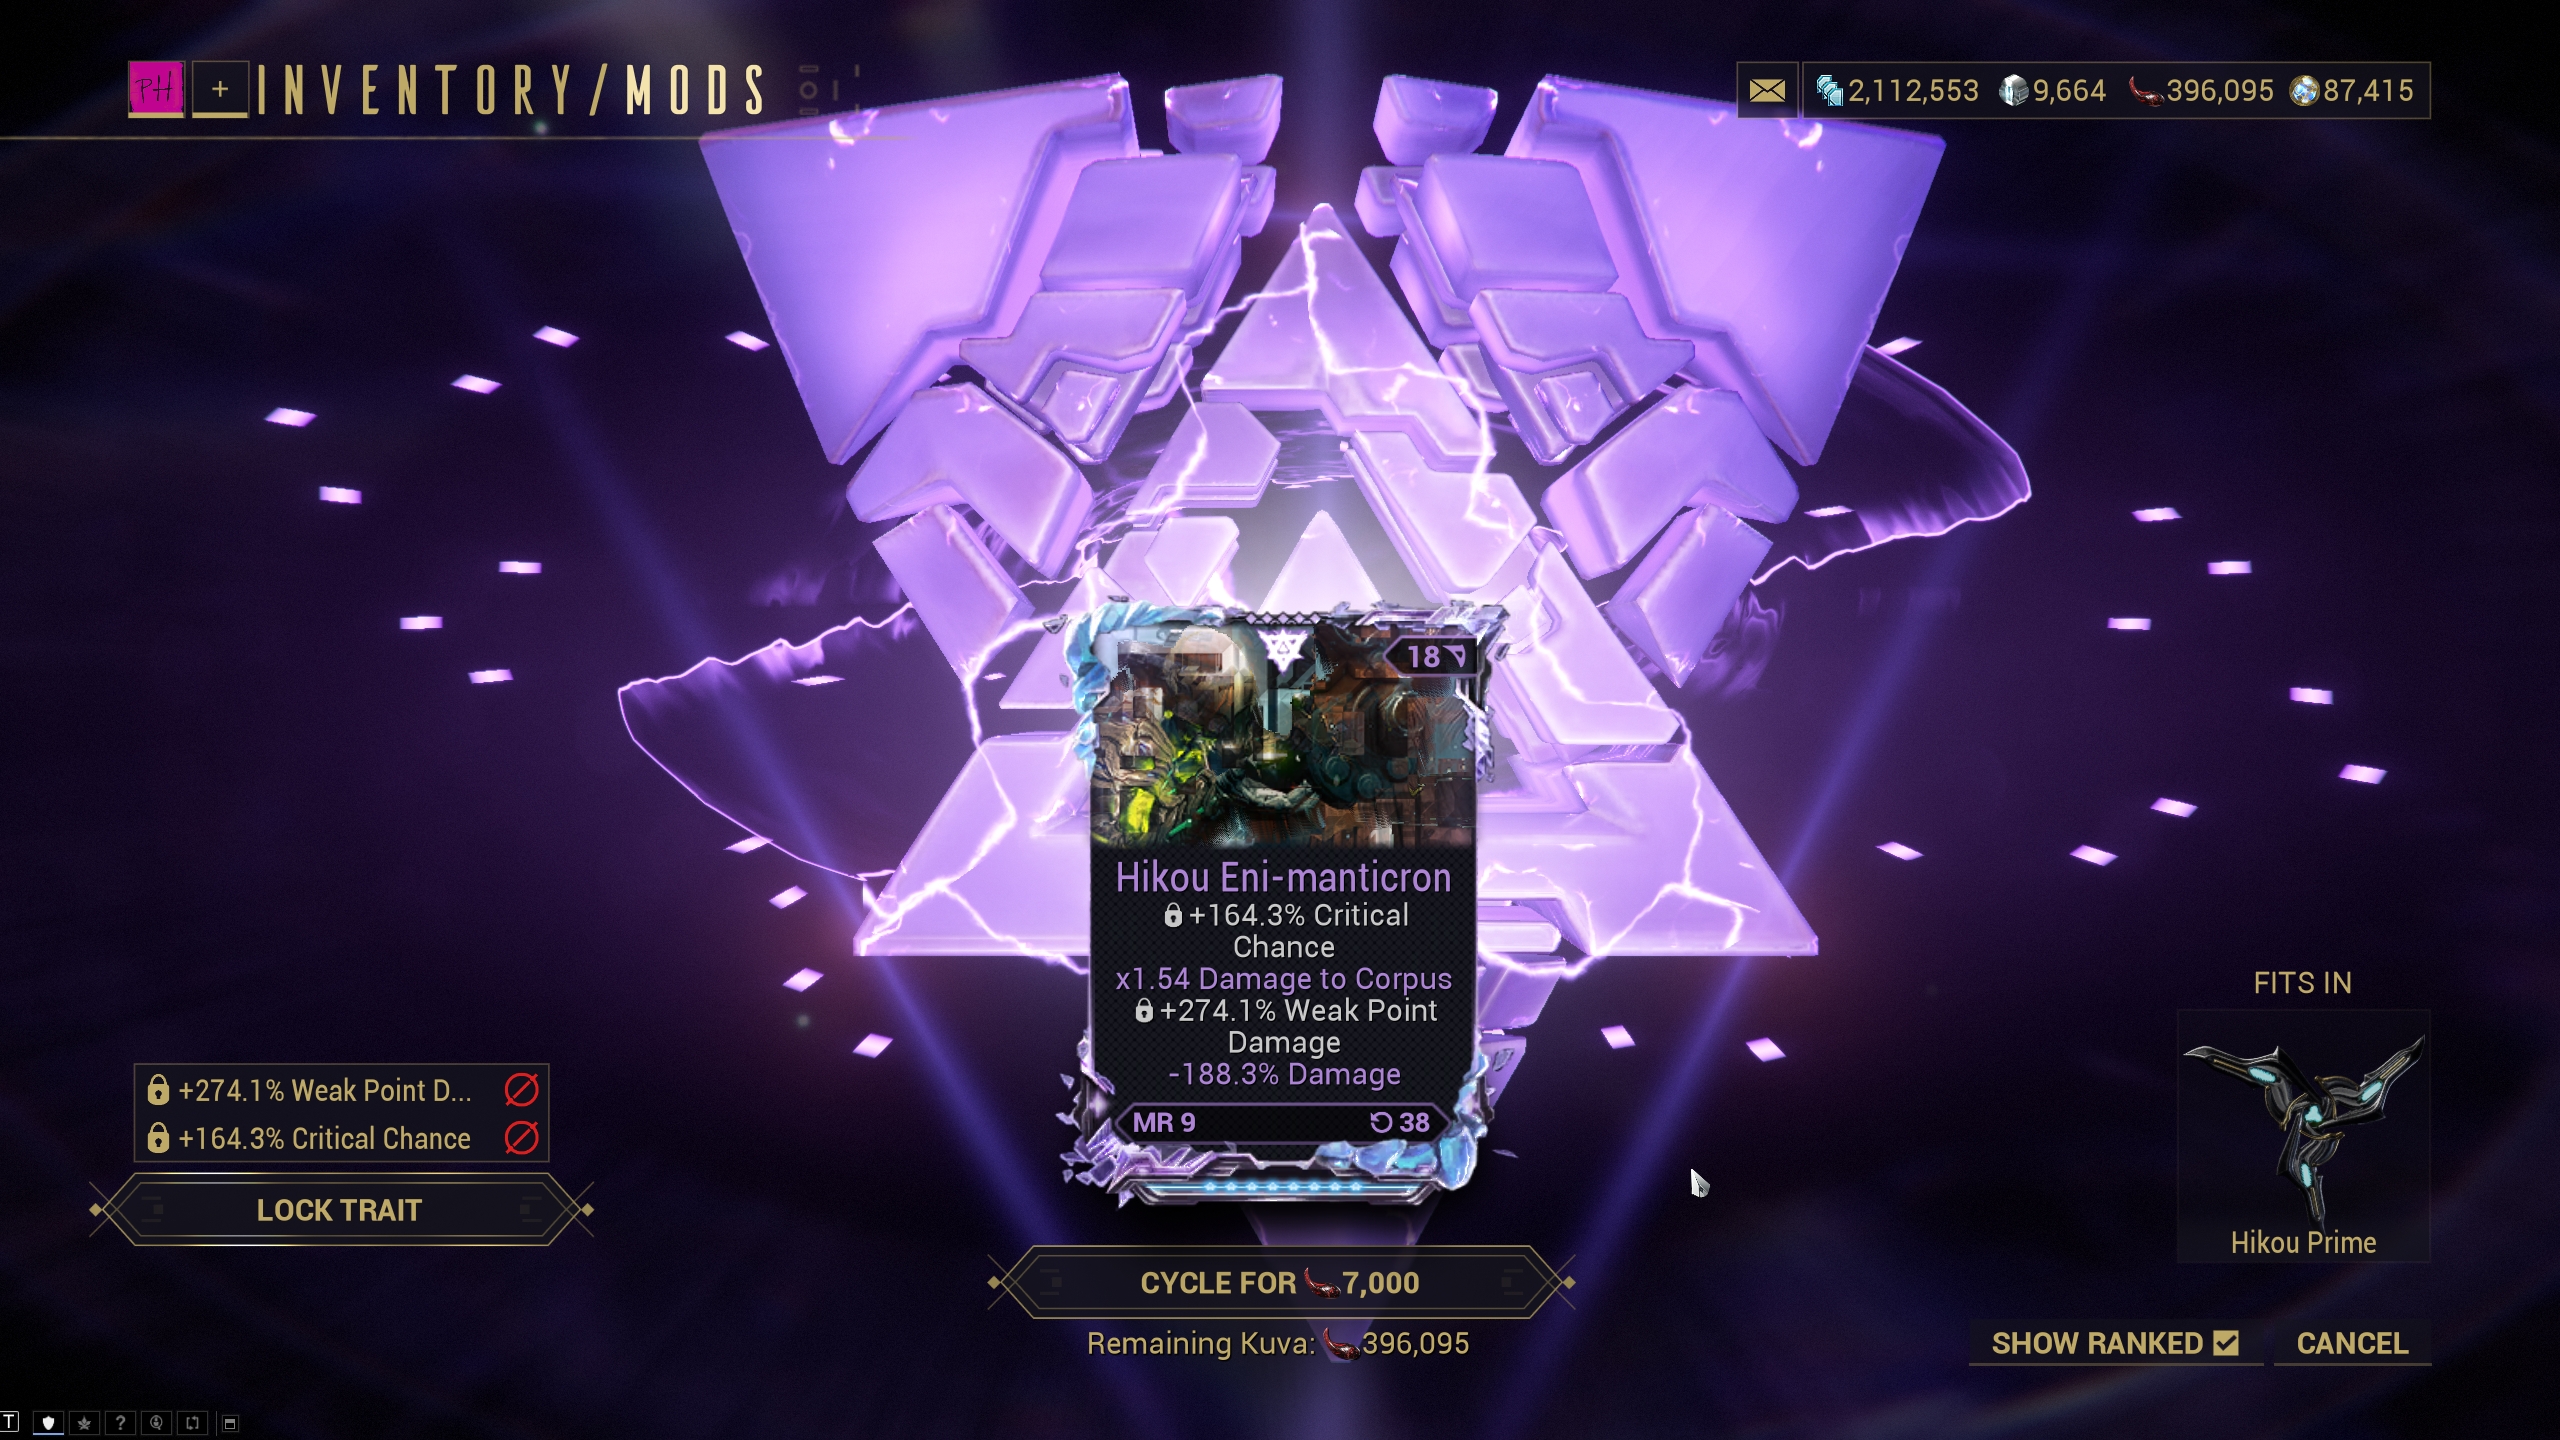
Image Description: A view of the Riven Cycle screen displaying a Spliced Hikou Riven Mod. The Mod has two locked traits: one of them is the Spliced Trait (+274.1% Weak Point Damage), and another is a locked trait via the Trait Locking system (in this case, +164.3% Critical Chance). The cost to cycle this Riven is 7,000 Kuva, which is doubled as a result of the locked Critical Chance trait.
The full list of spliced traits and which traits are needed to obtain them can be found below.
Ranged Weapons (Rifle, Shotgun, Pistol, Kitgun, Archgun, Select Companion Rivens):
-
Weakpoint Damage
- Damage & Zoom
- Damage & Multishot
-
Weakpoint Critical Chance
- Critical Chance & Zoom
- Critical Chance & Multishot
-
Ammo Efficiency
- Magazine Capacity & Reload Speed
- Weapon Recoil & Ammo Maximum
-
Magazine Reload While Holstered
- Ammo Maximum & Reload Speed
- Ammo Maximum & Magazine Capacity
-
Status Damage
- Damage & Status Chance
Melee Weapons (Melee, Zaw, Select Companion Rivens):
-
Heavy Attack Damage
- Heavy Attack Efficiency & Additional Combo Count Chance
-
Heavy Attack Windup Speed
- Heavy Attack Efficiency & Combo Duration
-
Parry Angle
- Attack Speed & Range
-
Slam Damage
- Melee Damage & Attack Speed
-
Status Damage
- Melee Damage & Status Chance
All Rivens:
-
Gas Damage
- Toxin Damage & Heat Damage
-
Corrosive Damage
- Toxin Damage & Electric Damage
-
Viral Damage
- Toxin Damage & Cold Damage
-
Radiation Damage
- Heat Damage & Electric Damage
-
Blast Damage
- Heat Damage & Cold Damage
-
Magnetic Damage
- Electric Damage & Cold Damage
-
Damage vs Orokin
- Damage vs Corpus & Damage vs Grineer
-
Damage vs Techrot
- Damage vs Corpus & Damage vs Infested
-
Damage vs Scaldra
- Damage vs Infested & Damage vs Grineer
For feedback on our Riven Splicing system, please use the dedicated Riven Expansion subforum.
ADDITIONS
-
Added the following items to Cephalon Melica’s Classroom Supplies:
- Glacial Laboratory Captura Scene
-
Tethyan Parchment Tatters decorations
- Each individual Tatter is available separately, ensuring you can obtain whichever Tatter(s) you want.
-
Added the Complexion B-17 [Legacy] to the Drifter/Operation Complexion menu.
- This Complexion allows players to access the original implementation of Vitiligo, before its changes with the Iceblade of Narin.
CHANGES
-
Players can now purchase 1 Riven Slot for 20 Platinum (instead of 3 for 60).
- Previously, players could only purchase Riven Slots in bundles of 3. The 3 Riven Slot bundle has been removed and replaced with the single purchase option.
- Following a Nightwave issue last year, affected players received an extra Riven Slot, which meant they were prevented from reaching the Riven Slot cap. Now, players can purchase Riven Slots in whatever number they desire (unless that number exceeds the cap).
-
Excavators and Defense Objectives (ex: Mobile Defense terminals, Defense Targets, etc.) now have a 90% damage reduction against Blitz Eximus shockwave attacks.
- Defense Objectives now also benefit from shieldgating (like Excavators, which received this change with The Shadowgrapher).
- Entropic Eximus can no longer spawn as Helions, as their flying behaviour can make them difficult to target with melee weapons.
-
Reduced the currency cost for Kuva bundles across various Vendors:
-
Acrithis’ Wares:
- Increased to 10,000 Kuva for 10 Pathos Clamps (was 5,000 for 10).
-
Exchange Scuttler Husks (Acrithis):
- Increased to 14,000 Kuva for 25 Scuttler Husks (was 6,000 for 100).
- Also increased purchase limit from one to three per week.
-
Flare’s Memorabilia:
- Increased to 14,000 Kuva for 100 Heartstrings (was 6,000 for 100)
- Reduced purchase limit from seven to three times per week.
-
Nightcap’s Wares:
- Increased to 14,000 Kuva for 75 Fergolyte (was 7,000 for 75)
- Reduced purchase limit from six to three times per week.
-
Hunhow’s Keepsakes:
- Increased to 17,000 Kuva for 35 of both Emerald & Crimson Talents (was 7,000 for 35).
- Reduced purchase limit from seven to three per week.
-
Acrithis’ Wares:
- The Events tab in the Navigation menu now sorts recurring events by most recently started.
- Reduced the amount of space the Thermia Fractures event takes up in the World State Window on the Navigation console.
- Updated the Entropic Kuva's resource description to specify it drops from Entropic Eximus.
- Added the Shedu Day of the Dead Skin to the Nightwave Cred Offerings rotation.
Performance and Optimizations
- Improved performance issues related to Oberon's Smite.
- Improved performance issues related to Frost's Avalanche.
- Fixed minor performance issues related to Last Gasp.
- Optimized texture streaming memory usage.
TOP FIXES
-
Metal Shader Fixes:
- Improvements and fixes towards our Metal Shaders are ongoing. For more information on the limitations related to updating Metal Shaders, please read our official post.
- Fixed metallics appearing plasticy for players with High Shader Quality toggled off.
- Fixes towards certain Warframe Skins appearing light gray when tinted black following our High Shader Quality changes.
- Fixed Oberon's Renewal no longer slowing bleedout timers.
- Fixed not being able to use Loki's Switch Teleport on Hacked Drones in the Plains of Eidolon.
-
Fixed Balor Fomorian events not being scheduled properly, resulting in repeated Razorback Armadas.
- The pending Balor Fomorian will begin once the current Razorback Armada has concluded.
- Fixed Grendel's Gastropareisis causing Azima's alternate fire to stack Secondary Enervate infinitely.
- Fixed the "Hide Owned" toggle hiding different items each time it was toggled on and off.
- Fixed being unable to upgrade Companions via the Navigation Loadout bar if Orion is set as the Primary Son.
- Fixed Shotgun Rivens being listed as "Shotgun" instead of the actual weapon when chatlinked.
- Tentative fix towards cases of controller inputs not functioning correctly when using Steam Input.
Fixes
- Fixed the Aksondol and Nunchasa missing blueprint location descriptions in the Market.
- Fixed moving very slowly resulting in Mining Deposits not updating properly when using Oxylus' Scan Matter precept.
- Fixed the Caliban Scion Helmet's metallics and base color not matching base Caliban.
- Fixed a duplicate Catenach appearing when using Uriel in Duviri.
- Fixed the Operator being able to attempt to pull out the Iceblade of Narin.
- Fixed camera flickering if a movement input is pressed when attempting to pull Narin's Iceblade free.
- Fixed players in Yuvan Peak blocking the screen when attempting to pull out Narin's Iceblade.
- Fixed Tauron Strike animations being broken if cast while Narin's Nuranarmin is active.
- Fixed a texture issue on Yuvan Peak.
- Fixed Uriel's Demons being doubled after using Transference.
- Fixed duplicates of Uriel's Demons appearing in the Höllvania Central Mall Backrooms Scene if Uriel is also equipped on the Loadout Display.
- Fixed having two full-body Sigils applied resulting in the Sigils' effects not applying to the head.
- Fixed the Mission Tutorial Transmission toggle hiding introduction transmissions for the Temporal and Deep Archimedea missions.
- Fixed Gemini Skin faces becoming distorted when swapping in and out of Duviri Navigation in the Navigation menu.
- Fixed an unnecessary "Mission 1" appearing over the Hallowed Nightmares alert in the Navigation menu.
- Fixed incorrect capitalization for Voidshell Materials in the Operator/Drifter customization screen.
- Fixed a rare case of Inaros being revived with function loss if he died at the start of casting Sandstorm with an item (ex: power cell) in his hands.
- Fixed a sound crash.
Script Error Fixes
Script errors mean that something went wrong when the game client was executing a script, which can have various outcomes. Usually it means the related content didn’t function properly under specific circumstances — often we don’t actually know what the error outcome was, so we list it as a Script Error fix to indicate it was addressing an unintended behaviour.
- Fixed a script error when attempting to destroy an Entropic Eximus’ shield.
- Fixed a script error related to Narin's Nuranarim.
- Fixed a script error related to Nokko's Sporespring projectiles.
- Fixed a script error related to the Unairu Tauron Strike.
- Fixed a script error related to Nightwave Act popups when transitioning out of missions on the Zariman Ten Zero.
- Fixed a script error related to the Panic Call Peely Pix in Temporal Archimedea.
- Fixed a script error related to Narin's passive.
- Fixed a script error related to Baruuk's Serene Storm.
- Fixed a script error related to the Confront Kullervo objective in Duviri.
- Fixed a script error related to Khora's Venari.
- Fixed a script related to Arcane effects that trigger "on Critical Hit".
- Fixed a script error related to Yareli's Sea Snares.
For a list of known issues that are on our radar, visit our dedicated thread: https://forums.warframe.com/topic/1523875-known-issues-iceblade-of-narin/
 Retour à l'index des notes de mise à jour
Correctifs
- Le plus récent Update 44.1.0: Iceblade of Narin: The Icebind