 Basic Art Guide
Basic Art Guide
In an effort to provide you with more information on the art end of the spectrum, we've put together a reference guide to help you make style-based decisions in your work.
We have another guide located here, with in-depth explanations for creating different types of accepted pieces here. You'll also find the downloadable files there. The purpose of the Basic Art Guide is to address broader style concerns.
General list of things to keep in mind before we start:
Warframe has many factions with their own unique design language, so stick with only one at a time (with the exception of infested, which may “infest” another faction). Choose from: Tenno, Grineer, Corpus, and Infested. Please also refer to our style guide here.
Avoid the use of perfect geometry, especially circles, as well as modern materials like carbon fiber; we're in a sci-fi universe. Also consider the player’s line-of-sight when creating Syandanas to ensure that aiming is not blocked by the piece, and ensure that it does not wrap around their shoulders or neck to prevent clipping.
Stay away from replicating existing characters (from Warframe or other sources) as well as Orokin, Syndicate or Sentient themes. On helmets, pay special attention to the front and make sure to avoid placing details in the exact places where you expect to see an eye, nose, mouth, etc. While some of the in-game designs vaguely hint at facial features, the goal is to heavily abstract the “face”.
When creating Tintmasks, try to avoid large untintable areas (for the sake of player customization) and do not create large areas of solid Emissive.
Here is a list of what is currently being accepted:
- Material set or
- Custom model + material set
- Material set
*No custom geometry or other changes to the base model will be accepted.
- Material set or
- Custom Model + material set
- Material set
- Material set
- Custom model + material set
- Custom model + material set
- Custom model + material set
A material set is comprised of:
- Diffuse map
- Normal map
- Specular or Metalness map (two different workflows... choose one or the other)
- Roughness map
- Tintmask
Lowpoly Triangle Limits
- 7500 for Syandanas
- 5000 for Helmets
- 3500 for One-handed weapon or a single dual-wieldable weapon
- 7500 for Two-handed weapon
- 6000 for Whip Mesh Swap
- 1500 for Operator Accessory
- 2500 for Chest Armor Piece
Whether you're working on a material set alone or a fully sculpted Syandana, these general art practices will help you decide where to put things. Remember to consider these ideas in every part of the process, from the initial design to where you put your tints. Also keep in mind that these rules are more like guidelines, and can be bent when appropriate.
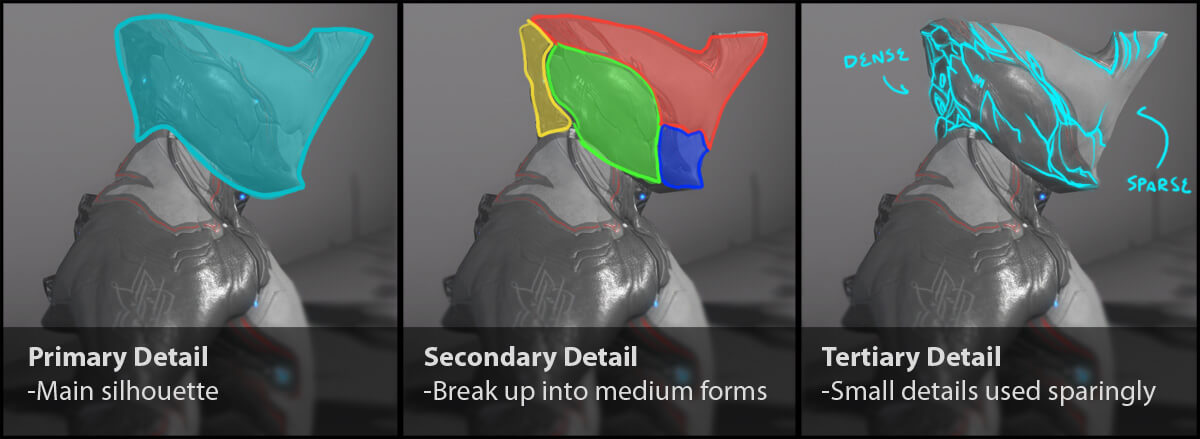
Layers of Detail and Grouping
Think of your piece as layered chunks of details. Begin with your primary form: A large form that you want to have an interesting overall silhouette. For Warframe skins, this would be the default body shape with no textures or other details on it; a blank canvas. For Syandanas or Helmets, this would be your first block-out sketch with no details. Remember: you're just trying to get a feel for the overall shape of your piece.
Break your primary form up into medium-sized chunks, these will become your secondary details. Think about how they interact with each other to determine an overall flow to your design.
Your final layer of detail is the tertiary detail, very small details in areas you want to draw attention to, like the front or back of a helmet, or areas where pieces join together. Where you want to draw attention is up to you. If you're working on a helmet, make sure to match your design style to the Warframe you're working on. Use the provided textures for reference whenever possible! Also keep in mind that the player sees the back of the character 90% of the time.
Here is a great site that explains primary, secondary, and tertiary forms in more detail: link
Dense vs Sparse
Group your details in focal areas and leave other areas more open for the eye to rest. You can say just as much with an open area as you can with tight details, so resist the urge to add details on every surface. Areas of tight detail will draw the eye to them, and should only be used sparingly so the piece does not become too busy.
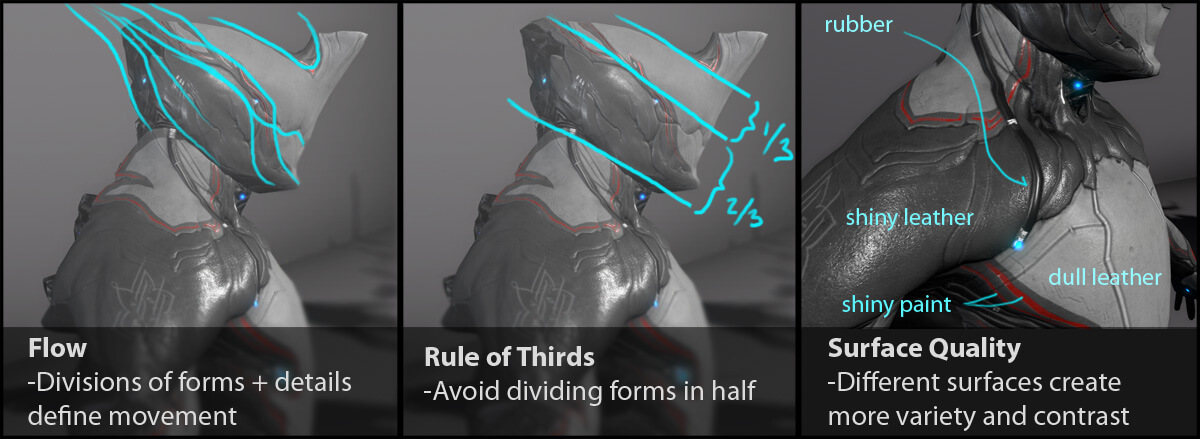
Flow
Remember to zoom out from time to time and think about how the divisions of forms move across the whole surface of your piece. An interesting design will lead your eye from detail to detail and support your creation’s theme. For example: For a fiery theme, you might want your flow to blast outward from the center of the body, ending in small, feathery details. It's up to you what you want to do, but the movement in your piece between details will be important for how you present your idea.
Rule of Thirds
A great way to group your details into dense and sparse groups is to consider the Rule of Thirds. In each layer of detail (primary/secondary/tertiary), you want to balance out forms in a 2-to-1 ratio. Try not to divide anything up directly in half and avoid repeating the same spacing on details/forms.
Surface Quality
The final details on your surfaces should be defined at the end of the design process, or you might end up with lumpy surfaces (if you are sculpting). Consider the material each area might be made of. Is it leather? Plastic? Metal?
Surface detail and roughness should be different in each tint area to the next to help give them further contrast when light moves across them. However, keep the diffuse value contrast between tints relatively low, so they can still be tinted in-game well. We look for generally midtone grey values for nonmetal materials. Anything too light will be blown out in-game once it is being lit by our shaders. Dark areas will make tints look muddy.
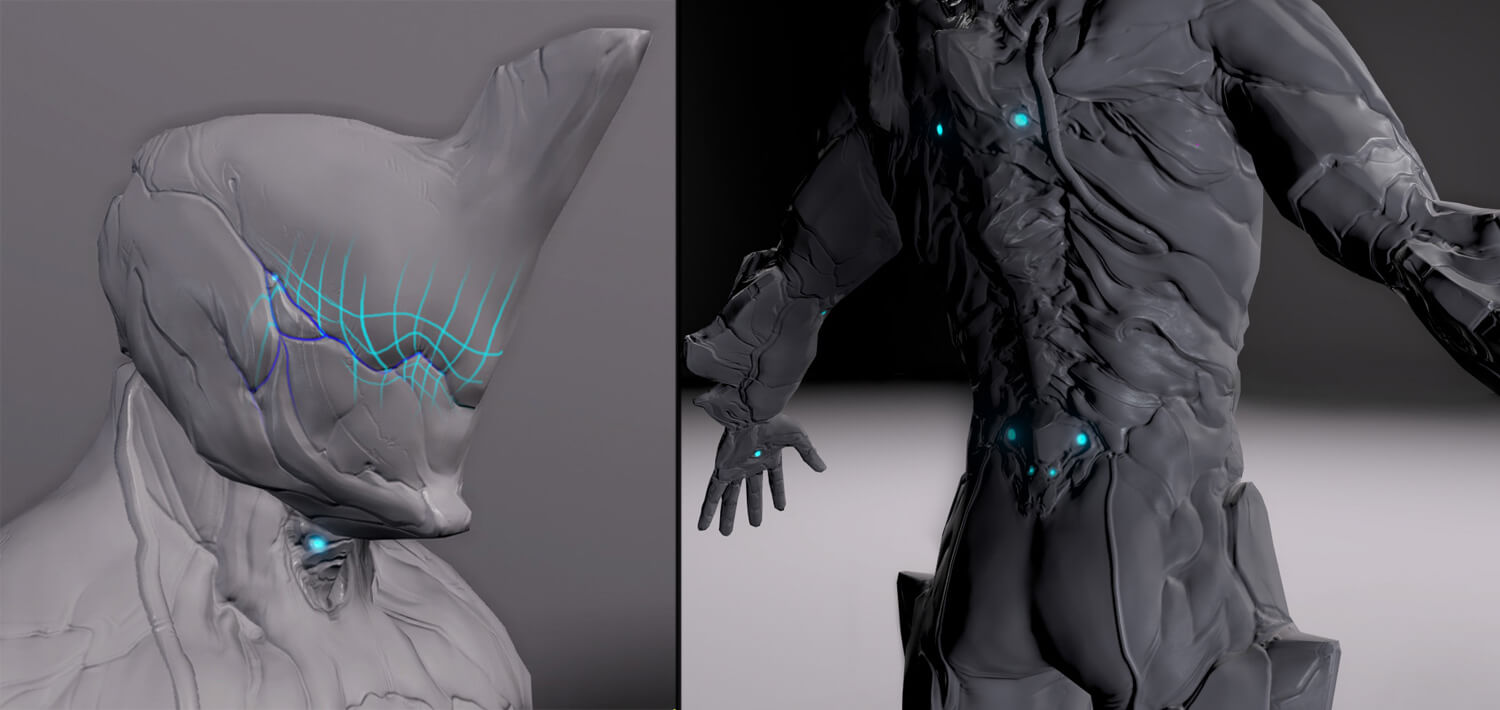
Volume
Just like when you defined your breakup of shapes using grouping and flow, you will want to consider the way light flows over your piece. In general, plump forms with sharp creases between them light very well and flat shapes or concave shapes don’t light as well.
Avoid long thin shapes, as they will be difficult to see and understand at a glance, especially in the already detailed and fast-paced game that is Warframe. These kinds of shapes also have a tendency to bake poorly. Use with caution!
Edge Treatment
How does each part fit together against the next? Are there overlapping parts? Brackets? We like to think of the Warframes themselves as a fusion of biological and mechanical parts. How would skin-like material grow around a mechanical piece? Try not to leave large areas completely flat; even subtle surface sculpting can make it more interesting (like the sculpting on Ash's chest).
Another thing to keep in mind is that edges where there is a sharp change in direction are rarely left bare. If you have a sharp mechanical corner somewhere, consider adding layers to one side, or a panel line to break up the edge. Remember that you can always find examples in the game for how to define such details!
Finally, be mindful of the texture resolution you are working with. Very fine details will look pixelated and unreadable in the game, and likewise, very large and thick lines will look too chunky and overbearing compared to other objects in the game. Make sure to use what's already in the game as reference. And remember to have fun!